
Introduction
The screen is one of the most crucial components of a laptop. Without a proper screen, a laptop can be rendered useless. In the event of your Dell Inspiron 910 laptop’s screen display is not functioning as intended, this guide will assist in removing the screen with step by step instruction. Possible issues that would require screen replacement include a cracked screen, dead pixels, backlight failure, or one that has gone completely blank. Before using this guide, make sure the laptop is powered off completely to prevent any further damage and the necessary tools are accessible.
-
-
Flip the laptop so the battery is facing upwards.
-
Push the battery release tabs toward the center of the device.
-
Remove the battery.
-
-
-
Using a plastic opening tool, pry the front silver bezel away from the colored plastic shell.
-
-
-
Unscrew the two screws using a Phillips #00 screwdriver from the metal casing that retains the screen.
-
-
-
Pull down the laptop's back, keeping the screen upright, held in place by two metal strips going along its sides.
-
Unscrew the 4 screws from the two strips.
-
-
-
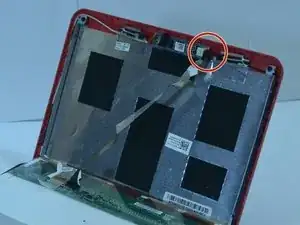
Disconnect the cord connecting the screen to the rest of the laptop. The cable will be attached to the screen using tape, so it can be safely removed. The actual cord connection is at the circuit board.
-


To reassemble your device, follow these instructions in reverse order.