Introduction

The speakers are the built-in method to provide audio to the user. Use this guide to replace the speakers if you have any issues such as faulty speakers.

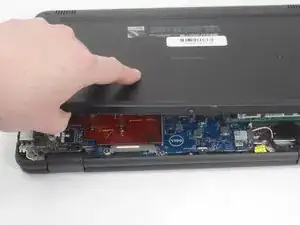
The prerequisites for this guide are the Base Cover Replacement Guide and the Battery Replacement Guide, as in order to access the speakers the base cover and battery must be removed. Before using this guide, completely power down the device, and unplug any cords or devices in the ports.

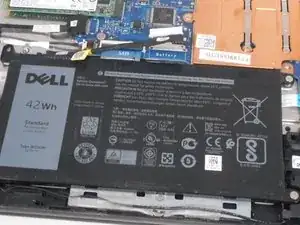
Exercise caution when removing the battery, any punctures or deformation will immediately damage the battery and may cause a fire if the battery was charged.

  1. JcYAqGXmrj5dIJLt
    JcYAqGXmrj5dIJLt
    QNnfKxAke6ZOaALy
    • Before beginning, power off and unplug the device.

    • Use a Phillips #0 screwdriver to loosen the seven captive screws that secure the lower case.

  2. dPphbD3G1ce2aVYc
    dPphbD3G1ce2aVYc
    FPFC2o41N1Pl6421
    qFBtPEYj4ClwOFgs
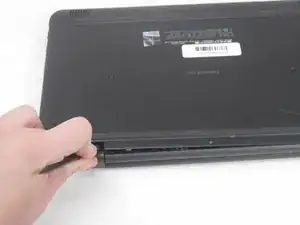
    • Insert a nylon spudger between the lower case and chassis at the two hinge spaces on the back side of the laptop and pry up the lower case.

    • Do not use metal items to pry the base cover off, like a screwdriver, as it could slip and damage internal components.

    • Avoid prying at the ports which could damage the ports.

  3. pobDUDqaJWFAt1SH
    pobDUDqaJWFAt1SH
    pcPorEVyIAFZEERI
    • Grip and pull the lower case up and away.

    • If you feel any significant resistance, double check that all of the screws are loosened.

  4. lFvtJ4vDOnjHT6Ph
    lFvtJ4vDOnjHT6Ph
    CCBg6y2YwGpmpMOj
    ZLetm4DOJDm2sBaJ
    • Before performing any operations within the laptop, unplug the battery.

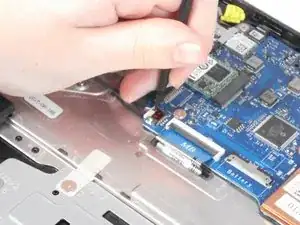
    • Using the pull tab on the connector, pull the connector directly out of its motherboard port.

  5. ZaPPjdmwBdIM5Ldl
    ZaPPjdmwBdIM5Ldl
    pf6KGqgyb62kDgpY
    • Use a Phillips #0 screwdriver to remove the three 3.2 mm screws that secure the battery.

  6. KDINqCSFipIf312B
    KDINqCSFipIf312B
    LZIE31tac6c2XjbB
    • Grip the battery and lift it up and out of the chassis.

  7. ymXppAyLGDJSGclG
    • Use the flat end of a spudger to push the white plastic speaker connector out of its motherboard port.

  8. aDnJKtTPoR4rV3h3
    aDnJKtTPoR4rV3h3
    QLtgxybExnqeAOb5
    • Lift out the right speaker.

    • Lift out the left speaker.

    • Before removing the speakers make note of how the wire between the right and left speakers are routed within the chassis.

Conclusion

To reassemble your device, follow these instructions in reverse order.

Bryan Pratt

Member since: 14/02/24

601 Reputation

0 comments