
Introduction
The motherboard of a computer is its control center and can seem daunting to replace. This guide will demonstrate how to efficiently replace the motherboard for a Dell Precision 7560 laptop.
Motherboards can be damaged by rough handling, drops, water damage, or power surges.
Some possible indications of a failing motherboard are: external USB devices are no longer being read by the laptop correctly, if at all; the laptop is operating much slower than normal; the computer boots with a blank blue screen, and/or any burning smell coming from the laptop while operating.
Power off and unplug your device before beginning.
-
-
Use a Phillips #0 screwdriver to loosen the the eight 5 mm captive screws in the bottom cover.
-
Remove the back cover by lifting at the corners.
-
-
-
Unscrew and remove the five 2 mm screws that secure the battery.
-
Locate the battery connector.
-
-
-
Pull the connector towards you to disconnect it.
-
Use your fingers or a plastic opening tool to pry the battery up and remove it from the laptop.
-
-
-
Remove the top cover of the Solid State Drive by lifting up from the corners.
-
Pull the Solid State Drive gently towards you from its exposed end to disconnect it.
-
With an appropriate replacement part, exchange the old SSD with a new one.
-
-
-
Remove the 5 mm screw holding the Wi-Fi card in place using a Phillips #0 screwdriver.
-
Lift to remove the metal overlay.
-
Disconnect the wires attached to the Wi-Fi card.
-
Lift from the sides to remove the Wi-Fi card.
-
-
-
Remove the 2 mm screws holding the metal frame in place using a Phillips #0 screwdriver.
-
Remove, carefully and completely, any wires running over the frame.
-
Grab securely and lift to remove the metal frame.
-
-
-
Flip up the metal edge holding down the SD connection.
-
Gently pull to disconnect the connecting strip.
-
-
-
Remove the 5 mm screw holding the metal cap over the wire connection using a Phillips #0 screwdriver.
-
Holding the sides, lift to remove the metal cap.
-
Lift to disconnect the wire bundle.
-
-
-
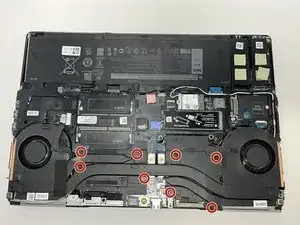
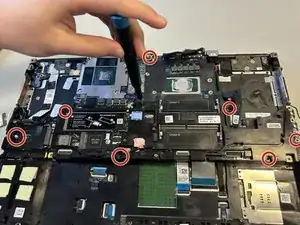
Using a Phillips #0 screwdriver, remove the eight 2 mm screws holding the motherboard.
-
Flip the motherboard over, exposing the underside.
-
Pull to disconnect the wires leading to the speaker unit.
-


To reassemble your device, follow these instructions in reverse order.
