Introduction

This guide shows you how to replace the CMOS battery in your Dell XPS 15 9575 laptop.

The CMOS battery powers your laptop's BIOS firmware, which is responsible for booting up your computer and configuring data flow.

You can tell if your CMOS battery has died if your laptop has difficulty booting up, if drivers disappear, and if your laptop's date and time are incorrect.

Check out the Dell XPS 9575 Troubleshooting page for more help narrowing down your issues to the CMOS battery.

Before you begin this repair, turn off your laptop and unplug it from the charging adapter. As an extra precaution, unplug the battery connector from the motherboard or remove the battery before you start.

  1. C6ohtjrisu5kDWfQ
    C6ohtjrisu5kDWfQ
    fdyFCmv3llbTAbbf
    JWki2gK2bEDiXPd2
    • For your safety, please make sure the device is powered off and the A/C adapter is unplugged.

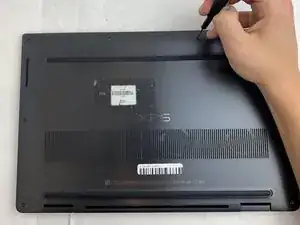
    • Use your T5 Torx driver to remove all eight 3.2 mm screws holding down the back panel.

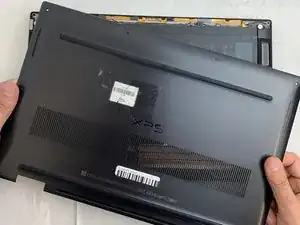
    • Wedge an opening pick between the back cover and the base of the board, then slightly lift the tool to pop the clips on the back cover off.

    I found it quite tough to make the initial pick insertion. The easiest point for me was on the rear edge of the laptop just to the outside of the hinge.

    The screws were all same size so no need to remember which came from where.

    Mr Mac -

  2. YDR2dEDJhlQmd3pd
    • Make sure all screws are removed before you lift the panel to prevent any damage from occurring.

    • Remove the bottom cover from the device when all sides are free.

  3. 1rOLSaYHCnSxhTN1
    1rOLSaYHCnSxhTN1
    rhAIQrIbmnKXO6sE
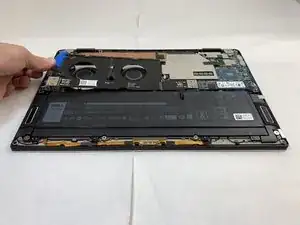
    • Use the Phillips #0 screwdriver to remove all four silver 3.2 mm screws fastening the interconnect cable.

    There is an off/on switch for the battery to the right of the SSD. You can see a diagram of it on the battery picture above. It advises to turn it off before working with the battery.

    AtotheJ -

    Turn off the internal power as AtotheJ suggests. I did not have to remove or touch the fan as the interconnect cable came loose easily.

    bubba -

  4. IHbPMktnPGZZBLoj
    IHbPMktnPGZZBLoj
    vRXEcJpETAh4raTI
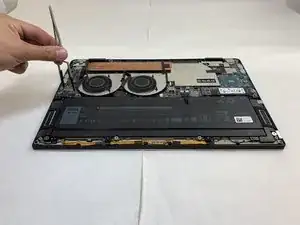
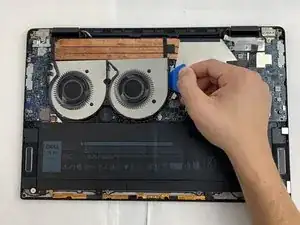
    • Carefully wedge the plastic opening pick between the fan and the interconnect cable.

    • If this position does not release the interconnect cable, slide the opening pick along the edge until it is completely free.

    • Remove the interconnect cable.

    I have a different cable on my XPS 15 2 in 1. The fan covers were not attached to the cable and remained in place. So only the long thin strip was removed and it came of very easily

    Mr Mac -

    On my 9575, I couldn’t get the entire fan cover off but realized it wasn’t necessary as I was able to get access to the battery connector by just removing the four screws above and moving the bottom section out of the way.

    AtotheJ -

    In fact, per Dell user manual, thats the sure way to break the very tiny plastic parts of the fan cover. I did it, now I regret. I cannot unhear the small creak due to void space, and un-feel the light wobbling while typing on the top part of keyboard

    Aurel A -

  5. KwRhJvZOcrUtmTbq
    KwRhJvZOcrUtmTbq
    CdYjLEasBam2utOR
    • Use the nylon tweezers to remove the interconnect pins from each of the circuit boards.

  6. pMAVhPccNVmIcLA4
    pMAVhPccNVmIcLA4
    Zd3BT3AtihuViOEO
    • Use the Phillips #0 screwdriver to remove all eight 6.4 mm screws from the battery.

    One of the screws was stripped on my laptop (the one between the fans) and rotated without releasing. I had to remove the other 7 and the battery cable and carefully lift up the battery while undoing the screw to try to pull it out. Thinking about it afterwards, maybe the location in the base that is was screwed into had snapped away rather than the thread being stripped which was why extracting was so problematic.

    Mr Mac -

    On my laptop. The J1 was a better fit for the screws. I almost stripped on with the j0.

    michael Estrada -

    Same situation for me. Battery screw heads are Phillips1 not Phillips0.

    jasonlbailly -

  7. stINktcraR5EtnfE
    stINktcraR5EtnfE
    NoCVEXyuAZi3CWSa
    • Use a plastic opening pick to pry the black battery cable away from its silver adapter.

    • Hold the pick at 35 degrees from the computer and push towards the battery to remove the cable from its socket.

    • Do not push straight into the battery cable as this could damage the adapter.

    • When you disconnect connectors like these, be careful not to dislodge the small surface-mounted components surrounding the socket.

    Study the connector on the new battery carefully and the large photos in this guide so you know which bit to push in which direction. The connector was in very firmly so you have to apply reasonable force very carefully as you must avoid slipping and damaging the motherboard components. I had to try a few different techniques as pushing just the small black plastic rectangle as shown was doing nothing. I found grabbing the sides of the cable with my fingers and wiggling side to side a little helped.

    Mr Mac -

    This connector doesn’t come out easy. Have no idea how the person removed it with the pick as the little plastic rectangle on mine broke easily. What worked for me was to remove all the screws holding the battery so that it’s free. Remove the battery so that’s it’s free and then pull by wires as close to the connectors as you can. It came out easy this way.

    AtotheJ -

    Definitely study the connector. I found the best way was to remove the battery and gently pull directly away from the connector. The little “T” has 2 pins underneath so you should not put pressure on it. Remember to turn the power switch back to the “On” position before closing the case.

    bubba -

    Removing was quite easy by first lifting battery then pulling the cable. Installing difficult, best was to gentle press with the pick step by step left and right.

    Aöbert -

  8. Q4XYp5ZEXtH1HSQ1
    Q4XYp5ZEXtH1HSQ1
    ngXLOPuDFHXPXPhl
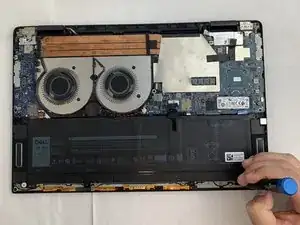
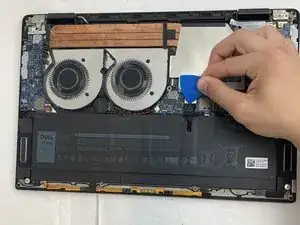
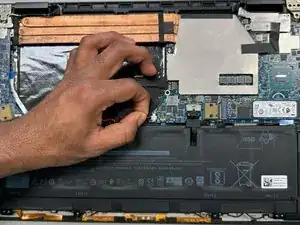
    • Use a plastic opening pick to separate the battery from the device.

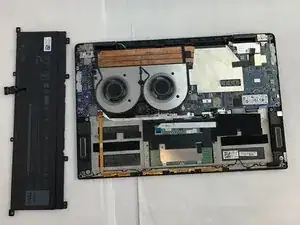
    • Lift the battery straight up and remove it when it is completely separated.

    The last bullet seems redundant since the conclusion says the same thing

    Markus Eldridge -

    The most difficult part of this for me was inserting the new battery cable. This will depend on who manufactured the replacement. It was very stiff and I used a spudger on either side of the connector bit by bit - i.e. push the left side in a bit, then the right side, and repeat until it was fully in. Again, be careful not to gouge the motherboard and don’t cut into the outer cable in the connector.

    The cable was a bit too long on my replacement and curved upwards proud of the battery. I was hoping that pushing down best I could and reassembling would not cause a problem but now the right mouse click on the mouse pad is very stiff and only just works. I think I’ll live with it rather than open up again as I’m just happy that the laptop still works and has a battery that has a decent life.

    Mr Mac -

  9. tl6m1sBqvCrv3bNX
    tl6m1sBqvCrv3bNX
    aIfEQmViVJrdVlTd
    • Use the Phillips 0 Screwdriver to carefully extract each of the four 3.2 mm screws.

    If you have red markup, you should also have red bullets. Also, make sure to use end punctuation—I would check every step for this.

    Alex Watkins -

  10. EBwDRerjo5troJVj
    EBwDRerjo5troJVj
    OshEKdEfCvnQiNui
    • Confirm all four screws have been extracted from the fan.

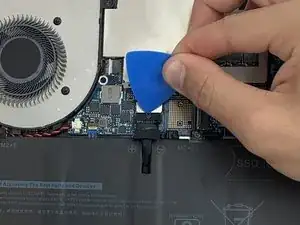
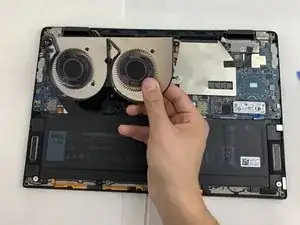
    • Find the wire connecting the fan into the motherboard and use the plastic opening tool to push the wire out from the motherboard's port.

    Follow ROYGBIV order for markup.

    Alex Watkins -

  11. OKeXHXPf6H2I2wQX
    OKeXHXPf6H2I2wQX
    FVUJXuaqehGSAbUX
    • The fan has been completely disconnected and is now safe to remove.

    Remember to begin all steps with action verbs, and remove reassembly directions, since the blue box below has the same information.

    Alex Watkins -

    The last bullet seems redundant when the conclusion says the same thing

    Markus Eldridge -

  12. t1JwyIp1GlbmcFUM
    t1JwyIp1GlbmcFUM
    HOmhAI5hZQySCIbR
    TSytmaMhtjAoUasl
    • Use a spudger to remove the CMOS battery from the board.

    • It is attached with a small amount of adhesive so you may need to pry it off, but be careful not to puncture or bend the battery.

    • Use a spudger to disconnect the CMOS battery connector cable from the motherboard.

    • To disconnect, use the point of a spudger to push on alternating sides of the connector to "walk" it out of its socket.

    • It may take a lot of alternating before the connector comes out. Be patient, and don't pull on the cables.

    • To reconnect the cable, align the connector and use a spudger or clean fingernail to push it fully into the socket.

    • Don't push on the cables themselves, or you may damage the connector.

Conclusion

To reassemble your device, follow these instructions in reverse order. Take your e-waste to an R2 or e-Stewards certified recycler.

Mayuresh

Member since: 08/02/24

73 Reputation

0 comments