Introduction
If you have to replace your Dell XPS 15 9570's battery, you have come to the right place!
Before you start following the replacement guide, here are some signs that your battery needs to be replaced:
- Your laptop will not turn on unless it is plugged in.
- Your battery drains really quickly and does not hold any charge.
- Your battery is not charging.
- Your battery is swollen or is leaking. Caution: Be very careful when replacing and make sure not to touch the liquid with bare hands. For more information on how to safely deal with swollen batteries: Click Here
Alright, you have decided on replacing your battery. But wait, we still have to determine which battery model you need to purchase. The XPS 15 9570 comes in two versions; with a 2.5" SSD/HDD installed and without.
If you HAVE a 2.5" SSD/HDD installed, purchase an H5H20 battery.
If you DO NOT have a 2.5" SDD/HDD installed, purchase a 6GTPY battery. (This is the battery being used in this guide)
If you are unsure of which battery you need to get, follow this guide until Step 4 and compare if you have a similar or smaller battery. If it is smaller, then you have an H5H20 battery.
Disconnect your laptop from any power source and turn it off before starting the battery replacement.
Dell's XPS15 9570 uses soft screws, please make sure you are using the appropriate tool and using appropriate technique when unscrewing to avoid stripping the screws.
Please properly dispose of your old battery after replacement. For more information: Click Here
-
-
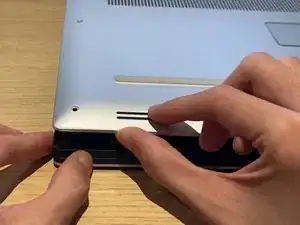
Open the flap with "XPS" written on it.
-
While holding the flap down, remove the two 8.5 mm screws using a Phillips #00 screwdriver.
-
-
-
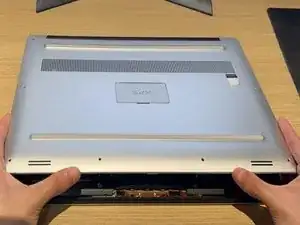
Pry open the baseplate by pulling in an upward direction on one corner of the baseplate.
-
Repeat for the next corner of the baseplate.
-
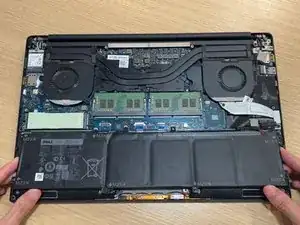
With two hands, lift the baseplate off in an upward direction and remove it from the laptop base.
-
-
-
Locate the battery connector inside of the laptop.
-
Disconnect the battery connector from the motherboard by pulling in a downward and horizontal direction.
-
-
-
Lift the battery up and out of the chassis.
-
The highlighted area in red is where you would place a 2.5" storage drive if you wanted to upgrade your laptop's storage.
-


To reassemble your device, follow these instructions in reverse order.

One comment
It is a great guide that displays every step in simplicity and what problems to avoid in the guide. I like the style of the photos and enjoy the flip-book effect as it helps the reader to understand better. The use of markup was also appreciated. In the introduction where it is mentioned "here are some signs that your battery needs to be replaced:" and the list goes on about why you might need to replace your battery is very educational.
This guide is easy to follow and the wording is also simple which is simple to understand. I like how in the conclusion it is said that you can do these steps in reverse to reassemble the device. Overall it is an amazing guide!