Introduction
This guide demonstrates how to replace the face buttons (A/B/X/Y) of your EasySMX ESM-9100 game controller. A probable reason for the face buttons on your controller to stop working is that they have become misaligned within the controller and no longer reach the board when pressed. If they don't work consistently, it is likely due to faulty placement within the shell of the controller and the panels not being fully secured to hold the buttons in place. The B button is especially prone to these issues as it has a unique and smaller shape compared to the other buttons. If any of these issues occur, they can be remedied with a simple realignment or replacement, as detailed in this guide. If the face buttons on your EasySMX ESM-9100 game controller are not working anymore, use this guide to replace them.
Since this will require working closely with the internal electronics, be careful not to damage them to avoid making the controller entirely unresponsive. Before you begin this repair, ensure that the controller is unplugged from the console or PC.
-
-
Place the controller face down on a solid surface.
-
Use a Phillips #00 screwdriver to remove the seven 10 mm screws from the back cover.
-
-
-
Use the iFixit opening tool to pry off the back cover and remove it to reveal the internal components.
-
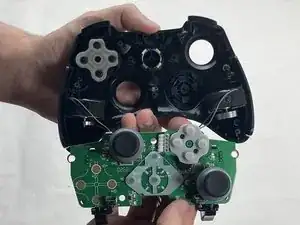
Place the cover off to the side, then grab the circuit board and gently remove it from the front cover.
-


To reassemble your device, follow these instructions in reverse order. Take your e-waste to an R2 or e-Stewards certified recycler.