Introduction
-
-
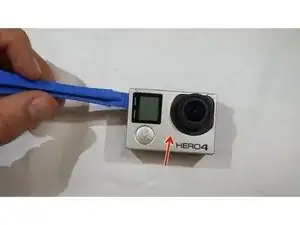
Remove the faceplate by carefully prying around the edge.
-
Loosen the clips on the edge, then pull the faceplate off. Be aware that there is double stick tape holding it in place(indicated by the red arrow).
-
-
-
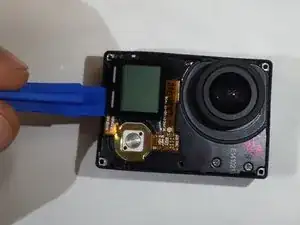
Now remove the camera and boards from the black plastic housing. Use the plastic opening tool to assist in the removal.
-
-
-
Remove the ribbon strip by pulling on it. This will remove the connection.
-
Push down on the three wires and the clip will disconnect from the motherboard.
-
-
-
Remove the four PH000 Phillips screws outlined in red.
-
Gently remove the board. As you lift the board, the computer chip (outlined in orange) will separate from the motherboard.
-
-
-
Remove the black tape from the ribbon cable. With the needle nose tweezers, gently grab the ribbon and pull down. This will disconnect the ribbon from the connector.
-
Now the motherboard can be removed. This will allow access to the screws that hold the camera lens in.
-


To reassemble your device, follow these instructions in reverse order.
5 comments
Just finished replacing the lens in the GoPro 4 Black here at work (that I dropped and broke). Other than a missing step and struggling with reconnecting the last ribbon cable during reassembly, it when well. After seeing these instructions, I was confident I could replace the lens. Thanks for posting this. It was very helpful.
How do people manage to get the last ribbon cable in place?
It's tricky. Reconnecting that small ribbon cable took me the longest of all of the steps to complete. I used the curved needle tweezers in the kit. It can be done, so keep trying.
sam -
I'm looking at the flags and it is saying that this is a archived version and I should use the update version. But I don't know how to find that.
Sorry about that! It looks like a new set of guides is in the works, but nothing has been published as yet. So for the moment, the flag is misleading, and this is the only available version of the guide.