Introduction

If you are having trouble with your USB connection you might need to replace the USB port. This is a guide for replacing the USB connection port on the Hero4 Black.

  1. JVwcGLlwVSCd35MP
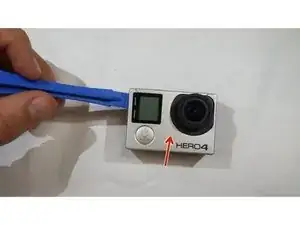
    • First, you will have to remove the faceplate by carefully using the spudger around the edge to loosen the clips.

    • After loosening the clips on the edge, pull the faceplate off.

    • Be aware that there is double-sided tape on the backside of the faceplate (indicated by the red arrow).

  2. 4V1KILNPADDmUHEj
    • Now, you will need to take a PH000 Philips head screwdriver and remove the 4 corner screws.

    • Note: The screws circled in red are longer than the screw circled in orange.

  3. N2QF6n4cUA4tNjj2
    • Now, you will need to remove the camera and boards from the black plastic housing. You may use any tool that will do the job. My group found out, if you use the plastic tool to remove the boards and camera, that it would assist you with the removal.

    You have not described HOW to remove the camera and board from the black plastic housing.

    Lisa Hagerty -

  4. flXbtTAGd2Ek2MoH
    • Remove the ribbon strip by carefully pulling on it. It should slide out of its connection.

    • When you push down on the three wires that are connected to the clip. The clip will disconnect from the motherboard.

    Don't remove the ribbon in red unless your replacing the LCD. Unless you want to end up replacing the LCD

    Geoff -

  5. Wc1oKxCovNcXFmED
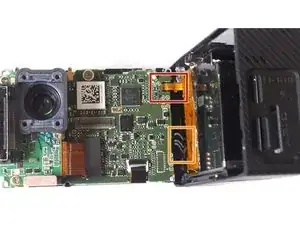
    • Take yourPH000 Philips head screwdriver to remove the four screws outlined in red.

    • Once the screws are removed. Gently remove the board and as you lift the board, the computer chip (outlined in orange) will separate from the motherboard.

  6. BatWATUZD3gx1mpe
    • Take your PH000 Philips head screwdriver and remove the three screws that are outlined in red.

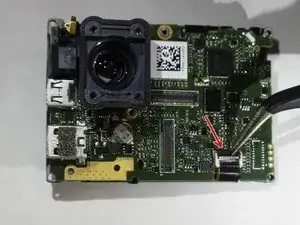
    • Just like before, gently pull up on the ribbon strip to remove the connector from the motherboard.

    You can't remove the centre red screw until you do step 7-10 and then wiggle the board free

    Geoff -

  7. OmEelIjRfjbO5pAL
    • Remove the two screws to remove the riser that is being held in place by the screws.

    Your directions say to "remove these two screws" but does not say (the ones outlined in red) as in the past. It might ordinarily be okay to assume the reader has correlated the two moving through the guide, however, it could become confusing to the reader in this case because the actual screwdriver that does the 'removing' is on an entirely different screw in the picture.

    Lisa Hagerty -

  8. IdpvqDcDVErhE2lS
    • Remove a single screw located near the barcode.

    • Note: Once the screw is removed, only the ribbon strip on the bottom of the motherboard is holding it.

    "This is the final screw holding in the motherboard other than the ribbon strip on the bottom of the board"

    This is somewhat confusing and can be cleaned up as follows:

    Once this screw is removed, only the ribbon strip on the bottom of the motherboard is holding it in.

    Lisa Hagerty -

    My motherboard appears to have adhesive holding it to the base. I damaged the motherboard trying to break it free.

    frankfv -

  9. crNL431S5olL1sD2
    • At the top of the ribbon strip, there is a black clip that will need to be popped up.

    • Note: You can use your finger to pop the clip, but a pair of tweezers might be of help.

  10. PMhEjQQaeLspZreD
    • Gently, grab the ribbon with a pair of tweezers to disconnect the ribbon from the connecter.

    • Now, the motherboard can be removed. Due to the USB connector being soldered to the motherboard, the entire board will need to be replaced.

Conclusion

To reassemble your device, follow these instructions in reverse order.

Jonathan Campbell

Member since: 29/09/15

830 Reputation

0 comments