Introduction

  1. meg1UXflXlRbNqVa
    • Turn off the computer.

    • Disconnect the power cord and any external devices connected to the computer.

    • Make sure the device is completely turned off or else you may risk injury through electric shock.

  2. V1mEUmOhZ2Q6rgSE
    V1mEUmOhZ2Q6rgSE
    nNCyRuA34NN1UU2J
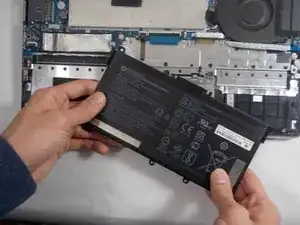
    • Flip the device so that the back plate of the laptop is up.

    • Use a Phillips #0 screwdriver to remove the four 6 mm Phillips screws from the bottom cover.

    • You might have to use a spudger to remove any rubber bezels that cover the screws.

    • Pry off the back cover with the spudger tool.

    There must be some newer, or older versions of this model. My notebook is definitely 14m-cd0003dx but I had a different screw pattern on the bottom plate: only the two back rubber bezels had screws underneath and there were 3 screws along the front edge of the back plate…

    Monte87 -

  3. frReMSnPKPEgNUfA
    frReMSnPKPEgNUfA
    KEBs6dq5wXYvxtG5
    PV4PIm2QPQl5NTFs
    • Remove the six 5 mm battery screws, and the battery can then be taken out.

Conclusion

To reassemble your device, follow these instructions in reverse order.

Mason T Arruda

Member since: 22/03/22

165 Reputation

One comment

Hallo

vielen Dank für diese coole Anleitung

als Ergänzung

beim Model 14-cd0101ng gibt es lediglich die beiden unteren Schrauben (siehe schritt, zwei 6mm schrauben) nicht.

Ansonsten konnte ich keine unterschiede feststellen!

Eng:

For Model 14-cd0101ng it is the same way, without the two 6mm Phillips screws underneath!

Erwin “ReudenBub” Po -