Introduction

This repair guide was authored by the iFixit staff and hasn’t been endorsed by Google. Learn more about our repair guides here.

Follow this guide to replace the screen adhesive in your Google Pixel 8.

Before starting this guide, make sure you've completed your repair and have reassembled your phone up until the screen. Return to your guide and do so if you haven't already.

  1. IqjSi4jWSpoZEHys
    IqjSi4jWSpoZEHys
    3kjSLuYUR5YndvMr
    6e5Uq2uBH1BLy2Tt
    • In order for the new adhesive to properly seal, you must remove all the old adhesive and its residue.

    • Use the flat end of a spudger to scrape up and remove all the old adhesive from the frame.

    • If you're having trouble, apply a few drops of highly-concentrated (greater than 90%) isopropyl alcohol to the adhesive and scrape it up.

  2. cNscWjtcMtY4xZLG
    cNscWjtcMtY4xZLG
    jfoQDIPPAVlPUpTZ
    RjHoWtmp2OjcJtVQ
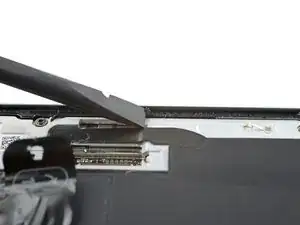
    • Once you've removed all the old adhesive, apply a few drops of highly-concentrated (greater than 90%) isopropyl alcohol to any residue left on the frame and wipe it away with a microfiber or lint-free cloth.

    • If you're having trouble, wrap the microfiber cloth around a spudger and use it to scrape the frame.

  3. 1A5VMZNZx3jq5KQg
    1A5VMZNZx3jq5KQg
    yhAR4pD6AYB5SORV
    EOaYlJYmbMdTaSnW
    • If you're installing a new screen, skip this step.

    • Repeat the cleaning procedure to remove all the old adhesive and its residue from the perimeter of the screen.

  4. 5EGu3521HPhUCpAT
    5EGu3521HPhUCpAT
    moRjlPsNROPXMXis
    wZwZ35DBDhdCkPcq
    • Before applying the new adhesive, it's helpful to see how it will be oriented on your phone.

    • Hold the adhesive sheet so the clear liner is on the bottom and place it over your phone to find the proper alignment.

    • Use the cutouts for the spring contacts and the bottom speaker to help align the adhesive.

  5. hYgvlgh1khnSWRhy
    • Remove the larger clear liner from the back of the sheet to expose the adhesive.

  6. Uhe1e1XoSAYtkFgm
    Uhe1e1XoSAYtkFgm
    1djXTJyEQseASp6F
    3aKvTuwAeQgvPrSM
    • Be very careful during this step! Once the adhesive sticks to the frame you won't be able to reposition it. You'll have to start over with new adhesive if it gets applied incorrectly.

    • Gently place the top edge of the adhesive onto the frame. Use the frame's lip to help position the sheet.

    • Press down gently to secure the bottom corners and carefully lay the rest of the adhesive onto the frame.

  7. qFEc5iXRLsG2lYLY
    qFEc5iXRLsG2lYLY
    UEkwbMx3knUcmAEU
    4PZZh4lDDM4vDlgF
    • The adhesive needs to be firmly secured to the frame before removing any liners to prevent it from pulling up and misaligning in the next step.

    • Be careful not to damage any spring contacts during this step.

    • Press down firmly and slide the flat end of a spudger around the entire perimeter of the frame to secure the adhesive.

  8. pc4IUNfngvsVkIPA
    pc4IUNfngvsVkIPA
    t1tcmPEcSniX5YXd
    11vFJVjRqVSLuj6Q
    • Use the pull tab at the top left corner of the adhesive to gently peel up and remove the larger blue liner.

    • If any of the adhesive starts to peel up with the liner, gently lay it back on the frame and use the flat end of a spudger to secure it.

  9. SEATMqIydlPGWG2A
    SEATMqIydlPGWG2A
    m4v2vNtONjqLycCu
    • Reconnect the screen cable press connector.

    • Reinstall the screen cable cover.

  10. OqTVhN3mcoAL3tkE
    OqTVhN3mcoAL3tkE
    PUfdoJA1VLWcJZhj
    UJDpNeaYSv6AD4GS
    • The inner liner is removed in two separate strips.

    • Grip one of the pull tabs along the right edge of the adhesive and remove one half of the inner liner.

    • Repeat for the other half of the inner liner.

    • If any of the adhesive starts to peel up with the liner, gently lay it back on the frame and use the flat end of a spudger to secure it.

  11. WSAtAphFxlPpOoIm
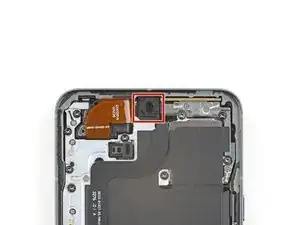
    • Before securing the screen, make sure the front facing camera is snug in its recess.

    • If you replaced the screen, check the front-facing camera hole and sensor cutout on the replacement screen and remove any remaining protective liners in it.

  12. OwOp4Wgq4dNDdFPW
    OwOp4Wgq4dNDdFPW
    DtoK33pDeJpZxxTv
    • Firmly press the screen into place on the frame.

    • You should feel the clips "pop" into place.

  13. i4EyqVXL4WQXrpqP
    i4EyqVXL4WQXrpqP
    iXanQBkAEMjILclW
    • Press firmly around the perimeter or the screen to secure it with the new adhesive.

  14. IPHMYlUfrOQuKbFT
    IPHMYlUfrOQuKbFT
    JulgixpDFceiROZo
    EHjKgBnlegHp5CXh
    • This step shows how to further strengthen the bond of your new screen adhesive.

    • In order to get even pressure around the perimeter of the screen, you'll need to account for the rear camera bump by placing objects on the rear cover.

    • If you have screen vice clamps, use them to work around the camera bar.

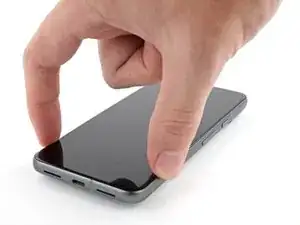
    • Lay your phone screen side down on a clean, flat surface.

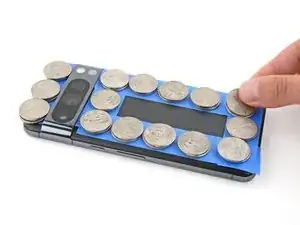
    • Put tape around the perimeter of your phone to protect the rear cover.

    • Place coins or similarly thick objects around the perimeter of the back cover. Make sure they're as thick or thicker than the camera bump.

    • Place heavy objects such as books on your phone and leave them for 30 minutes or longer. Ideally, leave them stacked overnight.

Conclusion

Repair didn’t go as planned? Try some basic troubleshooting, or ask our Google Pixel 8 Answers Community for help.

Alex Diaz-Kokaisl

Member since: 16/01/22

127411 Reputation

0 comments