Introduction
Replacing or installing new drawer slides can be challenging without knowing the proper steps or having the essential tools. The most challenging part of this process is making sure the drawer slides are leveled on the left and right side, and they have to be perfectly flush on the front part of the drawer. Failing to do so will make the drawer hard to pull or push back in place due to misalignment on the drawer slides. In this guide, we will demonstrate how to correctly install soft close drawer slides solely using a power drill, measuring tape, and hand grip clamps. We will also be providing alternative tools (without pictures) for people who may not be able to access ideal tools. We know our guide is foolproof and easy to follow, even if this is your first time installing a drawer slide, but please let us know any of your concerns if you have any.
-
-
Place the slides flush with the front of the cabinet, and clamp it down to screw it in place.
-
-
-
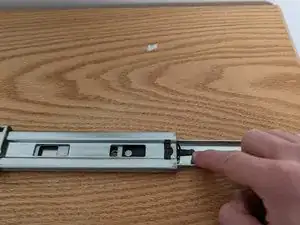
Insert all 8 of the 1/4" euro screws with the power drill putting 3 screws in total, from front, middle, and the back of the track.
-
-
-
Push the metal glides back into the track until it clicks back in place.
-
Place a cardboard box material or any material that is less than 1/8" thick at the bottom of the cabinet. The spacer will prevent the drawer from scraping the bottom side of the cabinet when we install it.
-
-
-
With the spacer, we have ensure our drawer will be aligned perfectly for marking the metal glides' placement.
-
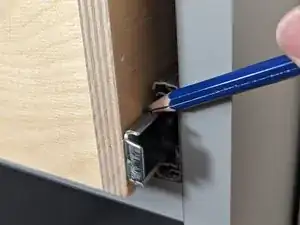
All we have to do now is to bring both drawer and metal glide slightly out of the cabinet and mark the placement with pencil on both sides of the drawer.
-
-
-
Measure the markup distance, and draw another line with the same measurement at the back of the drawer.
-
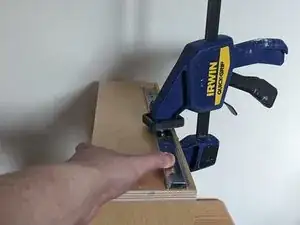
Line up the metal glide, and clamp it in place with our marker.
-
-
-
Insert 6 of the 1/2" screws using the power drill or screwdriver while making sure that the tip of the glide is flush with the front of the drawer.
-
Using the same step as before, screw the glides on the opposite side of the drawer.
-
-
-
Carefully place the drawer in the track, and push it all the way back until you hear a click. Once the drawer is in place, the slides should work properly and move with ease.
-
At last, the installation is finished!
-


To reassemble your device, follow these instructions in reverse order. We hope this guide provided you with a perfect way to install soft-close drawers. Please use these for alternative brands, and comment if assistance is needed.
One comment
Thank you! I built a table for a Dewalt 733 Planer that a friend gave to me. I used scrap material, pretty much, from my pole barn project, to complete this workshop table. I decided that a drawer would be good to hold my extra knives and correct tools for changing the blades. My table is a bit deeper than 24”, so I checked out drawer slides at Lowe’s. I was shocked to see that I could purchase the 24” soft close heavy duty slides for $6.98/pair! Regular price was almost $26! I grabbed those babies up and lit a shuck to the cash register! 😂 I hadn’t put slides into a cabinet for a couple years, so I brushed up with this very well laid out set of instructions and am now more confident that I will be able to install these well-built slides with ease! You are much appreciated! Thanks, again! Amber
Slides that I’ve used in the past have had an L and an R on the respective slides, but I did not see any on these. Does it matter? (This may be a dumb question . I am just curious.)
Amber Orm -