
Introduction
Of course you can use the TimeMachine backup to restore your settings and files, but if you don’t have one or if you don’t want to make a backup then check this out.
Tools
Parts
-
-
Boot to recovery by holding cmd + r immediately after the device boots up. Hold until you see the apple logo
-
Choose Reinstall macOS
-
-
-
BE SURE TO INSTALL TO THE NEW DRIVE
-
Do not reinstall to your existing drive
-
The reason to do this is to set up the file structure in the specific way that Catalina needs
-
-
-
Once the new SSD has catalina on it
-
Exit the setup menu, power off
-
Reboot to recovery mode using the same cmd + R method as before.
-
Use the top menu View>>Show All Devices
-
-
-
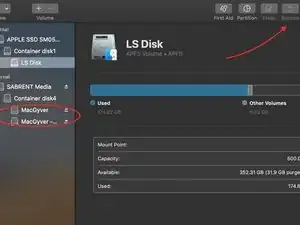
Since there are two partitions this step will be done twice.
-
Select the new (currently external) SSD that has catalina on it. Select the first partition. I've called my disk MacGuyver
-
Then Click restore and choose the corresponding partition on your existing Catalina disk still installed in the computer
-
Once that is complete Repeat the recovery process for the second partition, this may have the word - Data on the end of the named disk.
-
This step is critical. The goal is to recover your data from the old drive to the new drive. Catalina uses two partitions, so the step must be done twice. This can take a while...
-
-
-
Follow the guide below to replace the hardware
-
-
Boot into recovery mode again cmd + R
-
-
-
Once in recovery mode, choose disk utility.
-
At the top left find the option to set the boot disk. This should be the new SSD that you just installed
-
I actually ran first aid on each partition before doing this step. I'm not sure if this was necessary.
-
-
-
Restart and it should boot like you never left.
-
Enter your password and login!
-
You can now use your old drive for a backup, time machine, or extra storage now that you have the adapter to use it!
-


Enjoy the speeds of SSD!