Introduction

This guide shows you how to replace a Lenovo 320-17IKB touchpad.

Before replacing your touchpad, try updating and reinstalling the touchpad drivers. You will know your touchpad is faulty if your cursor is lagging or jumping after updating/reinstalling your drivers.

Step 1 requires you to remove a part that is glued down. Glue/solder is necessary to reattach this part.

Before beginning, make sure to power off your laptop completely and disconnect it from any external power source.

  1. qPd2DtrQgRKQKb1t
    • Turn off and unplug the computer.

    • Flip the laptop over so that the back panel is facing upwards.

  2. 3TCtqgvmXOsIcHPa
    3TCtqgvmXOsIcHPa
    Dn3la3RNcWOwssoE
    • Remove fourteen 7mm Phillips #00 screws from the back panel.

    Philips 0 or Philips 1 works better.

    Thorbjørn Kühl -

  3. cETjVT2ijDGZjOnR
    • Carefully remove the optical drive by pulling the bezel away from the laptop.

  4. FarGMLbgqCstKtah
    FarGMLbgqCstKtah
    O1X1ANpWQbmUOr25
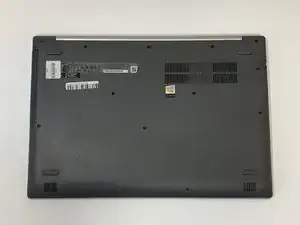
    • Use your fingers or an opening tool to gently remove the back panel from the bottom of the laptop.

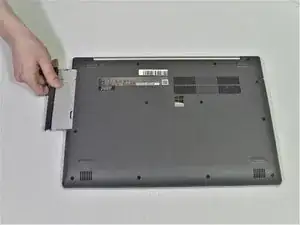
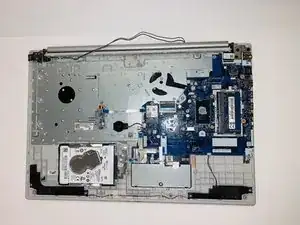
    • Lay both sides of the laptop next to each other.

  5. Gncn2rB4H3IAOp3J
    Gncn2rB4H3IAOp3J
    WNAVPm1UOoGw5mVw
    • Remove five 7mm Phillips #0 screws from the battery holder.

  6. ox5ekt26Dux4BYHm
    ox5ekt26Dux4BYHm
    1NfNYE2ZfrvTyJr6
    • Pinch the connecting cord with one hand and pry the battery connector with the other hand, while gently pulling the connector straight out and towards the bottom edge of the base.

    • When removing the battery, use care to keep it flat and do not open the battery because it can result in fire or explosion.

  7. ENoigThuOjCYVdRO
    ENoigThuOjCYVdRO
    YcH6McNBZHUONhRg
    • Remove five 7mm Phillips #00 screws from the cooling fan.

  8. MnkbuQESp1hwUKBq
    MnkbuQESp1hwUKBq
    xRYfaknwH2oPUCDS
    HtKgBNRJnoVsWO32
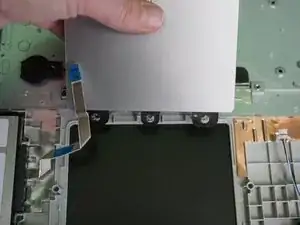
    • Gently lift the fan assembly out of the laptop.

    • Gently remove the connecting wires from the exterior of the fan by slowly "weaving" the cord between the ridges of the fan.

  9. FKaUeAIctOnAIZVX
    FKaUeAIctOnAIZVX
    2gSLK5NJFRGeWevA
    maDLjfaSEiiGOl6w
    • Gently lift and remove the heat sink and set it aside.

  10. HnKfNBSaKRKYhWNX
    HnKfNBSaKRKYhWNX
    vKhQptpEMKUblHwt
    BYcLMNKW1aWGVieo
    • Remove the single 3mm Phillips #0 screw from the Wi-Fi card.

    • Pull the Wi-Fi card straight out of the laptop.

  11. pGIVo3agAZr61Dxl
    pGIVo3agAZr61Dxl
    jZZWdLUvy1YYG1MC
    2sLGEVxsM6uuLtOC
    • Gently pull the blue ribbon marked with "MB" connectors.

    • Gently remove the other connectors in the picture by pulling them straight out.

    • Blue connectors encased in a black holder may require tweezers to unclasp the connector for removal.

  12. MhSThBhsdcsYmYD1
    MhSThBhsdcsYmYD1
    32VLj5DHqtHyDORF
    LN5HjecCytIPtmna
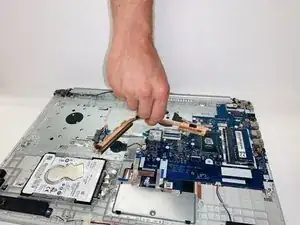
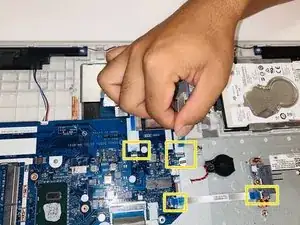
    • Using a Jimmy, gently pry the motherboard from under the corner screw holder with one hand and pull the motherboard out with the other.

  13. s16BeWymkpI2HZre
    s16BeWymkpI2HZre
    o3wph5rn2kR4LlZ2
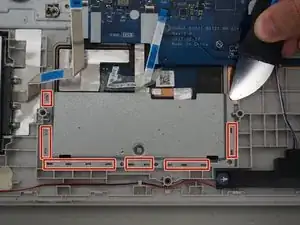
    • Use a Jimmy or opening tool to pry and and release the clips that secure the touchpad cover.

    • Soldering/glue is required to reattach this part.

    • Remove the touchpad cover.

  14. YXVXKQGRvLRgAVTT
    YXVXKQGRvLRgAVTT
    eAU4Y1pDH6SFZ4rW
    • Use a Phillips #0 screwdriver to remove two 2.42 mm screws from the top of the touchpad.

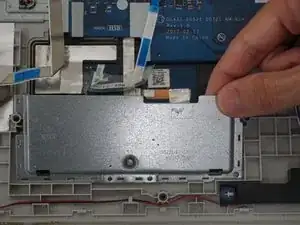
    • Peel off the ribbon cable from the touchpad, which is attached with adhesive.

  15. pZVEHEJo3Dgsy6VR
    pZVEHEJo3Dgsy6VR
    OvLqx3Bsr6eSlZUS
    mJkxTEVQ1ZwabFWD
    • Lift the touchpad from the bottom to remove it.

    • When you've replaced your touchpad, remember to reattach the ribbon cable as it will not function without it.

Conclusion

To reassemble your device, follow these instructions in reverse order. Take your e-waste to an R2 or e-Stewards certified recycler.

David Rojas

Member since: 08/02/24

97 Reputation

0 comments