Introduction

This guide will cover how to remove and replace the fan in the Lenovo ThinkPad X1 Carbon 6th Gen. This may be necessary if you need to access the fan for cleaning, or if you need to replace a broken or faulty fan. It is important for your fan to work properly because it prevents overheating which may damage your laptop. If you are having trouble with your computer fan, consult our troubleshooting page. Before beginning, be sure to power off your laptop and disconnect it from any power source.

  1. NFtYMIq2pIVe1NLS
    NFtYMIq2pIVe1NLS
    f3HPZLtAIooGCgUh
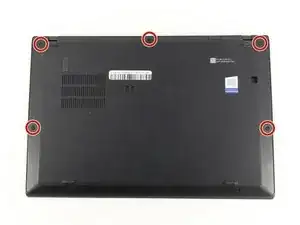
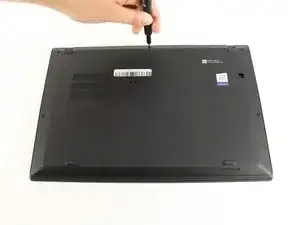
    • Use a Phillips #0 screwdriver to unscrew the five screws that secure the back cover to the laptop.

    • The screws do not completely come off from the back cover. Loosen until the screws are completely loose.

  2. HKMFZVKrjam3PWWH
    HKMFZVKrjam3PWWH
    6ZP1DMLSvgYbwIhX
    • Use a Jimmy to lift the cover directly up off of the locating pins.

    • Though a metal opening tool is shown in the image, we recommend using plastic opening tools to minimize any cosmetic damage.

    • Remove the back cover.

    • If you encounter resistance when lifting the cover, revisit the screws to see if any of them are still threaded on to the device.

    I thank you for these instructions. They were quite helpful and I successfully replaced the fan. There is one thing however. Your instructions stated the following: "Be sure to pull on all of the cables at the same time."

    I disagree. One should never pull the wires. I was able to nudge the one part of the connector loose from the other part that it fit into." I then put the new fan in and gently and carefully pushed the connecting parts together.

    Otherwise, your instructions were clear and to the point. Thank you very much

    ALAN L SILBERLIGHT -

    The image shows prying the cover open at the bottom right. In fact, there are tabs securing the bottom edge to the frame. The cover needs to be pried open at the top edge. Once the top edge is released, the cover can be shifted slightly toward the top of the image to disengage the tabs at the bottom.

    This error, along with the similar error about removing the battery in step 4, suggests that the instructions were written with the laptop in the opposite orientation than what is shown in the images.

    EatCroc3 -

  3. qhmY6XdAvKVFNxAH
    qhmY6XdAvKVFNxAH
    wwcFArcOSjnCHqDn
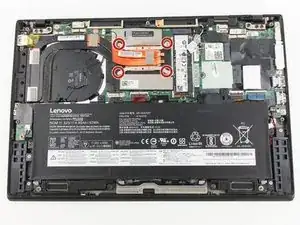
    • Use a Phillips #0 screwdriver to loosen the four screws that secure the fan to the motherboard.

    • The screws do not completely come off from the fan mount. Loosen until the screws are completely loose.

  4. aMMMTniEMpcgpPNQ
    aMMMTniEMpcgpPNQ
    PpOegsZ3XWGSZIjL
    • Use nylon tipped tweezers, or your fingers, to gently pull the fan's power cable towards the SSD, disconnecting it from the pins.

    • Be sure to pull on all of the cables at the same time.

  5. uC1onxvZgBvYZvdB
    uC1onxvZgBvYZvdB
    4BvO2WRgSnCwYEaC
    • Use a plastic opening pick to lift the fan mount.

    • Use your fingers to gently pull the fan diagonally away from where it is connected.

  6. 6SJT3usU3JCaLUyh
    • Turn the fan over to expose the interior.

    • If necessary, clean out the fan or wipe away and replace the thermal paste.

    All good. But most of us occasional Fixit-ers don't happen to have thermal paste lying around. Would have been helpful to include it in your list of necessary parts and tools. Otherwise, instructions were clear as crystal and worked as advertised. Tx!

    ESR Westchester -

    Great call out! I updated this guide to include the Thermal Paste as a required component. Thank you!!

    Matt Zieminski -

Conclusion

To reassemble your device, follow these instructions in reverse order.

Michael Megna

Member since: 23/01/20

1277 Reputation

0 comments