
Introduction
This is a guide to do a partial disassembly of the left-side of a Logitech G935. This is my daily-use headset, so I went as far as I was comfortable with knowing I could safely disassemble and reassemble without breaking tabs, glue, wires, or anything else like that.
After disassembly, reassembly is easy reversing these steps.
-
-
Remove the ear cup. It is slightly elastic and may be gently stretched off, starting at one point and gently working around the perimeter. A spudger may help in both removal, and especially re-installation.
-
-
-
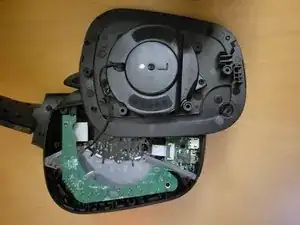
Remove the 6 Phillips #0 screws retaining the top section.
-
Gently pull off the section you just unscrewed. Flipping it upside-down off to the side is a good bet.
-
Note there is a thin cable soldered to both halves. Be very gentle with this, as I suspect repair will be near-impossible. (It's surface-mounted on the PCB, and sealed inside the driver.)
-
-
-
Remove the 2 screws holding the rear plastic facade that retains the buttons and volume wheel.
-
Detach the ribbon cable from the daughterboard.
-
-
-
Remove the ribbon cable connecting the daughterboard to the mainboard.
-
Open the microphone to expose a hidden screw
-
Remove the screw retaining the front plastic facade.
-
The microphone will now come out. Take care as it's attached to the daughterboard via a small fragile soldered cable.
-
With the microphone out, remove the screw retaining the daughterboard.
-
Gently pry the daughterboard out. Prying from the curved section towards the screw (as the yellow arrow points) worked well for me.
-
Take care once the daughterboard is free, as it is still connected to the mainboard via soldered wires.
-


To reassemble your device, follow these instructions in reverse order.

One comment
Thanks! It helped a lot. Mine was having a problem with the power on slider, I sprayed a little bit of contact cleaner and a little bit of rubbing with a soft brush, it's working like new now!