Introduction

This guide contains instructions for using the old-style iFixit adhesive remover with separate bottle and syringe, which is no longer sold. For the updated version, click here.

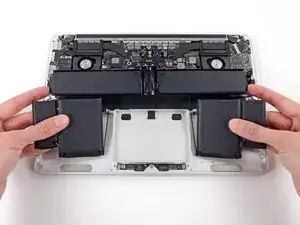
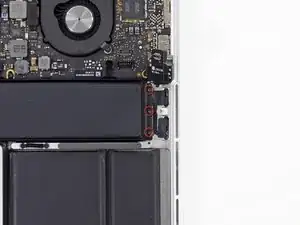
Use this guide to safely remove the glued-in battery from your MacBook Pro with the help of an iFixit battery replacement kit. The adhesive remover in your kit will dissolve the adhesive securing the battery, allowing you to remove it with ease. The battery is made up of six distinct cells, four of which are adhered to the upper case.

iFixit adhesive remover is highly flammable. Perform this procedure in a well-ventilated area. Do not smoke or work near an open flame during this procedure.

For your safety, drain your MacBook Pro's battery before you begin this procedure. A charged lithium-ion battery can create a dangerous and uncontrollable fire if accidentally punctured.

Note: The solvent used to dissolve the battery adhesive can damage certain plastics, such as the MacBook Pro's plastic speaker enclosures. Take care when applying the solvent.

  1. XxSVygoKg3BQZUeK
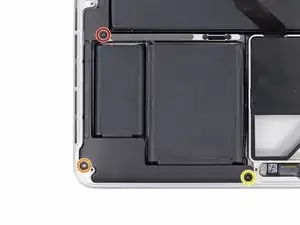
    • Remove the following ten screws securing the lower case to the upper case:

    • Two 2.3 mm P5 Pentalobe screws

    • Eight 3.0 mm P5 Pentalobe screws

    • Throughout this repair, keep track of each screw and make sure it goes back exactly where it came from to avoid damaging your device.

    If don’t have one of those neat project mats, then you can use small pieces of flattened blu-tack to hold the screws. If you arrange them in the shape of your mac book cover, and put the screws down methodically, you can get a one-to-one mapping of the screws to the correct screw holes.

    Toby Thurston -

    Or you can use an ice tray where you put the screws and the parts in separate bays in the same order as they come in the instructions.

    timofej.se -

    This is great! I used a small magnetic white board, and wrote on it to identify the parts as I went. This whole process, from the fast shipment to the great instructions to the complete, high quality, tool kit has been great. I’m typing this comment on my resurrected laptop. Thank you! Sue

    Susan Greer -

    It would be a good idea if people recorded in the comments which screws go where so that, if someone lost their screw positions, they could recover them from the comments.

    Raymond Shpeley -

  2. TZjAGsfhlId3q36t
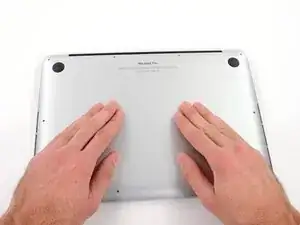
    • Wedge your fingers between the upper case and the lower case.

    • Gently pull the lower case away from the upper case.

    • Remove the lower case and set it aside.

  3. SLwb4KCgFZKfLR2B
    SLwb4KCgFZKfLR2B
    3eGiEP35uex15jKd
    muPIBpQokGnUUXJP
    • During reassembly, gently push down the center of the lower case to reattach the two plastic clips.

    • The lower case is connected to the upper case at the center, with two plastic clips.

  4. oh6QmDClHy3Es55f
    • Remove the plastic cover adhered to the battery contact board.

    The replacement cover doesn't seem to have the formed pads attached. I re-installed the original.

    Adrien -

  5. AvPUsRLbmXLZWSlb
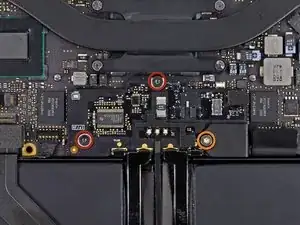
    • Remove the following screws securing the battery connector board to the logic board:

    • Two 2.8 mm T6 Torx screws

    • One 7.0 mm T6 Torx shouldered screw

  6. eYeaxKQXRIv43WNX
    eYeaxKQXRIv43WNX
    INge1d6OYG2XdrMr
    • Use tweezers to remove the small plastic cover located near the bottom right of the battery connector board.

    Is adhered to screw beneath, so lift firmly and slowly.

    Andrew -

    when doing this with metal tweezers as instructed in the video, it was difficult to get off and apparently while i was trying to do it, the tweezers went too far under and i believe made contact with the screw underneath? there was a zzz noise, an orange flicker and a little stream of smoke that came out. i freaked out and put everything back together to see if the laptop even still worked, it turned on and everything but died right away (i drained it before doing the repair anyway, so i was surprised it turned on at all).

    i finished the battery repair and did several other things while in there. i have charged it all the way as recommended and will use it later on to see how everything is, im hoping that it’s a okay, but could someone explain to me what happened and the possible consequences?

    Kait D -

  7. 3h3p5bF5gSsxU3H1
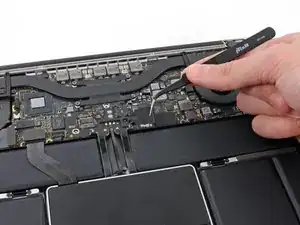
    • Remove the wide head 6.4 mm T6 Torx screw securing the battery connector to the logic board assembly.

    When reinstalling, be careful that the board lines up correctly and is completely seated in order for this screw to thread properly.

    Adrien -

  8. KnflDJ6YcW61sb3S
    KnflDJ6YcW61sb3S
    Y3LPyukbnPaH2Qua
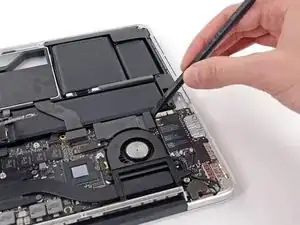
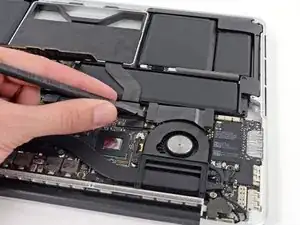
    • Carefully lift the battery connector board up off the logic board.

    • It is recommended to bend the battery cables just slightly, to keep the board suspended up above the logic board and out of the way.

    • Do not fold the board completely over, or crease the cables, as this may damage the battery.

  9. wBB3HYE4h4RPE1gv
    wBB3HYE4h4RPE1gv
    oUwSuUJp4RWM4RSK
    • Grasp the Interposer with tweezers.

    • An interposer is the name for an interface that links one electrical connection to another. In this repair, it is the board connecting the battery to logic board.

    • Lift the Interposer off the logic board and remove it.

    • Removing this board will ensure that the battery remains disconnected throughout your repair, preventing your computer from accidentally powering on. It's also a good idea to take it out so it doesn't fall out unexpectedly.

    How can I remove interposer I m not able to remove it

    Raunak -

    you must lift it absolutely vertically, or it fouls against the locator pin in the corner- you can easily get the impression that it won’t come over the end of this pin- almost like it’s rivetted in. it isn’t. get a good grip on it with the tweezers in the centre hole & one of the sides, & lift it STRAIGHT up.

    duncan rmi -

    I would recommend to use plastic tweezers in order to reduce risk of damage.

    Martin Sippel -

    Second that. If you have thin heat shrink tubing, form some over the tweezer tips. If the tubing is thin and small enough in diameter you’ll see the serrations of the tweezer tips.

    Raymond Shpeley -

    wat is the model this SSD

    thierry.wilow -

  10. OZelarOBjAVaVFfX
    OZelarOBjAVaVFfX
    AqIx1EApvUJZuqXt
    • Use the flat end of a spudger to pry the right side of the I/O board data cable connector up off its socket on the I/O board.

    • When prying the I/O board data cable connector from its socket, make sure to pry the connector itself and not the socket. Prying the socket may cause irreversible damage to the I/O board.

    I keep my fingernails fairly long, very handy for many computer repair jobs. This gives me 10 spudgers over which I have very fine muscular control. It is far easier to pop some of these tiny delicate MacBook parts loose with my nails.

    Ben Myers -

    Skip this step. For an easier, lower-risk repair, go straight to step 15 and just fold the speaker out of the way.

    .A. -

  11. QKxcNUeAhrixRuPH
    QKxcNUeAhrixRuPH
    fCYXnPX1iQDHNIaE
    • Wedge the flat end of a spudger beneath the left side of the I/O board data cable connector.

    • Gently twist the spudger to disconnect the I/O board data cable connector from its socket on the logic board.

    I also skipped this step as this data cable is not compromising the exchange of battery and less interaction with connectors is less risk of damage..

    Diesen Schritt habe ich ebenfalls weggelassen, da das Datenkabel den Austausch der Batterie nicht behindert und weniger Manipulationen an Steckverbindern bedeutet ein geringeres Risiko für Beschädigungen

    Martin Sippel -

  12. dWiQlHIlEeHEg2fO
    • Lift and remove the I/O board data cable from the MacBook Pro.

    This step is useless. Could be skipped

    Pierre S. -

  13. CTQFjoXtOgPwLrIS
    CTQFjoXtOgPwLrIS
    AjuDatPPf2Zjyt1F
    4KkLTuRpIoPVRcZF
    • Use the flat end of a spudger to pry the SSD cable connector up from its socket on the logic board.

    • Move the SSD cable connector out of the way.

    As per my comment on step 10, this is also not required. When you remove the SSD in step 22, you can just fold it over out of the way.

    .A. -

    This step is easy enough that I’d just remove it to be out of the way. I 100% agree with your other comments though. While you’re here, might as well do step 21 and remove the drive, just takes a sec.

    maccentric -

    I also strongly recommend not to unmount the speaker plugs, just flip them out of the way, same as with the SSD drive. Makes it much less complicated and less risky. It worked perfect for me.

    Ich empfehle ebenfalls, die Platinenstecker der Lautsprecher nicht zu lösen sondern die Lautsprecher einfach, so wie das SSD-Laufwerk, einfach aus dem Weg zu legen. Das macht die Sache weniger kompliziert und weniger risikoreich. Es hat bei mir super funktioniert!

    Martin Sippel -

  14. TPfVFMgi1CPsEAui
    TPfVFMgi1CPsEAui
    TKPQmCYZiLnOlnrf
    • Wedge the pointed end of a spudger beneath the right speaker cable connector.

    • Gently pry the right speaker cable connector up off from its socket on the logic board.

    • Be sure you are prying up on the connector, not the socket itself.

    When reassembling be careful that the right speaker wire is flush against the battery. At first, it was slightly touching the airport/bluetooth board causing wifi and bluetooth to not work after restarting.

    Stu -

    Good tutorial. Clearly explains the steps. I only had a little trouble fixing the audio cable back in the MB socket. Please mention in that step that the connector has to be pressed down onto the socket rather than slide it in.

    Aditya Vajpai -

  15. IS4fFpXWeUrB2tGD
    IS4fFpXWeUrB2tGD
    XsPQG65wgAM6PYUC
    • Use a T5 Torx driver to remove the following screws securing the right speaker to the upper case:

    • One black 6.8 mm screw

    • One silver 6.3 mm screw

    • One black 4.9 mm screw

    • The silver screw (in the corner) may be covered with a foam pad. If so, use your tweezers to peel it up and remove it.

    If you manage to misplace any screws, particularly one of the speaker retaining screws, look under the speakers - they are magnetic and great at hiding missing screws :)

    Peter Newman -

  16. DLfgjQrIOI4RtC16
    DLfgjQrIOI4RtC16
    pgHNnlGUEK4ohHqi
    • Lift and remove the right speaker out of the upper case.

    • If necessary, de-route the right speaker cable from its channel in the upper case.

    For those who don’t realize it, the speakers you are removing really are the plastic corner pieces that look like they’re just there to fill the space.

    S Cockerille -

  17. ND1i5FHjBtM3ZDYb
    ND1i5FHjBtM3ZDYb
    ZY2abI6gejZRlVNY
    p1S4ofUTIZmcNIQt
    • Use the flat end of a spudger to pry the headphone jack cable connector straight up off its socket on the logic board.

    • Gently bend the headphone jack cable to 90° up from the logic board.

    • Bending the headphone jack cable will allow you to disconnect the left speaker cable connector without having the headphone jack cable in the way.

    For an easier, lower-risk repair, skip this step and step 18 - go straight to step 19 and fold the speaker out of the way.

    .A. -

    Agreed, this is the way

    maccentric -

  18. 2XnPiTJJHRf4plBI
    2XnPiTJJHRf4plBI
    PhagJEgp4wKycpCG
    • Wedge the tip of a spudger beneath the left speaker cable connector.

    • Gently pry the left speaker cable connector up off from its socket on the logic board.

    • Be sure you are prying up on the connector, not the socket itself.

    It's easier to follow Step 19 & 20 first and then come to Step 18 (this step). Doing so will make it easier to remove that speaker connector easily holding the cable of speaker without having to use a pry tool.

    Johhnie Doe -

  19. nrtdpScEP4kmlYUS
    • Use a T5 Torx driver to remove the following screws securing the left speaker to the upper case:

    • One black 6.8 mm screw

    • One silver 6.3 mm screw

    • One black 4.9 mm screw

    • The silver screw (in the corner) may be covered with a foam pad. If so, use your tweezers to peel it up and remove it.

    Be very careful on this step. If you aren’t you can snap the plastic on the corners where the screws go in. Remember to go slowly when spinning the screws back in, it doesn’t take gorilla torque to tighten them, just take it easy!

    Stacey Deel -

  20. T3MxHZ2JNDUGMAOP
    T3MxHZ2JNDUGMAOP
    GEiDIUvN6JjvIXoB
    • Lift and remove the left speaker out of the upper case.

  21. gTdRPTDqMMjsVMJm
    gTdRPTDqMMjsVMJm
    qxpBYXZfgNG5Hb5F
    UYvgWmZLd4BViAic
    • Use your thumb or finger to bend the plastic spring bar on the SSD tray, freeing the two clips at the front side of the device.

    • While holding the spring bar depressed, tilt the SSD assembly up out of its cavity.

  22. pWbTEW2yxdwMA3Fl
    • Remove the SSD assembly from the upper case.

  23. Nmxx2pGap6glP1oT
    Nmxx2pGap6glP1oT
    UQQdlgEj5L1FHS5V
    • Remove three 2.2 mm T5 Torx screws from each side of the battery (six screws total).

  24. DCbPFpVHuNDlbvlH
    • The liquid adhesive remover provided in your kit can affect the antireflective coating on your MacBook Pro's display.

    • To protect your display, place a sheet of aluminum foil between the display and keyboard and leave it there while you work.

  25. kWdX6EyBKqBdoiKb
    kWdX6EyBKqBdoiKb
    DAuJB16Cd6kboU2q
    • Now that your MacBook Pro is fully prepped, it's time to prep yourself.

    • iFixit adhesive remover contains acetone, a mild skin and eye irritant.

    • Wear eye protection when handling and applying the adhesive remover. (Eye protection is included in your kit.)

    • Do not wear contact lenses without eye protection.

    • Protective gloves are also included in your kit. If you are concerned about skin irritation, put your gloves on now.

  26. Ao2boBY1QQEgatLm
    Ao2boBY1QQEgatLm
    PQx1oaGiJlq113Qr
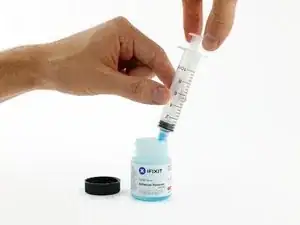
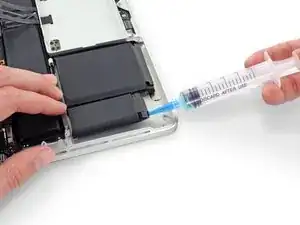
    • Open your container of adhesive remover.

    • Fill the syringe included in your kit with a small amount (approximately 1-2 milliliters) of adhesive remover.

    • It's best to fill the syringe with no more than about 1-2 milliliters of adhesive remover at a time, so as to avoid accidentally applying too much.

    • Refill your syringe as needed throughout the rest of this procedure.

  27. TpHGtRFa4yMbSAaM
    • Apply a small amount of adhesive remover (approximately 1 ml) evenly under the edge of the leftmost battery cell.

    • Wait 2-3 minutes for the liquid adhesive remover to penetrate underneath the battery cell before you proceed to the next step.

  28. epuWPc25hsXCpGXH
    epuWPc25hsXCpGXH
    ksweBYj4T1YhK5jd
    WaSGFhaWQp1NwNrP
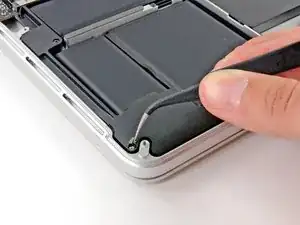
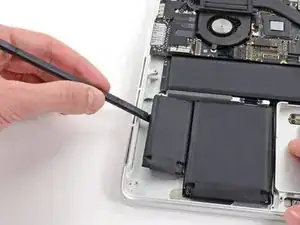
    • Insert the flat edge of a spudger or plastic card underneath the leftmost battery cell.

    • Run your tool along the bottom perimeter of the battery cell and lift to begin separating the adhesive.

  29. hQVPwVMQdoFqaMCV
    hQVPwVMQdoFqaMCV
    Ldd4AJ4sJCgDirjn
    aVtTCJbcYIQXviAQ
    • Insert the spudger along the left-hand side of the leftmost battery cell.

    • Run the spudger up along the left side of the leftmost battery cell.

    • Slightly pry the leftmost battery cell to release it from the adhesive.

  30. yRaF4CWNLGRrueNb
    yRaF4CWNLGRrueNb
    qMNPTs3vpubiesWj
    wUksictQ1OH5yqkN
    • Repeat the above steps to separate the adjacent battery cell from its adhesive:

    • Apply a small amount (about 1 ml) of liquid adhesive remover under the battery cell.

    • Wait 2-3 minutes for the adhesive remover to penetrate and soften the adhesive.

    • Carefully wedge a spudger or plastic card inwards, being careful to not damage the battery, and separate the battery cell from the adhesive securing it to your MacBook Pro.

  31. ClJjgNXKRHqwvHpX
    ClJjgNXKRHqwvHpX
    rrm4PwGQNGILCUUm
    5nFOeJtDeRnYjCDB
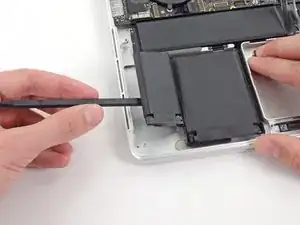
    • Insert the flat end of a spudger underneath the larger leftmost battery cell.

    • Carefully wedge the spudger inwards, being careful to not damage the battery cells.

    • Pry the larger leftmost battery cell up off the upper case.

  32. b3DUPHygwdTHSeui
    b3DUPHygwdTHSeui
    jHMmryPf1mROlVxU
    aMkHCKHZV6TYkJkL
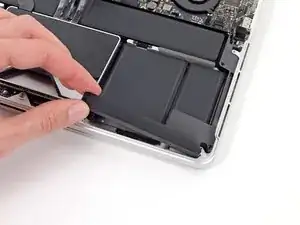
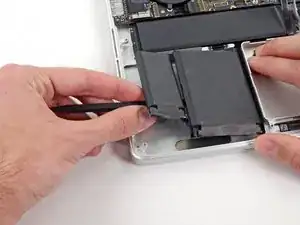
    • Grasp the battery cells and gently move (but do not remove) them from their recess in the upper case.

    • Leave the battery cells resting on top of the upper case as shown in the third picture.

  33. FDFlxPOB4YLTPKB2
    FDFlxPOB4YLTPKB2
    iyctAEcY12umVUbC
    KOwYtDNHAMxpuYwu
    • Switch sides and repeat the above procedure for the two battery cells on the right-hand side of the MacBook Pro.

    • Remember to add about 1 ml of liquid adhesive remover under each battery cell, and wait 2-3 minutes for it to penetrate before prying up the cell.

    • Be careful not to puncture or otherwise damage the battery cells.

  34. akmVoIBhyFU22bJJ
    akmVoIBhyFU22bJJ
    D4jCJOhhnOQMvN4R
    imHRIj6xPWrUNuwH
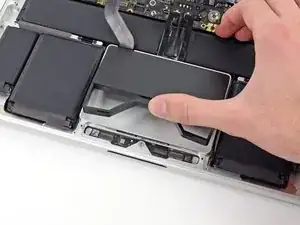
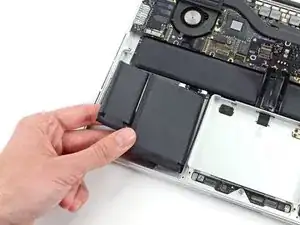
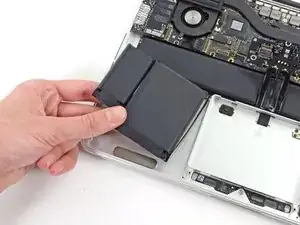
    • Lift the battery as a whole up out of the upper case, and remove the battery.

    • Before installing a new battery, remove all the old adhesive from the MacBook Pro's case.

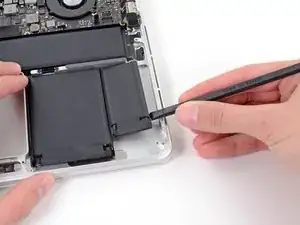
    • With a little luck, you can slowly pull out each strip of adhesive with your fingers.

    • Otherwise, soak each section of adhesive with a bit of adhesive remover for 2-3 minutes, and then scrape it out with an opening pick or one of the other tools in your kit. This can take quite a bit of work, so be patient.

    • Mop up any remaining adhesive remover and give your MacBook Pro a few minutes to air dry.

    • The replacement battery included in your iFixit kit comes with adhesive pre-installed. Test the battery's fit and alignment carefully before peeling off the film covering the adhesive, and then press each cell firmly into place. If any additional films/liners are present that weren't on your original battery, remove them now.

    • Calibrate your new battery before using it: allow it to drain overnight, then charge it to 100% and drain it again until your MacBook Pro shuts down automatically. Charge it again and use it normally.

    • If you notice any unusual behavior or problems after installing your new battery, you may need to reset your MacBook Pro's SMC.

Conclusion

To reassemble your device, follow these instructions in reverse order.

Walter Galan

696048 Reputation

0 comments