Introduction

The Milwaukee Rotary Hammer 260520 D14A 2016 gasket may need replacement if the device is leaking oil, isn't hitting hard enough, or is stalling. Keep in mind that this guide calls for accessing the gear case assembly, so expect whatever is touching the device to get exposed to grease. Some of these steps also require a considerable amount of force from the user.

Gaskets are mechanical seals that protect joined surfaces under compression by padding the space between them.

  1. aPPSuIEiWIYIqtR3
    • Remove the battery by sliding it from the base.

  2. QhKBsfrBheSU4TWL
    • Remove two 20.3 mm screws at the right side of the drill base using a Torx T3 screwdriver.

  3. sTngW2eqpvYcFA3G
    sTngW2eqpvYcFA3G
    QSuYvKZEQvhFTZHD
    UEDqCvwLprHXwnR6
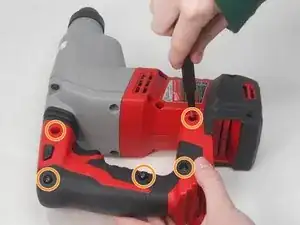
    • Remove five 20.3 mm screws on the right side of the handle using a Torx T3 screwdriver.

  4. 5yasRnqJFKkvnILx
    5yasRnqJFKkvnILx
    XSDEVHXf64pauMZj
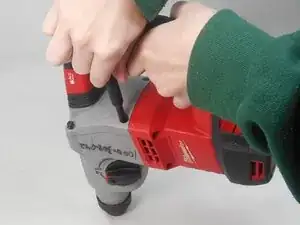
    • Remove four matte 24 mm screws on the crankcase at the rear cover of the drill (connecting the chuck to the handle) using a Torx T3 screwdriver.

  5. WrUTN4Te1MthQnaO
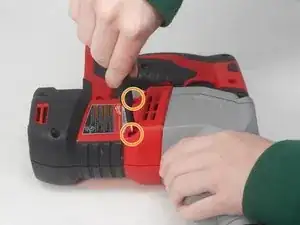
    • Remove two 24 mm screws on the housing cover beneath the ventilation slots. These screws point into the drill.

  6. bEPpPB55Fo3mse1s
    bEPpPB55Fo3mse1s
    EIDgoXB1S3QQyXAe
    • Using a Torx T5 screwdriver bit, remove two 26.8 mm screws on each side of the drill housing cover, located beneath the ventilation slots. These screws point upwards.

  7. BtEHrsARYKQw3hOm
    • Gently pry apart the covers for the drill handle.

  8. kB3JYc2WkVW6Iyia
    • Push down the locking sleeve at the head of the drill.

  9. SUYyT4x1rEgLbkbE
    SUYyT4x1rEgLbkbE
    ocZFvJBUAUbpfJu3
    • With the sleeve pushed down, pry off the dust cap.

  10. BBPL5EXMhMrnLZPw
    • Remove the locking sleeve.

  11. UtMn34vrjGuRRkZf
    UtMn34vrjGuRRkZf
    NHySoTdjaaRaDeFo
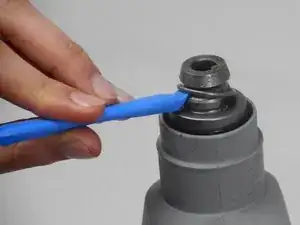
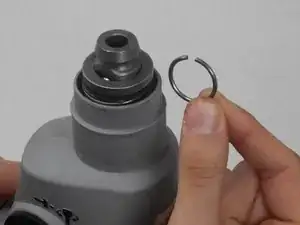
    • Using the iFixit Opening Tool, pry the C-ring off the drill.

  12. WSjGjMyt26df2ZqC
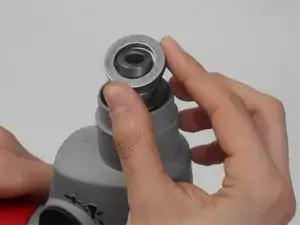
    • Remove the ball retaining washer.

  13. 45MoOhN4TyUTWWBG
    45MoOhN4TyUTWWBG
    sbyF3LSdZMCTjfKk
    • Turn the drill so that it points downwards. Push in the ball support plate so that the 7 mm ball falls out.

    • The ball may fall out unexpectedly. Make sure you are attentive and have a clean workspace.

  14. vtyXENTnYTdM1WeK
    • Remove the ball support plate.

  15. LAsUvVDyLqjV3Z6R
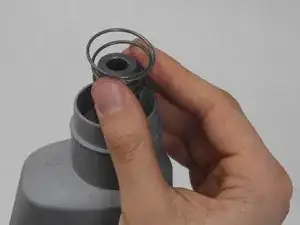
    • Remove the conical spring.

  16. bTdhYQYjq1jcVlwG
    • Remove the drill from the side handle case assembly.

  17. brRMcNlO21aegGTx
    • With the screws removed, gently pry the grey gear housing cover from the rear of the drill.

  18. 1sxGjGisCYsPLAJV
    1sxGjGisCYsPLAJV
    iOQcHWISscbnLJma
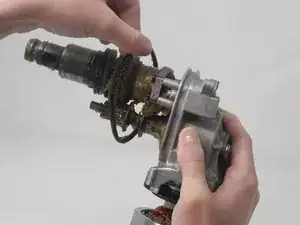
    • Remove the drill from the grey gear housing.

    • Remove the damaged gasket from the crankcase.

Conclusion

To reassemble your device, follow these instructions in reverse order.

Sophie Nieder

Member since: 14/02/24

796 Reputation

0 comments