
Introduction
This is a fairly straight forward repair. Soldering skills are required.
Still possible even if you've only soldered twice in your life and are afraid you'll make a mess of it. You know who you are ;)
-
-
Lift the back cover off the controller.
-
Remove the cable from its holders to facilitate PCB removal.
-
-
-
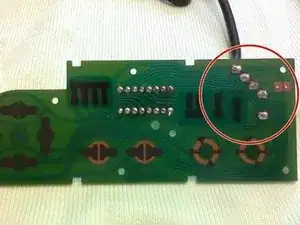
Lift the PCB straight up and out of the controller. Turn the board over to access the solder joints for the cable.
-
Desolder the 5 connections and solder in your new cable.
-


To reassemble your device, follow these instructions in reverse order.

One comment
My replacement plugs have different colors. Colors are yellow, white, red, black, and green. I’m also doing a max controller not regular nes controller. The max has yellow, red, white, red, and orange color schemes. Any advice. I wired up same colors and guessed for rest. figured black could replace one of the reds, and used green to replace orange, but console just resets over and over with that controller plugged in.