Introduction

The Nintendo WaveBird Wireless Controller uses radio frequency (RF) technology to connect to the Nintendo GameCube Console wirelessly.

Should your WaveBird Controller C-stick (the yellow “joystick” located on the righthand side of the controller with the letter C on top of the button) need replacement or repair from wear and tear or malfunction, this guide will show you the steps necessary for removing and reassembling a C-stick.

This repair will be helpful if the C-Stick isn't working properly.

Comfortability with the handling of a controller motherboard and skilled use of tweezers and a Tri-point Y1 screwdriver are necessary skills required.

There is potential for device damage to the motherboard and daughterboard of the controller during this repair, and this guide further explains the careful steps necessary to prevent damage below.

  1. gIc3eroIeGlIjSQ2
    gIc3eroIeGlIjSQ2
    kB3lriVOXO6M2WJ5
    • Pull down on the battery cover release lever and pull back to remove the cover.

  2. ihC1vNSuSNCMJlKO
    • Remove both batteries from the device.

  3. BQJIvRpASkXSABSU
    BQJIvRpASkXSABSU
    1KiSGhUGXcCNBbT4
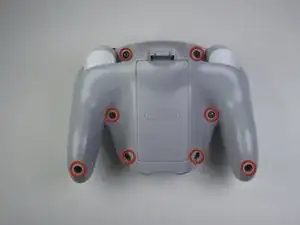
    • Remove the eight 9 mm screws from the back panel using the Tri-point Y1 screwdriver.

    • During reassembly, firmly hold the panels of the controller together while replacing the screws so the panels do not separate.

  4. ivsa5goaQNZepGLO
    ivsa5goaQNZepGLO
    RHjvYmMuCMeWQGnh
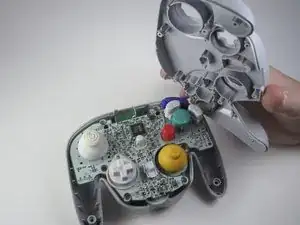
    • Carefully turn over the controller and place it on a flat surface.

    • Slowly separate the top panel from the bottom panel.

    • The buttons are loose and may fall off the motherboard.

    • Once separated, set aside the top panel.

    • During reassembly, make sure the front panel lines up with the buttons so they slide back into place.

  5. UGNXFfptbAxhMZgc
    UGNXFfptbAxhMZgc
    5tGonOCHcVQ1Cnc6
    EVZh3kaOrPmCQYVV
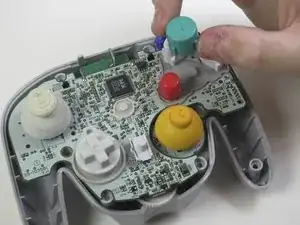
    • Use tweezers to remove the buttons.

    • It may be easier to remove the A button off of the pad by lifting it with your fingers.

    • During reassembly, make sure all buttons are in their respective sockets so they match up with the front panel.

  6. qFUeJvOFNqGsPoUu
    qFUeJvOFNqGsPoUu
    ChHHHCmAPMDemTV3
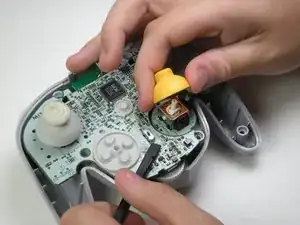
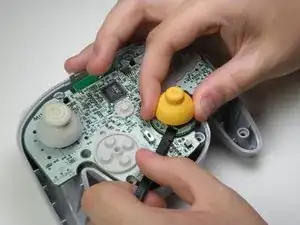
    • Potential for device damage: Rough handling of the C-stick could cause the daughterboard to break off of the motherboard.

    • Grab the base of the yellow C-Stick cover with one hand and gently hold down the bottom piece of the motherboard with the spudger.

    • Pull off the yellow C-Stick cover.

    • During reassembly, make sure the slots inside the C-Stick cover line up with the motherboard so it can fit back together.

Conclusion

To reassemble your device, follow these instructions in reverse order.
Garrett Leung

Member since: 17/04/13

955 Reputation

0 comments