Introduction

By following these steps you can successfully repair your device.

  1. Glq61Mvj3DZa2ZPa
    • Gently pull off plastic device cover where it connects to the rest of the Palm IIIc.

    • Keep track of the device cover.

  2. KHEmEaKAY35q5iJ1
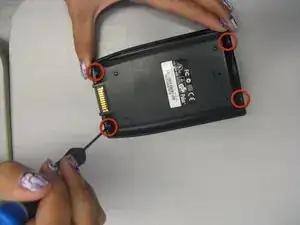
    • Using a Phillips head screw driver, take out the four screws on the back of the device. You may have to pull them out with your hands once they are unscrewed.

    • Keep track of your four screws. Don't lose them.

  3. T4TqGDfUFEcNhLhK
    • A small sensor cover will fall out when the front and back covers are removed. Keep track of it.

    • Using a spudger, carefully pry open the front and back covers along the side seam.

  4. GUcLReHXFQSbXwfS
    • Unhook the battery cable from the motherboard and remove the battery.

  5. rhJXeToHmCP3Bces
    rhJXeToHmCP3Bces
    losZZQ6qrpHXZXVw
    • Use tweezers to pull up the ZIF connector (the brown plastic tab) on the back of the motherboard and disconnect the tail, which looks like a ribbon.

    • Once the ZIF connector is unattached, remove the clear screen cover using a spudger. Some force may be necessary.

  6. I1WQaa5lqDJAfUFa
    • Using tweezers unhook the blue and red screen cables where they connect to the motherboard.

  7. XbFfTjFfbKQVEoaw
    XbFfTjFfbKQVEoaw
    fsl3K4vXiJmcGS5D
    • Using tweezers, lift up the other two ZIF connector tabs to disconnect the tails.

  8. Y6q6KCcZAZxuZ25g
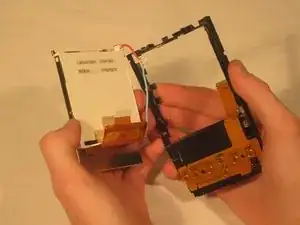
    • Gently pull the black clips on the inside case to detach the motherboard from the device. Pull the motherboard out towards the bottom left corner.

  9. qXuwvXGuYjfttVBj
    • Pull the screen out from the front.

  10. EHudg6PUqx2WJB5v
    EHudg6PUqx2WJB5v
    eaN6axGYeTyNKtPi
    • Place the new screen in from the front.

    • Insert the motherboard back into the casing so it fits back under the black snaps. The ZIF connector tabs should realign with their respective tails at the bottom.

  11. WcYtdtak6TNC5Ife
    WcYtdtak6TNC5Ife
    SYcJnTEomBH2JBTC
    xpFMH31LUNwShtHB
    • Place the plastic screen cover back on the front of the device and reconnect the three ZIF connector tails.

  12. D3P4GKxfxwxXvTeE
    • Put the battery back in place.

    • Reconnect the battery and screen cables to the motherboard.

  13. yQEQvf6gp5WXdlJS
    • Snap the front and back covers back over the device.

    • Make sure you reinsert the sensor cover at the top if it fell out.

  14. l1D2kNDvvmAQSyLR
    • Screw in the four screws, the long ones at the top and the short ones at the bottom of the device.

  15. UknW6R2Exi5aySBe
    • Reattach the device cover at the hinge points.

Conclusion

To reassemble your device, follow these instructions in reverse order.

Zach

Member since: 13/10/11

101 Reputation

0 comments