Introduction

Everyone has broken their favorite mug before. In this tutorial you will learn an easy way to salvage your favorite mug after the handle has been shattered. After completing all steps your mug will be able to be used again. However, the handle is no longer dishwasher or microwave safe.

  1. TK5tvfNmLRKeGf6i
    • Wash your mug clean and rinse the broken edges. Handle carefully to prevent further damage.

    • Make sure you don't cut yourself on any sharp edges.

  2. 3HtPrEOJXO51Rp1H
    3HtPrEOJXO51Rp1H
    5YHKMXbLjbeWVFO6
    cqAsk2xBF2JfJSdq
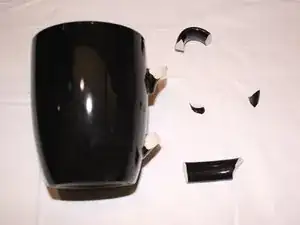
    • Collect the pieces of the handle and place them on a few paper towels.

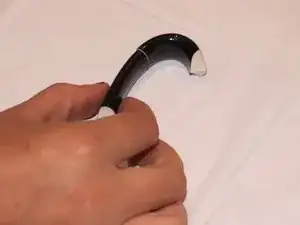
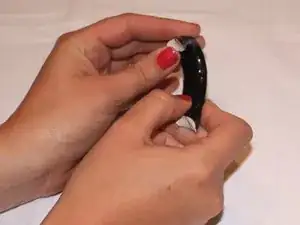
    • Piece them back together and make sure all of the parts are there.

    what exactly do you mean by "place them back together"?

    Daniel Riedeman -

  3. Y5doFWJk1lGDH5ab
    Y5doFWJk1lGDH5ab
    QoSesycC4nkfoQoA
    • Take two of the broken pieces that fit together and glue them.

    • Cover the piece in a thin layer of glue (about one drop) and try to avoid getting glue on your hands, keep paper towels close by incase you do.

  4. Ql1EGlQsGJtXDcHU
    Ql1EGlQsGJtXDcHU
    sbNQMUEQRZeSGHcO
    kXyCb3FLyKZtZIb3
    • Continue glueing other pieces of the handle in place until all pieces are together.

    • Once the handle is glued together, wait for the glue to dry before moving on. It will take about 30 minutes to dry.

    • Be very delicate with the piece while it is drying. Before the glue sets the handle will be very fragile.

    on average how long do you think the drying will take

    also your note in comment four is the same as your step five

    Justin Salonia -

  5. oCuXJFqWCMURjE5B
    oCuXJFqWCMURjE5B
    vDAN5R5xiDuBBQCI
    • After the handle has dried, test that the glued pieces are sturdy.

    • Do not purposely break it apart, but make sure that the pieces are secure.

    • If the handle happens to break anywhere, repeat step 4.

  6. xX5mIUFkKim2dW2R
    xX5mIUFkKim2dW2R
    QHkhhVarYwkeVfIC
    wuRXGJxLWRvoMCb5
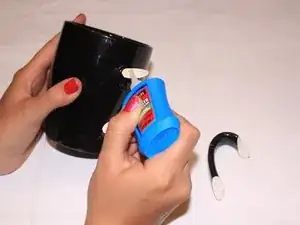
    • Once the handle is dried and secure. Begin placing glue on the cup where the handle should attach.

    • After gluing both places, gently press handle ends into place.

    • The handle should fit in almost perfectly when alined.

  7. NHhELWn6qJiivFWQ
    NHhELWn6qJiivFWQ
    rn1Z4XLZQ2y1weVv
    qgRDk1RcIr1XPKCk
    • Now let the glue dry, and your mug is usable again.

    • Remember it will take about 30 minutes to dry.

    • I would not advise washing this mug in the dishwasher anymore because this makes it more likely to break again.

Conclusion

After completing all steps your mug will now be able to be used again. Remember that the handle is no longer dishwasher or microwave safe.

Kathryn Webb

Member since: 09/04/15

254 Reputation

6 comments

Do introduction

Daniel Riedeman -

In Step 2, we would advise against handling any of the smallest shards of the mug. For safety reasons, we would just stick to adhering the larger, less sharp pieces of the broken handle.

Do you recommend any specific type of glue? Some glues (such as Gorilla glue) need to be applied in a very small amount, due to expansion. Make sure you give instructions as to how much glue to apply (apply a pea-sized amount, apply enough so that it covers the whole piece, etc.) Does the mug need to be damp before applying glue?

Approximately how long did it take for the glue to dry? Results may vary from person to person, but it's a good idea to give an estimated time frame. "After completing all steps your mug will now be able to be used again. Remember that the handle is no longer dishwasher or microwave safe," should be placed either in the intro or as a special bullet in your guide. The audience should know this before they begin the repair.

Kathryn Webb -

Be sure to have all team members proofread the text for spelling, grammar, and punctuation. We have noticed the misspelling of "break" throughout your guide.

Kathryn Webb -

Thank God we always have the spelling and grammar police on the internet and I bet she is a Democrat.

Wolfman -

Disappointed by the instructions… everyone can guess how to put the pieces together so the right ones are next to each other. But…

you should start with: “it is no longer dishwasher/microwave safe”.

Why? Is it a glue? or just an assumption?

What kind of glue did you use? Does it say the glue will not be safe in the dishwasher?

findbostonhome -

I would advise against using cyanoacrylate (CA or Superglue) for this kind of repair. CA glue tends to be very thin and wicks into the porous surface of the raw ceramic. While CA glue has good strength under tension (pulling the pieces apart) because of its thin film, it's off-axis or shear strength is pretty low. It's liable to simply break again when you left a full mug. CA glue also doesn't resist heat very well. It's good for lots of things, but this isn't one of them.

If you want a better glue for this application, I'd buy a small tube of 5 minute epoxy. Mix it according to directions, apply to the broken areas, fit them tightly and hold that pressure with tape or rubber bands. Wipe off any excess while it's still wet, or else you'll need to chip it off later. Epoxies set the strongest when clamped. Epoxies are also impervious to moisture and far more heat tolerant. You can usually unclamp (take off tape or rubber bands) after 5 minutes, but let it cure for 24 hours before use.

Mike McKeen -