
Introduction
The purpose of this guide is to instruct users on how to effectively repair a broken wire, as they commonly become damaged. Those who need to continue using wire, which has accidentally been cut, will find this guide useful.
Before moving to instructions, please read message below:
To efficiently complete the following guide, it is crucial one knows how to strip wires. The following link can be used as a guide for wire stripping before continuing.
Stripping Wire: Wire Stripping
-
-
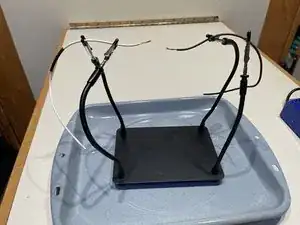
First, place a non-flammable object (soldering mat, metal plate, etc) on your workstation. Then, place the helping hand clamps over the object and attach a stripped wire to each of the clamps that are facing each other.
-
-
-
Slip the heat shrink to one of the wires, making sure to move the heat shrink away from the soldering point as to avoid any burning.
-
-
-
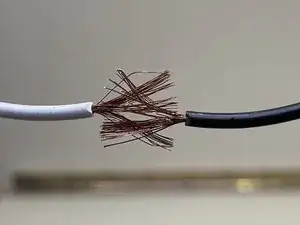
Unravel all of the wire strands for both the wires, intermesh them, and then twist the strands together.
-
-
-
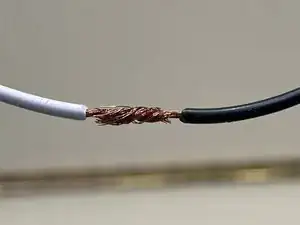
In careful increments, add a millimeter of new solder wire from the top of the existing wires until the entire wire reaches a shiny silver color.
-
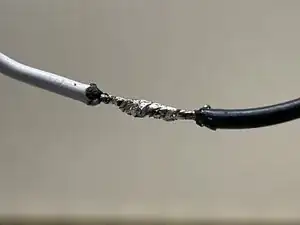
Next, turn off the soldering gun and allow the solder to cool down and solidify (approximately five minutes).
-
-
-
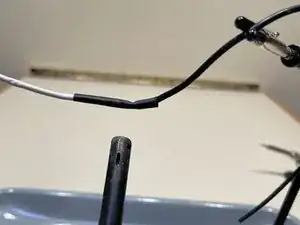
Move the heat shrink to the solder area; completely cover the area. Using a heat source (i.e.,grill lighter), begin heating the middle of the solder area and slowly move towards the end of the soldier to the insulation.
-
The heat shrink acts as insulation for the wire.
-


You have successfully soldered two wires together
