Introduction

If there is no image coming from the parents monitor this could mean that both the screen and circuit board need to be replaced. In order to replace the screen, you need a Phillips #00 Screwdriver. In order to remove the circuit board, you will need a cord solder. This does not include any difficult steps, as long as you are gently removing the circuit board and screen.

  1. UZjjftwAtQJQfoDc
    UZjjftwAtQJQfoDc
    kMVgGOKbFxrdYDr6
    • Turn the monitor on its back, and remove the two 8 mm Phillips #0 case screws.

  2. 5eGVBwauuGiLw6JX
    5eGVBwauuGiLw6JX
    MVdSBLDoeDhIiQRH
    J2b25UanO51Fo2Vx
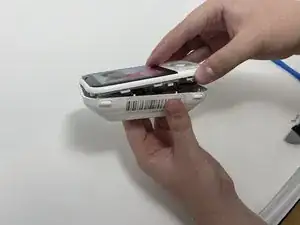
    • Use the iFixit Jimmy tool to begin removing the face of the monitor.

    • You may need to use an opening pick to hold the screen open as you move the Jimmy tool around all the edges of the device.

    • Once the screen has been separated, lift it from the case.

    • Be gentle while removing the screen. There are wires connected to the two pieces that may be damaged.

  3. nTKIVscntILLnkvB
    nTKIVscntILLnkvB
    HBSMJXaE2jowLQcN
    • Remove the four 8 mm Phillips #00 screws from the bracket that secures the battery.

    • Remove the bracket.

  4. pHkWCCXqqZmEeQGY
    pHkWCCXqqZmEeQGY
    vyDInWMSGWVwwH62
    PRsgCBHdRylQOFBa
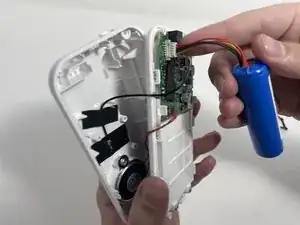
    • Gently remove the battery from its location.

    • Carefully disconnect the bundled cable connector from the circuit board.

    Wo finde ich denn genau solch eine Batterie ?

    Besten Gruß

    René

    kroenung1990@googlemail.com

    René Krönung -

  5. v5TwWubkKVndqTX2
    v5TwWubkKVndqTX2
    aDkgpYjciWchCdlL
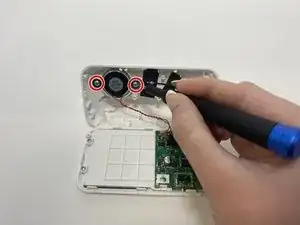
    • Remove the two 7 mm Phillips #00 screws from the speaker.

    • Carefully remove the speaker and its cords from the motherboard.

    • Handle gently to not break the motherboard or any other parts.

  6. 2iCA1JiLZ455eOWI
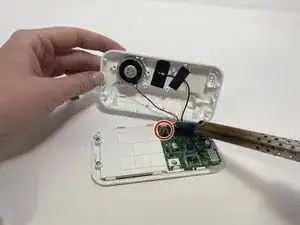
    • Desolder the wire connecting the speaker to the board.

  7. nLGEGSe3tL2Gy4rS
    nLGEGSe3tL2Gy4rS
    JRBB3XSdUgRYPNkq
    • Remove the three 8 mm Phillips #00 screws.

    • Gently remove the screen and circuit board from the case.

  8. NHtUgkTbUeetCsp2
    NHtUgkTbUeetCsp2
    AlO1HPMAGWCBeqoC
    • Remove the button assembly from the front of the screen unit.

    • Flip the screen unit back over and desolder the wire holding it to the case.

Conclusion

To reassemble your device, follow these instructions in reverse order.

Christina Block

Member since: 10/02/23

375 Reputation

One comment

Any source for replacement screens?

Rob Olivieri -