Introduction
Teardown of the Rippa RA903B Six Axis PS4 Controller.
-
-
There 6 total screws holding the outside shell of the controller together 4 of which are visible.
-
Remove the 4 visible screws as highlighted in the images. 2 on the rear and 1 on the bottom of each grip, totaling 2 screws from the left and right grip.
-
-
-
The left and right grips come off similar to the Nintendo Switch Pro controller, the direction you should pull is shown with the white arrow.
-
Note: Keep your screws mostly organised. The longer screws shown in red are for the grips and the blue for the rest of the controller.
-
-
-
After removing the grips, the 2 hidden screws should be visible as shown in image. After these are removed the controller is ready to be opened.
-
-
-
Insert a pry tool as shown in image next to the charging port to open the controller.
-
After it is opened you will work the tool around the controller until it is mostly open
-
-
-
After prying the controller, you will feel some resistance at the bottom of the controller as there are two clips either side of the headphone jack.
-
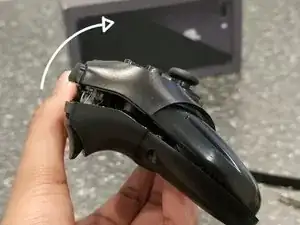
In order not to break the clips open the controller like a book in a motion portrayed by the arrow in the image. This is in an effort not to break the aforementioned clips
-
-
-
After we're in you'll be greeted by soldered in vibration motors, mainboard and a battery.
-
Detach the touch pad by flipping open the grey locking bale/tab on the FPC connector to disconnect the touchpad flex cable as shown in the image.
-
It is not necessary to disconnect the battery because we like living on the edge but if you do feel a need to do so this can be done by pulling the wires of the battery as closeto the battery connector and as straight as possible out of the mainboard.
-
-
-
To remove the mainboard and midframe in order to access the face buttons etc. We will have to remove two screws that the battery sits on top of.
-
Proceed to pull battery off to expose the 2 screws being mindful of the battery if it is still connected to the mainboard.
-
-
-
This concludes our teardown.
-
Note: Be careful not to lose things like the trigger springs, shoulder buttons and face buttons as they like to fall out.
-