166

I have a set of data that I am plotting in a scatter. When I mouseover one of the circles I would like it to popup with data (like x, y values, maybe more). Here is what I tried using:

vis.selectAll("circle")
   .data(datafiltered).enter().append("svg:circle")
   .attr("cx", function(d) { return x(d.x);})
   .attr("cy", function(d) {return y(d.y)})
   .attr("fill", "red").attr("r", 15)
   .on("mouseover", function() {
        d3.select(this).enter().append("text")
            .text(function(d) {return d.x;})
            .attr("x", function(d) {return x(d.x);})
            .attr("y", function (d) {return y(d.y);}); });

I suspect I need to be more informative about what data to enter?

ScottieB
  • 3,958
  • 6
  • 42
  • 60
  • 1
    I've also tried: vis.selectAll("circle").each(function (d) { vis.append("svg:text").attr("x", d.x).attr("y", d.y) .text(function (d) { return d.x; }); }); to no avail alas. – ScottieB May 29 '12 at 19:22
  • 2
    http://bl.ocks.org/Caged/6476579 – ehsan Feb 21 '14 at 07:40

6 Answers6

190

I assume that what you want is a tooltip. The easiest way to do this is to append an svg:title element to each circle, as the browser will take care of showing the tooltip and you don't need the mousehandler. The code would be something like

vis.selectAll("circle")
   .data(datafiltered).enter().append("svg:circle")
   ...
   .append("svg:title")
   .text(function(d) { return d.x; });

If you want fancier tooltips, you could use tipsy for example. See here for an example.

Lars Kotthoff
  • 107,425
  • 16
  • 204
  • 204
  • 3
    I like tipsy. My only issue now is that it points to the upper left corner of the circle, rather than the edge as in that demo. I'm not finding any obvious reason why. http://jsfiddle.net/scottieb/JwaaV/ (tipsy at very bottom) – ScottieB May 29 '12 at 21:08
  • That jsfiddle doesn't seem to have any tooltips? – Lars Kotthoff May 29 '12 at 21:13
  • You could try adding the tooltip to an `svg:g` that you overlay with the actual circle, but give zero width and height. Currently it's taking the bounding box and putting the tooltip at the edge. Playing around with tipsy's options might help as well. – Lars Kotthoff May 30 '12 at 07:50
  • So that works for my jsfiddle, but I cannot for the life of me even get the tooltip working on d3 in asp.net (no problem working off a button though). http://stackoverflow.com/q/10817622/1052985 – ScottieB May 30 '12 at 13:47
  • 1
    It does not seem to work anymore. Also I found an example using svg:title which fails: http://bl.ocks.org/ilyabo/1339996 – nos May 11 '16 at 05:09
  • 1
    @nos Works for me. – Lars Kotthoff May 11 '16 at 17:15
  • This way of getting a tooltip doesn't use D3, so it's the same in version 4. – Lars Kotthoff Mar 31 '17 at 04:43
148

A really good way to make a tooltip is described here: Simple D3 tooltip example

You have to append a div

var tooltip = d3.select("body")
    .append("div")
    .style("position", "absolute")
    .style("z-index", "10")
    .style("visibility", "hidden")
    .text("a simple tooltip");

Then you can just toggle it using

.on("mouseover", function(){return tooltip.style("visibility", "visible");})
.on("mousemove", function(){return tooltip.style("top",
    (d3.event.pageY-10)+"px").style("left",(d3.event.pageX+10)+"px");})
.on("mouseout", function(){return tooltip.style("visibility", "hidden");});

d3.event.pageX / d3.event.pageY is the current mouse coordinate.

If you want to change the text you can use tooltip.text("my tooltip text");

Working Example

<script src="https://d3js.org/d3.v7.min.js"></script>
<body>
<div class="example_div"></div>
</body>
<script type="text/javascript">
  var tooltip = d3.select("body")
    .append("div")
    .style("position", "absolute")
    .style("z-index", "10")
    .style("visibility", "hidden")
    .text("a simple tooltip");

  var sampleSVG = d3.select(".example_div")
    .append("svg:svg")
    .attr("class", "sample")
    .attr("width", 300)
    .attr("height", 300);

  d3.select(".example_div svg")
    .append("svg:circle")
    .attr("stroke", "black")
    .attr("fill", "aliceblue")
    .attr("r", 50)
    .attr("cx", 52)
    .attr("cy", 52)
    .on("mouseover", function(){return tooltip.style("visibility", "visible");})
    .on("mousemove", function(){return tooltip.style("top", (event.pageY-10)+"px").style("left",(event.pageX+10)+"px");})
    .on("mouseout", function(){return tooltip.style("visibility", "hidden");});
</script>
Carson
  • 6,105
  • 2
  • 37
  • 45
Pwdr
  • 3,712
  • 4
  • 28
  • 38
40

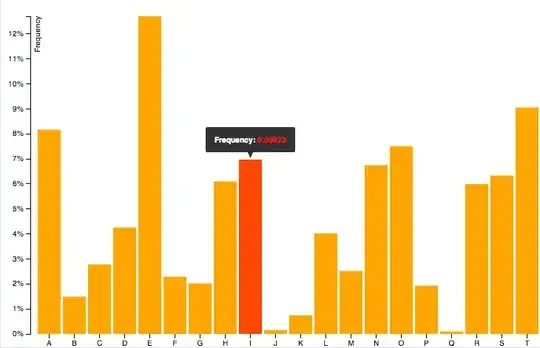
There is an awesome library for doing that that I recently discovered. It's simple to use and the result is quite neat: d3-tip.

You can see an example here:

enter image description here

Basically, all you have to do is to download(index.js), include the script:

<script src="index.js"></script>

and then follow the instructions from here (same link as example)

But for your code, it would be something like:

define the method:

var tip = d3.tip()
  .attr('class', 'd3-tip')
  .offset([-10, 0])
  .html(function(d) {
    return "<strong>Frequency:</strong> <span style='color:red'>" + d.frequency + "</span>";
  })

create your svg (as you already do)

var svg = ...

call the method:

svg.call(tip);

add tip to your object:

vis.selectAll("circle")
   .data(datafiltered).enter().append("svg:circle")
...
   .on('mouseover', tip.show)
   .on('mouseout', tip.hide)

Don't forget to add the CSS:

<style>
.d3-tip {
  line-height: 1;
  font-weight: bold;
  padding: 12px;
  background: rgba(0, 0, 0, 0.8);
  color: #fff;
  border-radius: 2px;
}

/* Creates a small triangle extender for the tooltip */
.d3-tip:after {
  box-sizing: border-box;
  display: inline;
  font-size: 10px;
  width: 100%;
  line-height: 1;
  color: rgba(0, 0, 0, 0.8);
  content: "\25BC";
  position: absolute;
  text-align: center;
}

/* Style northward tooltips differently */
.d3-tip.n:after {
  margin: -1px 0 0 0;
  top: 100%;
  left: 0;
}
</style>
DanielX2010
  • 1,897
  • 1
  • 24
  • 26
  • 2
    The latest [d3-tip](https://github.com/Caged/d3-tip) supports d3v4 just fine. It's not obvious if you google around, but it is working great for me with d3v4. – moodboom Apr 06 '17 at 03:04
  • unfortunately, the .attr() function no longer working in D3 v5. – Jerry Chong Sep 25 '20 at 06:41
8

This concise example demonstrates common way how to create custom tooltip in d3.

var w = 500;
var h = 150;

var dataset = [5, 10, 15, 20, 25];

// firstly we create div element that we can use as
// tooltip container, it have absolute position and
// visibility: hidden by default

var tooltip = d3.select("body")
  .append("div")
  .attr('class', 'tooltip');

var svg = d3.select("body")
  .append("svg")
  .attr("width", w)
  .attr("height", h);

// here we add some circles on the page

var circles = svg.selectAll("circle")
  .data(dataset)
  .enter()
  .append("circle");

circles.attr("cx", function(d, i) {
    return (i * 50) + 25;
  })
  .attr("cy", h / 2)
  .attr("r", function(d) {
    return d;
  })
  
  // we define "mouseover" handler, here we change tooltip
  // visibility to "visible" and add appropriate test
  
  .on("mouseover", function(d) {
    return tooltip.style("visibility", "visible").text('radius = ' + d);
  })
  
  // we move tooltip during of "mousemove"
  
  .on("mousemove", function() {
    return tooltip.style("top", (event.pageY - 30) + "px")
      .style("left", event.pageX + "px");
  })
  
  // we hide our tooltip on "mouseout"
  
  .on("mouseout", function() {
    return tooltip.style("visibility", "hidden");
  });
.tooltip {
    position: absolute;
    z-index: 10;
    visibility: hidden;
    background-color: lightblue;
    text-align: center;
    padding: 4px;
    border-radius: 4px;
    font-weight: bold;
    color: orange;
}
<script src="https://cdnjs.cloudflare.com/ajax/libs/d3/4.11.0/d3.min.js"></script>
Mikhail Shabrikov
  • 8,453
  • 1
  • 28
  • 35
  • If anyone needs the tool-tip to move relative to the position of the object. Like in case of a tree graph. You might want to use `return tooltip.style("top", (d.x + 40) + "px") .style("left", (d.y + 80) + "px");` in the `'mousemove'` attribute. The `d.x` will help move the tool-tip relative to the object, not the entire page – Chandra Kanth Oct 29 '19 at 15:26
6

You can pass in the data to be used in the mouseover like this- the mouseover event uses a function with your previously entered data as an argument (and the index as a second argument) so you don't need to use enter() a second time.

vis.selectAll("circle")
.data(datafiltered).enter().append("svg:circle")
.attr("cx", function(d) { return x(d.x);})
.attr("cy", function(d) {return y(d.y)})
.attr("fill", "red").attr("r", 15)
.on("mouseover", function(d,i) {
    d3.select(this).append("text")
        .text( d.x)
        .attr("x", x(d.x))
        .attr("y", y(d.y)); 
});
danimal
  • 1,567
  • 13
  • 16
0

You can think about what you want before you do it yourself, I'll provide 4 examples here.

Essentially demos 1, 2, 4 are pretty much in the same spirit, demo3 is using the title approach.


demo 1, 2, 4: add text (or foreignobject) tags to each item

  • demo1: pure javascript writing.

  • demo2: same as demo1, use d3.js instead

  • demo4: the example applied to the Histogram, and show why I use so much text instead of just using one.

    Note:

demo3: this is very convenient, if the requirements are not high, this is probably the best way. (It's the same as the Lars Kotthoff answered.)

Examples

<script src="https://d3js.org/d3.v7.min.js"></script>
<style>
  text.tooltip {
    display: none;
  }

  circle:hover + text.tooltip {
    display: initial;
  }

  circle:hover + foreignobject {
    display: initial;
    color: #ffff00;
    background-color: #015db7;
  }

  /* ↓ used for demo4Histogram only */
  rect:hover + foreignobject {
    display: initial;
  }

  rect:hover {
    fill: red;
  }
</style>
<body></body>
<script>
  const w = 500
  const h = 150
  const dataset = [5, 10, 15, 20, 25]

  function demo1PureJS() {
    const svgFrag = document.createRange().createContextualFragment(`
<header>PureJS</header>
<svg width="400" height="150"><g></g></svg><br>
`)
    const gElem = svgFrag.querySelector(`g`)
    for (const idx in dataset) {
      const r = dataset[idx]
      const [cx, cy] = [idx * 50 + 25, h / 2];

      gElem.insertAdjacentHTML("beforeend", `
<circle cx="${cx}" cy="${cy}" r="${r}" data-tooltip="(${cx}, ${cy})"></circle>
<text class="tooltip" x="${cx}" y="${cy}" fill="red">${r}</text>
`)
      document.body.append(svgFrag)

    }
  }

  function demo2D3js() {
    const svg = d3.select("body")
      .append("svg")
      .attr("width", w)
      .attr("height", h)

    svg.node().insertAdjacentHTML("beforebegin", "<header>demo2D3js</header>")

    svg.selectAll("circle")
      .data(dataset)
      .enter()
      .append("circle")
      .attr("cx", (d, i) => i * 50 + 25)
      .attr("cy", h / 2)
      .attr("r", d => d)
      .text((d, idx, arr) => {
        const circle = arr[idx]
        const x = circle.getAttribute("cx")
        const y = circle.getAttribute("cy")

        const testCase = "foreignobject"
        if (testCase === "foreignobject") { //  focus here
          circle.insertAdjacentHTML("afterend", `
     <foreignobject x="${x}" y="${y}" width="${d.toString().length * 12}" height="26" display="none">
        <div>${d}</div>
     </foreignobject>
    `)

        } else {
          circle.insertAdjacentHTML("afterend", `<text class="tooltip" x="${x}" y="${y}" fill="yellow">${d}</text>`)
        }
        return ""
      })
  }

  function demo3SVGTitle() {
    /*
    https://developer.mozilla.org/en-US/docs/Web/SVG/Element/title
    <rect x="11" y="1" width="8" height="8">
      <title>I'm a square</title>
    </rect>
     */

    const svg = d3.select("body")
      .append("svg")
      .attr("width", w)
      .attr("height", h)

    svg.node().insertAdjacentHTML("beforebegin", "<header>SVGTitle</header>")

    svg.selectAll("circle")
      .data(dataset)
      .enter()
      .append("circle")
      .attr("cx", (d, i) => i * 50 + 25)
      .attr("cy", h / 2)
      .attr("r", d => d)
      .append("svg:title") //  focus here
      .text(d => d)
  }

  async function demo4Histogram() {
    const margin = {top: 50, right: 50, bottom: 50, left: 50},
      width = 900 - margin.left - margin.right,
      height = 900 - margin.top - margin.bottom

    const svg = d3.select("body")
      .append("svg")

    svg.node().insertAdjacentHTML("beforebegin", "<header>Histogram</header>")

    const mainG = svg.attr("width", width + margin.left + margin.right)
      .attr("height", height + margin.top + margin.bottom)
      .append("g")
      .attr("transform", `translate(${margin.left}, ${margin.top})`)


    const dataSet = []
    await d3.csv("https://raw.githubusercontent.com/holtzy/data_to_viz/master/Example_dataset/1_OneNum.csv", (row) => {
      dataSet.push(row)
    })

    // X: price
    const scaleX = d3.scaleLinear()
      .domain([0, 2000])
      .range([0, width])

    mainG.append("g")
      .attr("transform", `translate(0,${height})`)
      .call(d3.axisBottom(scaleX)
      )

    const histogram = d3.histogram()
      .value(d => d.price)
      .domain(scaleX.domain())
      .thresholds(scaleX.ticks(50))

    const bins = histogram(dataSet)

    // Y: Count
    const scaleY = d3.scaleLinear()
      .domain([0, d3.max(bins, d => d.length)])
      .range([height, 0])

    mainG.append("g")
      .call(d3.axisLeft(scaleY))

    mainG.selectAll("rect")
      .data(bins)
      .enter()
      .append("rect")
      .attr("transform", d => `translate(${scaleX(d.x0)},${scaleY(d.length)})`)
      .attr("x", 1)
      .attr("width", d => d3.max([0, scaleX(d.x1) - scaleX(d.x0) - 1]))
      .attr("height", d => height - scaleY(d.length))
      .attr("fill", "#298e75")
      .attr("fill-opacity", 0.4)
      .text((d, idx, arr) => { //  focus here
        const rect = arr[idx]
        const [x, y, width] = [rect.getAttribute("x"), rect.getAttribute("y") ?? 0, rect.getAttribute("width")];
        if (width > 0) {
          const msg = `${d.x0}~${d.x1}: ${d.length}`
          rect.insertAdjacentHTML("afterend", `
     <foreignobject x="${x}" y="${y}" width="${msg.length * 13}" height=26 display="none" class="tooltip"
     transform="translate(${scaleX(d.x0)},${scaleY(d.length)})">
        <div>${msg}</div>
     </foreignobject>
    `)
        }
        return ""
      })

    /**
     You can certainly consider creating just one element and moving it around to achieve the display effect. [see https://stackoverflow.com/a/47002479/9935654]
     On my side, I made a corresponding element individually, which seems to generate a lot of duplicate items, but it can be done as follows:
     If you are interested in a specific marker, you can click on it, and it will display the message forever(cancel again to hidden)
     * */
    document.querySelectorAll(`foreignObject.tooltip`).forEach(div => { //  focus here
      div.addEventListener("click", () => {
        div.setAttribute("display", div.getAttribute("display") === "none" ? "" : "none")
      })
    })
  }

  demo1PureJS()
  demo2D3js()
  demo3SVGTitle()
  demo4Histogram()

</script>
demo4: Because each element has a label, it is possible to display multiple labels at the same time, something that cannot be done with just one element.

demo4Histogram


d3.js version: v7

Carson
  • 6,105
  • 2
  • 37
  • 45