Introduction

This repair guide was authored by the iFixit staff and hasn’t been endorsed by Google. Learn more about our repair guides here.

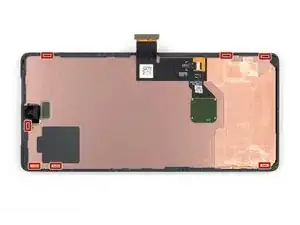
Use this guide to replace the screen for your Google Pixel 7.

For your safety, discharge the battery below 25% before disassembling your phone. This reduces the risk of fire if the battery is accidentally damaged during the repair. If your battery is swollen, take appropriate precautions.

Caution: The Pixel 7 contains class 1 lasers. Disassembly could result in exposure to invisible infrared laser emissions.

Your new replacement screen should come with the fingerprint reader already attached. If not, you will need to reinstall the original fingerprint reader to your new replacement screen and recalibrate the reader to maintain its functionality.

Retaining water resistance after the repair will depend on how well you reapply the adhesive, but your device will lose its IP (Ingress Protection) rating.

You'll need replacement adhesive in order to complete this repair.

  1. RH1hNR5DYvEMTNGX
    RH1hNR5DYvEMTNGX
    kUNSpM2wM3aEGX23
    • Allow your battery to drain below 25% before starting this repair. A charged battery may catch fire if damaged.

    • Fully power off your phone and unplug any cables.

    i replaced my pixel 7 screen, I noticed that my proximity sensor is no longer working, I have tried to calibrate it using 3rd part apps and it ddisnt work,i tried using developer settings to switch the proximity sensor and i also updated my android version...all these didnt work

    Ian -

  2. uWsCCoGWV5JIrUns
    uWsCCoGWV5JIrUns
    qBuyTnEhoZIp4ycS
    rCPFaRmEDnGc6YSe
    • The screen of the Google Pixel 7 is held in place by plastic clips and adhesive.

    • During the removal procedure, make sure to insert your opening picks in the right position to avoid separating the screen from its safety frame instead of the phone assembly.

    • Only insert the pick up to ~3.5 mm during the removal procedure to avoid damaging the internals and to avoid interfering with the plastic clips.

    • There are several plastic clips around the whole screen. In case your opening pick gets blocked during the screen removal procedure it means you inserted your pick too deep underneath the screen.

  3. uNWQn4O2iyarfTwP
    uNWQn4O2iyarfTwP
    X4Mot1WmVF3dl5H6
    hwdBtFR1G1bs6cUM
    • The next three steps demonstrate the Anti-Clamp, a tool we designed to make the opening procedure easier. If you aren't using the Anti-Clamp, skip down three steps for an alternate method.

    • For complete instructions on how to use the Anti-Clamp, check out this guide.

    • If your screen is cracked, cover it with a layer of clear packing tape to help the suction cup adhere.

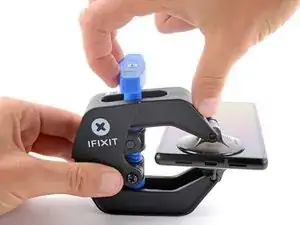
    • Pull the blue handle backwards to unlock the Anti-Clamp's arms.

    • Slide the arms over either the left or right edge of your phone.

    • Position the suction cups near the bottom edge of the phone—one on the front, and one on the back.

    • Squeeze the cups together to apply suction.

    • If you find that the surface of your phone is too slippery for the Anti-Clamp to hold onto, you can use tape to create a grippier surface.

  4. C5UOdfJGyBNrPmud
    C5UOdfJGyBNrPmud
    NT1pkIvVebv5WAbQ
    5q3uaImPG2XtyBUP
    • Pull the blue handle forward to lock the arms.

    • Turn the handle clockwise 360 degrees or until the cups start to stretch.

    • Make sure the suction cups remain aligned with each other. If they begin to slip out of alignment, loosen the suction cups slightly and realign the arms.

  5. iu5TEcPWZeWgMueB
    iu5TEcPWZeWgMueB
    iklY4LILrc5nWFlx
    mI2NZfhUYJ3QJbYH
    • Heat an iOpener and thread it through the arms of the Anti-Clamp.

    • You can also use a hair dryer or heat gun—but extreme heat can damage the display and/or internal battery, so proceed with care.

    • Fold the iOpener so it lays on the bottom edge of the phone.

    • Wait one minute to give the adhesive a chance to release and present an opening gap.

    • Insert an opening pick under the screen frame when the Anti-Clamp creates a large enough gap.

    • If the Anti-Clamp doesn't create a sufficient gap, apply more heat to the area and rotate the handle clockwise half a turn.

    • Don't crank more than a half a turn at a time, and wait one minute between turns. Let the Anti-Clamp and time do the work for you.

    • Skip the next two steps.

  6. 6cKgLNhBJSeuArNm
    • Apply a heated iOpener to the screen to loosen the adhesive underneath. Apply the iOpener for at least 3 minutes.

    • A hair dryer, heat gun, or hot plate may also be used, but be careful not to overheat the device. The edge should feel slightly too hot to the touch.

  7. CexARCSAqGYQbmha
    CexARCSAqGYQbmha
    4gF4DCWXWHNS2aGI
    gfaVVfZV1RGTbMLx
    • Once the screen is warm to the touch, apply a suction handle to the bottom edge of the screen.

    • If your display is badly cracked, covering it with a layer of clear packing tape may allow the suction cup to adhere. Alternatively, very strong tape may be used instead of the suction cup. If all else fails, you can superglue the suction cup to the broken screen.

    • Lift the screen including its safety frame with the suction handle to create a small gap between the screen and the phone assembly.

    • Depending on the age of your phone, this may be difficult. If you're having trouble, apply more heat to the bottom edge and try again.

    • Insert an opening pick into the gap.

    If you're having trouble getting the first pick in, try a different hand position than what is shown. Grip the suction cup's handle with your index finger, and keep your thumb and middle finger on either side of the screen. Choose a forgiving surface underneath in case you slip. Then hold firmly and keep it stable (no need to really push down). Just be prying it open deliberately and evenly. Then take your pick and use gentle prodding, experimenting with your angle and pressure, feel around. That should be all you need to get in.

    Orin Zebest -

  8. IBUeZvgemYHWImZc
    IBUeZvgemYHWImZc
    2SO1E2gi6C2FiaZI
    • To avoid damaging your phone, don't insert your pick more than ~2.5 mm as you separate the screen adhesive. Note the following areas:

    • The screen cable is a little less than halfway up the left edge of the phone. Be very careful here to avoid tearing the cable.

    • There are many spring contacts around the perimeter of the phone. Be very careful in these areas to avoid bending the contacts.

  9. wtdv5UrUMow2CECH
    wtdv5UrUMow2CECH
    djiNoNgaVURRqAnE
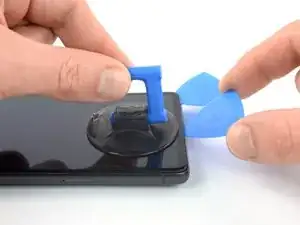
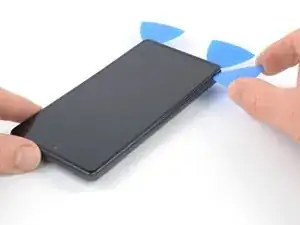
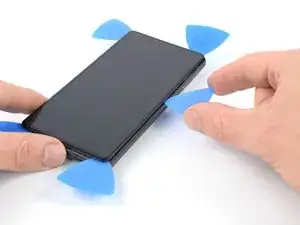
    • Slide the opening pick to the bottom right corner of the screen to slice its adhesive.

    • Leave the opening pick in place to prevent the adhesive from resealing.

  10. BvVyMHlKdFsfT4jJ
    BvVyMHlKdFsfT4jJ
    STqP6jEultQQM41x
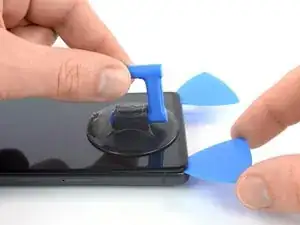
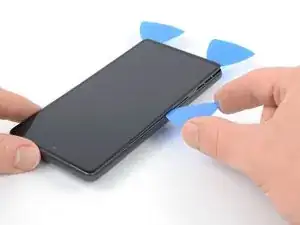
    • Insert a second opening pick at the bottom edge and slide it to the bottom left corner of the screen to slice the adhesive.

    • Leave the opening pick in place to prevent the adhesive from resealing.

  11. 3TahkFe4ry6RCiY4
    3TahkFe4ry6RCiY4
    3JU6OqcJvHWxqoST
    6ZPHWVqkfEhNxfpF
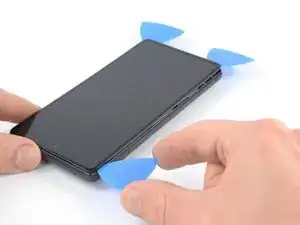
    • Insert a third opening pick underneath the bottom left corner of the screen.

    • Slide the opening pick along the left edge of the screen to slice the adhesive and to release the plastic clips.

    • Leave the opening pick in the top left corner to prevent the adhesive from resealing.

  12. RAqKHAsrl3xCRUU1
    RAqKHAsrl3xCRUU1
    snvx1NYmrDPfUDaX
    cnPPFVoxMmq3nELB
    • If the adhesive becomes hard to cut, it has most likely cooled down. Use your iOpener or heat gun for 1-2 minutes to reheat it.

    • When you slice near the front facing camera, insert only the tip of the opening pick (~2.5 mm) to avoid damaging or smearing the camera.

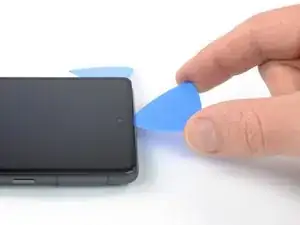
    • Insert a fourth opening pick at the top left corner of the screen.

    • Slide the opening pick along the top edge of the phone to slice the adhesive.

    • Leave the opening pick in the top right corner to prevent the adhesive from resealing.

    This is the only slice that makes me nervous. Never had a problem, but yeah... extra care because of the camera.

    Orin Zebest -

  13. PnfIw3f25Eqr1XHF
    PnfIw3f25Eqr1XHF
    KenvqZiSWYaywVKu
    TZuqyojhZfgKo23H
    • Insert a fifth opening pick and slide it along the right edge of the phone to slice the remaining adhesive and release the right plastic clips.

    • Do not try to remove the display all the way yet, the screen is still connected to the phone assembly by a flex cable.

  14. rhQqo5C35FvoYK3U
    rhQqo5C35FvoYK3U
    IrVMIJexBS6bDSeP
    jLlFZYjxMwL21C2X
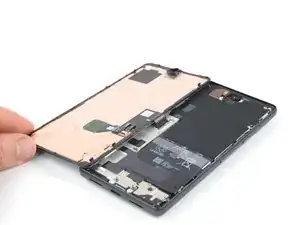
    • Lift the right edge of the screen up and towards the left side of the device, like opening a book.

    • Don't twist the screen or move it too far away from the frame to avoid straining or damaging the flex cable.

    • Rest the screen upside down and parallel to the frame before continuing.

    The adhesive still sticking to the screen might trip you up... don't let it pull the screen in weird ways. Just pick that stuff off and the screen sits perfectly next to the phone, as pictured.

    Orin Zebest -

  15. PSmtyE4SOWOdAwOu
    PSmtyE4SOWOdAwOu
    EP6lSfkEvCqupEtr
    • The display cable bracket sits tightly and requires some force to release it.

    • Insert one arm of a pair of tweezers into the opening at the upper end of the display cable bracket.

    • Push the bracket inwards and pry up to release it.

    The way this piece is wedged in there can be a difficult to imagine, so you may need to apply force at a different angle than you expect. I bent mine a few times, but just bent it back into shape with no issue.

    Orin Zebest -

    This was a pain to get out! Felt like I was going to rip the whole cable out. But it popped out eventually.

    Alex Thengvall -

  16. WKPNiJHhVHnhCorC
    WKPNiJHhVHnhCorC
    LhAcZy62xFSngm3n
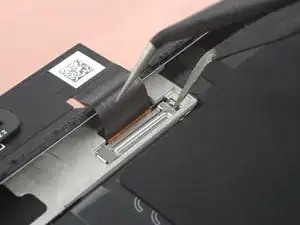
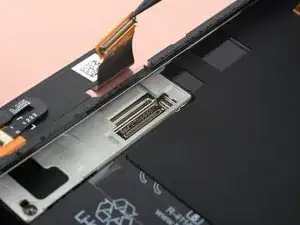
    • Use a pair of tweezers to remove the display cable bracket by pulling it from underneath the midframe and in direction of the cameras.

    I forgot to replace this the first time. It's not a dealbreaker (phone works fine without it), but if you ever open your phone again you must be super-extra careful -- nothing is securing the connection.

    Orin Zebest -

  17. jRnnMxxSKtAwg2aW
    jRnnMxxSKtAwg2aW
    HaPX5khLMl4bDRNB
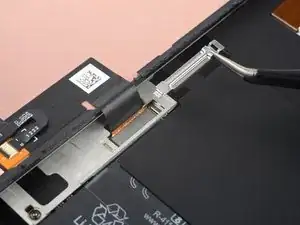
    • Use a spudger to disconnect the display flex cable by prying the connector straight up from its socket.

    • To re-attach press connectors like this one, carefully align and press down on one side until it clicks into place, then repeat on the other side. Do not press down on the middle. If the connector is misaligned, the pins can bend, causing permanent damage.

    Getting the press connector aligned properly is a very fiddly task and impossible without a light touch and several tries. My only advice is to take a break if you get frustrated. There's no 'click' or anything to help you notice that you've got it right. But when you do, it'll just... fit. And you'll probably think, "wait I did it? oh, not as hard as it sounded. just took awhile."

    Orin Zebest -

    Beware! I tried using the forceps instead of my finger and I ended up tearing into the ribbon cable. So be careful and use your finger if possible. I wouldn't use a sharp tool like I did. There are a couple Youtube videos that probably can help if you search "pixel 7 screen replacement". Sadly I didn't do that first.

    Alex Thengvall -

  18. XYNCjJjvlRE5kfxZ
    XYNCjJjvlRE5kfxZ
    q5ECwAhlHHcqfV4W
    • Remove the screen.

    • During reassembly:

    • If you replaced your screen, check the front-facing camera hole and the sensor cutout on your replacement screen, and remove any remaining liners.

    • Remember to reinstall the display cable bracket.

    • This is a good point to test your phone before sealing it up. Temporarily connect your screen, power on your phone, and make sure it works as expected. Before continuing with reassembly, power off your phone and disconnect the screen.

    • Follow this guide if you're using custom-cut adhesives for your device.

    • Follow this guide in case you're using a pre-cut adhesive card.

    • If you're installing a new screen, follow this guide to calibrate the fingerprint sensor.

    It was much easier to remove the adhesive after the phone cooled down completely.

    Lacey E -

    That's super strange. There's certainly a middle ground of not being too hot, but I've done this job 3 times now, I can really tell if it needs a little more warmth.

    Orin Zebest -

    IMO this really needs some kind of jig to align the new adhesive. It is nigh on impossible IMO to align properly, and you'll end up with bunched-up sections of stretched adhesive all over the place. It is beyond frustrating, after taking ones time and being so careful.

    It seems that it should be possible to cut the plastic backing that the new adhesive comes on into a shape that would fit in the phone, and index it on some of the existing pins by making accurate holes. That might at least make it possible to get all of the new adhesive in a useful place.

    Otherwise pretty good. Thank you to the people who have taken the time to put this together.

    David B -

    How to unlock the fingerprint sensor ?

    Why is there no adhesive with the display.

    It's not very consumer friendly if you need to buy everything seperate

    paul E -

    Was there a solution to unlocking the fingerprint sensor? I have the same issue.

    Marian -

    Before putting the new screen, remove the black and not so visible black plastic frame under the surrounding scotch. Otherwise you cannot put the new screen, this black and surrounding plastic is also on the new screen with it's claws.

    Ratinox -

    I would have liked to know I had to put the adhesive card before connecting the new screen (which took me 15mn just to connect the wire to the motherboard) because the flat cable makes it very hard to do so...

    Otherwise, tutorial is good, although it misses the fingerprint sensor recalibration as said in other comments

    Gael Rottier -

    When testing the new screen, it DID work previously. Now it does not. What could be wrong? Did I break a pin? How can I troubleshoot further?

    David Gannaway -

Conclusion

Compare your new replacement part to the original part—you may need to transfer remaining components or remove adhesive backings from the new part before you install it.

To reassemble your device, follow these instructions in reverse order.

To run a diagnostics test with the built-in Pixel Diagnostic tool, click here.

Repair didn’t go as planned? Try some basic troubleshooting, or ask our Google Pixel 7 answers community for help.

Dominik Schnabelrauch

Member since: 23/11/16

209329 Reputation

31 comments

This guide was excellent. And the most tedious bit of the repair was removing the remaining adhesive before installing the new screen. Very easy repair for anyone with some patience.

If the fingerprint unlock does not work after this, you may get a message on the lock screen indicating that you need to go to a google website to fix it.

What you actually need to do is:

o Install the Google USB driver for Windows from here: https://developer.android.com/studio/run...

o Put your phone in fast-boot (turn off, then turn on while holding volume down)

o Connect the Pixel to your PC

o Using chrome, visit this site, which will reset the fingerprint reader: https://pixelrepair.withgoogle.com/udfps

I had to reboot twice after this to actually get it to work, but it's all good now.

bradappel -

Thank you for this. Since the message on the phone is unhelpfull, this info should really be added to the manual.

Vincent van Leijden -

Thank you! No driver needed on a Mac (as it says at the first link.) Just go to the withgoogle pixelrepair page and follow the instructions. Worked on the first restart for me.

Chris K. -

Ohhh thank you so much for this, I was about to give up on the fingerprint reader ha

Joshua Chandler -

The above instructions are not complete. These are the full instructions that work for me:

1.Before you turn your phone off, go to the developer options and enable USB debugging.

Go to: Settings, About phone then tap Build number 7 times.

2. Go here Get the Google USB Driver | Android Developers and download the google USB zip file (this is for windows BTW)

3. Unzip however you want it

4. Open the folder usb_Driver and rightclick "android_winusb" and install

5. To make sure it installed, connect your pixel (with USB debugging still enabled) to your PC and open "device manager". You should see "Android Devices > Android Composite ADB Interface".

6. Disconnect pixel from PC

7. Go here Google Fingerprint Calibration website and follow the instructions.

https://pixelrepair.withgoogle.com/udfps

Filip Lou -

Thank you so much. This has worked for me :)

Robot Dog -

Thank you for the extra help. Bradapple pointed me in the right direction and you guided me in for the landing... so to speak. 😏

Already Sanchez -

I did all that but when connecting my computer the monitor shows "Unsupported device

To use this tool, your device must be a Pixel 3, 3 XL, 3a, 3a XL, 4, 4 XL, 4a, 4a (5G), 5, 5a, 6, 6 Pro, 6a, 7, 7 Pro, 7a, Tablet." That is very confusing because I have the Google Pixel 7.

Cedric Willi -

OMG thank you so much for this information, i've spent such a long time on various forums and threads, i even talked to google support they said factory reset would work.. no one mentioned the developer options and enabling USB debugging. Thanks again this finally worked!

Mitchell Rogers -

thanks so much. I think these steps should have been included in the guide. it doesn't seem like the system lets you do a straight swap without it (which makes sense given it is an important security feature)

Jesse Kohn -

I found attaching the press cable the most difficult, it eventually went in after a few hours trying on and off, but I couldn't tell you why. Once that was done everything was easy

Sam Rutland -

Yes i agree, this was fiddly and I was very worried about breaking pins.. though for me it was 10mins, not hours :(

Jesse Kohn -

Really good guide. Had some trouble with the removal of the display cable branket and the adhesive, but after an hour in the end, the screen turnee on. Also had to reinstall the fingerscanner….

Steffan Juel Højgaard Jensen -

guys my screen turn on but the touchscreen doesnt work, can anyone tell what do wrong?

ewdor gutierrez -

I have the same problem, did you solve it somehow?

Борис Міндер -

How to order the parts if im outside of shipping region, im in indonesia

Kristian Harjanto Abarja -

Great quality kit. I underestimated how fiddly cleaning off the old adhesive would be but otherwise this was straightforward and there were some really good pointers for things to watch out along the way. Glad I took the time to do this as now my screen is perfectly readable again. A couple of lessons learnt from me: 1/ impressed at how quickly the microwave heat pack gets super hot. one application was enough for me to get the screen off. 2/ The clips along the outside edges are very fragile.. be very careful when cleaning out the adhesive. 3/ Speaking of adhesive cleaning/removal.. I understimated this step. It took a looong time. Take breaks if getting tired/frustrated. Probably spent over an hour just on this step. Maybe more heat would have helped, but I was worried about damaging components 3/ As others have mentioned there are issues with the fingerprint sensor post install, the instructions above worked perfectly for me re/ windows driver, developer mode, google software update tool.

Jesse Kohn -

I followed this guide to open the phone and try to fix my broken glass: not screen, glass only. I decided to post here some advices.

Resources:
- This guide
- Video on how to open and apply OCA Glass
- Video on how to apply OCA without machines

Where I bought things and what I used?
- IFixIt Pro Tech Toolkit
- Glass replacement with OCA
- Molybdenum string
- Isopropyl alcohol
- Heat Gun / Hairdryer

Advices:
- you need to have something that will hold your screen still. It will move a lot, adhesive is strong as hell
- do not apply too much heat: if it's hot to touch, probably is too much (max 80°C)
- make sure to have A LOT of time, a LOT of patience and a LOT of molybdenum
- do not push on the internal screen and its components: go against glass, not the "LCD"
- screen-frame adhesive cannot be reused, you need a new one

At this point I need to tell you that I failed and ordered a new screen from iFixIt.
I managed to get half of the work done, but then my string started to eat the internal screen :(

Marcin Pabich -

Should I remove the thin blue backing off(has what look like serial number stickers on it) the new screen before install? Thanks

Chris Vann -

When installing a replacement screen be sure to remove the black plastic cover that obscures the selfie camera hole, otherwise you won't be able to take selfies!

Josh -

I didn't notice this cover when closing it up, so it didn't want to close at the top edge. Still doesn't close snugly, and the front camera doesn't work now, but idk if it's worth trying to get the screen off again and risk breaking the new display. T_T It would have been helpful to have some information on what to remove from the new screen in the article.

Hitch -

Update, a few minutes later: I was able to fix it! The adhesive was fresh enough that a little heat was enough for me to get just the top edge open enough to slip in a pair of tweezers and remove the covering. Camera is now functioning.

Hitch -

Thank you Hitch!

I encountered the same situation and could solve it just as you did.

mikg -

how important is it to put the display cable bracket back on?? I forgot then sealed up

Kyle Walker -

Hi Kyle,

The display cable bracket with the piece of foam holds the connector in place. Without it, the connector just holds with a little friction and is likely to come off by vibration or shock. Your mileage may vary. At least you know how to fix it, should it come off. Keep the bracket in a safe place.

What I do not know is, if there is a possibility for electrical damage on the screen or the mainboard, should the connector not come off completely, leaving just some contacts connected. But given the low currents, damage seems not very likely. At least in my experience, these things are relatively robust.

mikg -

Hello! Does anyone know if it is possible not to change the whole screen of the phone but somehow to reattach the upper glass only? My problem is that the screen itself is fine but the glass goes off a bit in the left upper corner and now there's a several mm whole in between the glass and the screen. Is it possible somehow to fix it without changing the whole screen? Thanks a lot for your replies!

Lily -

The replacement screen isn't sitting flush with the phone. What have I missed?

Thanks

Jon Smith -

Hi Jon,

If it is on the top, you likely didn't remove the cover that obscures the selfie camera, which will prevent you from taking selfies too (see comments above). Happened to me and solved it, like Hitch described.

Other possibilities include incomplete cleaning of the old adhesive, torn application of the new adhesive or having some other 'body' lodged between frame and screen.

Best of luck!

mikg -

le tuto est genial tout fonctionne merciiiiiiii

Moi Tusauraspas -

Having issues with the proximity sensor after replacing display. Screen no longer turns off when against face on calls, nor does flip to shh work. I checked for all protective films, nothing present (looked just like the original display and even just like what's pictured above). What do I need to do?!

Kyle Walker -

I have used iFixit guides to repair phones/tablets numerous times over the years, and this is yet another thorough, well put together guide that led to another successful repair.

One thing to pay attention to is the additional hyperlinks/steps needed to reinstall the fingerprint sensor and follow them carefully. For anyone who hasn't messed around with installing custom ROMs on phones/tablets, this might seem a bit daunting, but it's just a matter of following the steps carefully and you should be able to get it done - make sure that you are using the Chrome browser too - I wasn't able to get this to work with Firefox.

One last note on the Pixel 7 driver installation if you're on Windows and have already downloaded the driver - make sure to extract it somewhere easy to find (like the Downloads folder). In Device Manager, Pixel 7 was located under "Universal Serial Bus devices". Once you're ready to select the file to install, you only need to select the folder - it will install the correct driver file.

Christopher Ingram -