9

I wrote a quick python script to return the average colour of rectangles surrounding the perimeter of my screen. (The end goal here is to have RGB LED strips surrounding my monitor, for a glowing effect during movies - like this (youtube), but more fun because I'm making it myself).

I'm currently using autopy for getting the screen as a bitmap ("screenshot"), getting each pixel value, and the RGB <-> HEX conversions.

Simplified version:

step = 1
width = 5
height = 5

b = autopy.bitmap.capture_screen()

for block in border_block(width, height): # for each rectangle around the perimeter of my screen

    R,G,B = 0,0,0
    count = 0

    for x in xrange(block.x_min, block.x_max, step):
        for y in xrange(block.y_min, block.y_max, step):
            r,g,b = autopy.color.hex_to_rgb(image.get_color(x, y))
            R += r; G += g; B += b
            count += 1

   block.colour = "#{:06x}".format(autopy.color.rgb_to_hex(R/count,G/count,B/count))

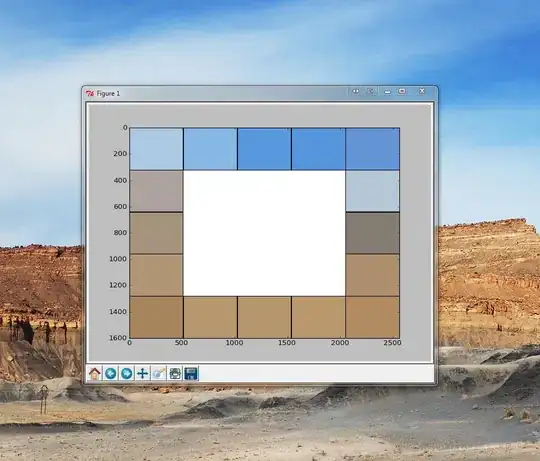
I then display the blocks using matplotlib: (this is configured as 5x5 blocks, step = 1)

5x5 Screenshot

The problem is the speed of implementation - because this is looping for each pixel in a block (2560*1600 resolution/5 = 320*512 block = 163,840 pixels per block), and each block around the perimeter (16*163,840 = 2,621,440 loops). Overall, this took took 2.814s to complete.

If I increase the step value, it speeds up, but not enough: (this is using a more realistic 15x10 blocks surrounding the border)

Step    Time (s)
1       1.35099983215
2       0.431000232697
5       0.137000083923
10      0.0980000495911
15      0.095999956131
20      0.0839998722076
50      0.0759999752045

That's because the screenshot itself takes approx 0.070s - this means that I'm limited to 12.8 FPS.

>>> timeit.Timer("autopy.bitmap.capture_screen()", "import autopy").timeit(100)/100
0.06874468830306966

Questions:

  • Is there a faster method of taking a screenshot and averaging regions of the screen?

    I'm not too worried about accuracy, but would like to be able to return these values at approx 30 FPS, ideally faster (20-30 ms) to allow for serial transmission overhead. Bear in mind my screen resolution is 2560*1600!

    I've heard about Python Imaging Library (PIL), but haven't had time to look into the speed of the ImageGrab function yet, but it looks promising.

  • Can I read pixel values directly from the GPU?

  • Another thought - what's the best way to detect the top/bottom edge of a movie? (If aspect ratio is widescreen, there are black bars at top/bottom of screenshot, and some rectangles are black).


Using PIL's grab():

>>> timeit.Timer("ImageGrab.grab()", "from PIL import ImageGrab").timeit(100)/100
0.1099840205312789

PIL - resize: (ChristopheD)

>>> timeit.Timer("PIL.ImageGrab.grab().resize((15, 10), PIL.Image.NEAREST)", "import PIL").timeit(100)/100
0.1028043677442085

>>> timeit.Timer("PIL.ImageGrab.grab().resize((15, 10), PIL.Image.ANTIALIAS)", "import PIL").timeit(100)/100
0.3267692217886088

Note: This is an improvement over the results obtained above, but we're still limited to 9 FPS, or 3 FPS with full anti-aliasing.


PIL - nearest then resize: (Mark Ransom)

>>> for step in [1,2,5,10,15,20,50]:
    print step, timeit.Timer("PIL.ImageGrab.grab().resize(("+str(2560/step)+", "+str(1600/step)+"), PIL.Image.NEAREST).resize((15, 10), PIL.Image.ANTIALIAS)", "import PIL.ImageGrab").timeit(100)/100

Results:

Step  Time(s)
1     0.333048412226
2     0.16206895716
5     0.117172371393
10    0.102383282629
15    0.101844097599
20    0.101229094581
50    0.100824552193

Much faster than manually looping with autopy at top, but we're still limited to ~9 FPS (at a 'step' of 10).

Note: This doesn't include the RGB to HEX conversion required


Can anyone come up with a faster method - i.e. taking a partial screenshot? Should I write something in C?

Alex L
  • 8,748
  • 5
  • 49
  • 75
  • 1
    Most of the modes used in the `resize` are going to deliver poor results because they don't sample enough pixels, that's why they're so close in speed. NEAREST takes 1, BILINEAR takes 2x2, and BICUBIC takes 3x3. That's nowhere near the 170x160 that ANTIALIAS will use at that scale. – Mark Ransom May 18 '12 at 16:34
  • @MarkRansom Ah, thanks for explaining that. It's interesting to see the difference between manually looping with autopy (1.35s) and PIL's ANTIALIAS (0.326s) - much improved! – Alex L May 19 '12 at 13:09
  • 1
    Personally this seems like an obvious candidate for parallelizing if PIL isn't already doing it. If that also doesn't give enough of a speedup, this should also be quite simple to do on the GPU itself (in which case the speed would be much higher). Though an FSP of 9 seems not too bad and with parallelized code you should be fine.. – Voo May 20 '12 at 00:41
  • @Voo Do you mean using the GPU for parallelizing (screenshot->CUDA/OpenCL), or something that runs on the graphics card directly? How do you suggest increasing the speed of the screenshot itself? – Alex L May 23 '12 at 12:37
  • @Alex Well the simple (for me that is) solution would be to do only the processing (i.e. the averaging) with the GPU, but that's because I do know quite a bit CUDA and not much OpenGL. But obviously that's suboptimal because we'd be transferring the raw data to the CPU and then back to the GPU. That overhead is not nice, although you'd probably still be able to speed it up nicely. What I think would be the best performing solution would be some custom OpenGL shaders, then you'd only have to transfer the small final array around. – Voo May 23 '12 at 14:40
  • 1
    cont. Note that maybe you can even access the frame buffer from Cuda/OpenCL somehow in which case that'd be by far the simplest solution. Edit: [This paper](http://gravisma.zcu.cz/GraVisMa-2010/Papers/Poster/F13-full.pdf) seems to be exactly about that stuff. So if you need performance, that'd be it probably. There's even a Python cuda wrapper, although tbh this seems easier in C anyhow ;) – Voo May 23 '12 at 14:44

3 Answers3

3

Use the Python Imaging Library. From the docs (in the Image module):

getcolors

im.getcolors() => a list of (count, color) tuples or None

im.getcolors(maxcolors) => a list of (count, color) tuples or None

(New in 1.1.5) Returns an unsorted list of (count, color) tuples, where the count is the number of times the corresponding color occurs in the image.

The Image module also contains a crop() method you can use to get each rectangle to plug into getcolors(). You can take a weighted average from that easily.

It should be much faster than running the loop manually in python. I'm not sure if it's fast enough to use in real time, but you will get a dramatic speed boost. You could also take the screenshot a few times per second, since odds are that sending signals to the LEDs at 60 fps vs 10 fps won't be particularly noticeable. Don't look at it as "limited to 12.8 FPS", look at it as "can only update the LEDs once every 5 frames", which shouldn't be a noticeable difference.

EDIT: If you're really interested in further optimization here, I think you'll find Fastest way to take a screenshot with python on windows quite helpful.

Community
  • 1
  • 1
  • I've updated my question - looks like `ImageGrab.grab()` takes 0.109s on average - only 9 FPS! I realise that the visual difference between 9 FPS and 30 FPS will be minimal, but optimising code is a fun challenge, right? – Alex L May 18 '12 at 15:49
  • Interesting, not what I expected at all. I've linked to something that seems to perform better, though I haven't tested it myself. – Robert Mastragostino May 20 '12 at 00:36
  • Thanks for the link Robert, I'll have a crack with gtk! I'll post back here with my results. – Alex L May 21 '12 at 04:58
  • It looks like the [gnome ftp](http://ftp.gnome.org/pub/GNOME/) is down, I'll try again a bit later. – Alex L May 21 '12 at 05:21
1

A quick win could be to use a resize operation (in PIL) (you may use simple interpolation for speed) to a 5x5 image instead of averaging the regions, e.g.:

myimg = ImageGrab.grab()
resized = myimg.resize((5, 5), Image.NEAREST) 

This should yield approximately the same effect as doing the averaging work yourself.

Not really sure about the speed of PIL's ImageGrab (and how it compares to autopy) though, but it's easy enough to try and find out.

ChristopheD
  • 112,638
  • 29
  • 165
  • 179
  • I've updated my question - looks like `ImageGrab.grab()` takes 0.116s on average, about 1.6x the speed of `autopy.bitmap.capture_screen()`. The resizing is slightly quicker, not sure why. – Alex L May 18 '12 at 15:36
  • 1
    Using `Image.NEAREST` doesn't do any averaging at all - it just chooses one pixel from many. There's no guarantee that the pixel it chooses will be representative of the area. – Mark Ransom May 18 '12 at 15:51
  • @MarkRansom Good point - I've updated my question with the other resizing method `timit`s – Alex L May 18 '12 at 16:16
1

To speed up a resize operation you can do it in two steps. Use NEAREST for the first one to cut down the number of pixels in the fastest way possible, then ANTIALIAS to merge those into a representative sample. It's equivalent to the step size you experimented with earlier, done with PIL functions.

PIL.ImageGrab.grab().resize((150, 100), PIL.Image.NEAREST).resize((15, 10), PIL.Image.ANTIALIAS)
Mark Ransom
  • 299,747
  • 42
  • 398
  • 622
  • Cheers for this, much faster than my `autopy` step function. We're still limited to 9 FPS though - all this achieves is more accurate colours! Any ideas for screenshot speed improvements? I could try something in `c`? – Alex L May 19 '12 at 13:23