30

I'm building a Photo filter app (like Instagram, Camera+ and many more..), may main screen is a UIImageView that presenting the image to the user, and a bottom bar with some filters and other options.
One of the option is blur, where the user can use his fingers to pinch or move a circle that represent the non-blur part (radius and position) - all the pixels outside of this circle will be blurred.

When the user touch the screen I want to add a semi transparent layer above my image that represent the blurred part, with a fully transparent circle that represent the non-blur part.

So my question is, how do I add this layer? I suppose I need to use some view above my image view, and to use some mask to get my circle shape? I would really appreciate a good tip here.

One More Thing
I need the circle will not be cut straight, but have a kind of gradient fade. something like Instagram:
enter image description here

And what's very important is to get this effect with good performance, I'd succeed getting this effect with drawRect: but the performance was very bad on old devices (iphone 4, iPod)

vikingosegundo
  • 52,040
  • 14
  • 137
  • 178
Eyal
  • 10,777
  • 18
  • 78
  • 130
  • How about using a zoomable UIScrollView on top of your UIImageView? That way, you can add a static mask to it (an image with a transparent "hole" in the middle) and it will react smoothly to the user's gestures. – Stavash Feb 03 '13 at 11:00
  • like this? http://stackoverflow.com/questions/5721196/create-layer-mask-with-custom-shaped-hole – InvalidReferenceException Mar 12 '13 at 23:45
  • this is the best answer in your case... change it as per your requirement ...http://stackoverflow.com/questions/14107979/how-can-i-make-specific-part-blur-of-an-image-rectangular-circular...i can use this code for in my case .. :) thanks :) –  Mar 15 '13 at 05:57

3 Answers3

97

Sharp Mask

Whenever you want to draw a path that consists of a shape (or series of shapes) as a hole in another shape, the key is almost always using an 'even odd winding rule'.

From the Winding Rules section of the Cocoa Drawing Guide:

A winding rule is simply an algorithm that tracks information about each contiguous region that makes up the path's overall fill area. A ray is drawn from a point inside a given region to any point outside the path bounds. The total number of crossed path lines (including implicit lines) and the direction of each path line are then interpreted using rules which determine if the region should be filled.

I appreciate that description isn't really helpful without the rules as context and diagrams to make it easier to understand so I urge you to read the links I've provided above. For the sake of creating our circle mask layer the following diagrams depict what an even odd winding rule allows us to accomplish:

Non Zero Winding Rule

Non Zero Winding Rule

Even Odd Winding Rule

Even Odd Winding Rule

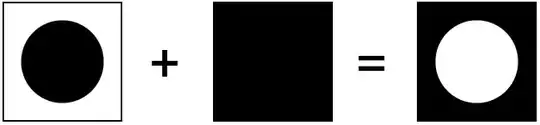
Now it's simply a matter of creating the translucent mask using a CAShapeLayer that can be repositioned and expanded and contracted through user interaction.

Code

#import <QuartzCore/QuartzCore.h>


@interface ViewController ()
@property (strong, nonatomic) IBOutlet UIImageView *imageView;
@property (strong) CAShapeLayer *blurFilterMask;
@property (assign) CGPoint blurFilterOrigin;
@property (assign) CGFloat blurFilterDiameter;
@end


@implementation ViewController

// begin the blur masking operation.
- (void)beginBlurMasking
{
    self.blurFilterOrigin = self.imageView.center;
    self.blurFilterDiameter = MIN(CGRectGetWidth(self.imageView.bounds), CGRectGetHeight(self.imageView.bounds));

    CAShapeLayer *blurFilterMask = [CAShapeLayer layer];
    // Disable implicit animations for the blur filter mask's path property.
    blurFilterMask.actions = [[NSDictionary alloc] initWithObjectsAndKeys:[NSNull null], @"path", nil];
    blurFilterMask.fillColor = [UIColor blackColor].CGColor;
    blurFilterMask.fillRule = kCAFillRuleEvenOdd;
    blurFilterMask.frame = self.imageView.bounds;
    blurFilterMask.opacity = 0.5f;
    self.blurFilterMask = blurFilterMask;
    [self refreshBlurMask];
    [self.imageView.layer addSublayer:blurFilterMask];

    UITapGestureRecognizer *tapGesture = [[UITapGestureRecognizer alloc] initWithTarget:self action:@selector(handleTap:)];
    [self.imageView addGestureRecognizer:tapGesture];

    UIPinchGestureRecognizer *pinchGesture = [[UIPinchGestureRecognizer alloc] initWithTarget:self action:@selector(handlePinch:)];
    [self.imageView addGestureRecognizer:pinchGesture];
}

// Move the origin of the blur mask to the location of the tap.
- (void)handleTap:(UITapGestureRecognizer *)sender
{
    self.blurFilterOrigin = [sender locationInView:self.imageView];
    [self refreshBlurMask];
}

// Expand and contract the clear region of the blur mask.
- (void)handlePinch:(UIPinchGestureRecognizer *)sender
{
    // Use some combination of sender.scale and sender.velocity to determine the rate at which you want the circle to expand/contract.
    self.blurFilterDiameter += sender.velocity;
    [self refreshBlurMask];
}

// Update the blur mask within the UI.
- (void)refreshBlurMask
{
    CGFloat blurFilterRadius = self.blurFilterDiameter * 0.5f;

    CGMutablePathRef blurRegionPath = CGPathCreateMutable();
    CGPathAddRect(blurRegionPath, NULL, self.imageView.bounds);
    CGPathAddEllipseInRect(blurRegionPath, NULL, CGRectMake(self.blurFilterOrigin.x - blurFilterRadius, self.blurFilterOrigin.y - blurFilterRadius, self.blurFilterDiameter, self.blurFilterDiameter));

    self.blurFilterMask.path = blurRegionPath;

    CGPathRelease(blurRegionPath);
}

...

Code Conventions Diagram

(This diagram may help understand the naming conventions in the code)


Gradient Mask

The Gradients section of Apple's Quartz 2D Programming Guide details how to draw radial gradients which we can use to create a mask with a feathered edge. This involves drawing a CALayers content directly by subclassing it or implementing its drawing delegate. Here we subclass it to encapsulate the data related to it i.e. origin and diameter.

Code

BlurFilterMask.h

#import <QuartzCore/QuartzCore.h>

@interface BlurFilterMask : CALayer
@property (assign) CGPoint origin;      // The centre of the blur filter mask.
@property (assign) CGFloat diameter;    // the diameter of the clear region of the blur filter mask.
@end

BlurFilterMask.m

#import "BlurFilterMask.h"

// The width in points the gradated region of the blur filter mask will span over.
CGFloat const GRADIENT_WIDTH = 50.0f;

@implementation BlurFilterMask

- (void)drawInContext:(CGContextRef)context
{
    CGFloat clearRegionRadius = self.diameter * 0.5f;
    CGFloat blurRegionRadius = clearRegionRadius + GRADIENT_WIDTH;

    CGColorSpaceRef baseColorSpace = CGColorSpaceCreateDeviceRGB();
    CGFloat colours[8] = { 0.0f, 0.0f, 0.0f, 0.0f,     // Clear region colour.
                            0.0f, 0.0f, 0.0f, 0.5f };   // Blur region colour.
    CGFloat colourLocations[2] = { 0.0f, 0.4f };
    CGGradientRef gradient = CGGradientCreateWithColorComponents (baseColorSpace, colours, colourLocations, 2);

    CGContextDrawRadialGradient(context, gradient, self.origin, clearRegionRadius, self.origin, blurRegionRadius, kCGGradientDrawsAfterEndLocation);

    CGColorSpaceRelease(baseColorSpace);
    CGGradientRelease(gradient);
}

@end

ViewController.m (Wherever you are implementing the blur filer masking functionality)

#import "ViewController.h"
#import "BlurFilterMask.h"
#import <QuartzCore/QuartzCore.h>

@interface ViewController ()
@property (strong, nonatomic) IBOutlet UIImageView *imageView;
@property (strong) BlurFilterMask *blurFilterMask;
@end


@implementation ViewController

// Begin the blur filter masking operation.
- (void)beginBlurMasking
{
    BlurFilterMask *blurFilterMask = [BlurFilterMask layer];
    blurFilterMask.diameter = MIN(CGRectGetWidth(self.imageView.bounds), CGRectGetHeight(self.imageView.bounds));
    blurFilterMask.frame = self.imageView.bounds;
    blurFilterMask.origin = self.imageView.center;
    blurFilterMask.shouldRasterize = YES;
    [self.imageView.layer addSublayer:blurFilterMask];
    [blurFilterMask setNeedsDisplay];

    self.blurFilterMask = blurFilterMask;

    UITapGestureRecognizer *tapGesture = [[UITapGestureRecognizer alloc] initWithTarget:self action:@selector(handleTap:)];
    [self.imageView addGestureRecognizer:tapGesture];

    UIPinchGestureRecognizer *pinchGesture = [[UIPinchGestureRecognizer alloc] initWithTarget:self action:@selector(handlePinch:)];
    [self.imageView addGestureRecognizer:pinchGesture];
}

// Move the origin of the blur mask to the location of the tap.
- (void)handleTap:(UITapGestureRecognizer *)sender
{
    self.blurFilterMask.origin = [sender locationInView:self.imageView];
    [self.blurFilterMask setNeedsDisplay];
}

// Expand and contract the clear region of the blur mask.
- (void)handlePinch:(UIPinchGestureRecognizer *)sender
{
    // Use some combination of sender.scale and sender.velocity to determine the rate at which you want the mask to expand/contract.
    self.blurFilterMask.diameter += sender.velocity;
    [self.blurFilterMask setNeedsDisplay];
}

...

Code Conventions Diagram

(This diagram may help understand the naming conventions in the code)


Note

Ensure the multipleTouchEnabled property of the UIImageView hosting your image is set to YES/true:

multipleTouchEnabled


Note

For sake of clarity in answering the OPs question this answer continues to use the naming conventions originally used. This may be slightly misleading to others. 'Mask' is this context does not refer to an image mask but mask in a more general sense. This answer doesn't use any image masking operations.

Cœur
  • 37,241
  • 25
  • 195
  • 267
Elliott
  • 4,598
  • 1
  • 24
  • 39
  • No doubt you saw my previous answer, I wasn't happy with it, I knew it wasn't the optimum solution. Not only is this solution cleaner, it's also more performant (I profiled both solutions to make sure). – Elliott Mar 15 '13 at 22:29
  • Hi Elliott, 10x a lot for your detailed answer :) I didn't had the opportunity to test the performance yet, but it's certainly look like a good answer. I updated the question with one more thing I didn't mention and I'd be happy if you could look at it. – Eyal Mar 16 '13 at 11:03
  • ok thanks, I'll wait for your answer. Do you think I should use a resource (.png file) to get this effect ? – Eyal Mar 17 '13 at 12:11
  • @Eyal Using an image can be useful for applying masks that are complex shapes. Since the mask we need is a simple circle and since we need to modify its size and position in response to touch events I think it's best we create the mask dynamically in code. – Elliott Mar 18 '13 at 10:38
  • @Eyal Apologies for the delay, I've been bust recently. I have updated my answer to include a solution with feathered/gradated mask edges. – Elliott Mar 22 '13 at 09:13
  • hi @ElliottJamesPerry , any way to add a border just around the circular mask? When I add a stroke or layer border, it adds it around the whole layer as well (rectangular bounds). – royherma Dec 15 '15 at 16:07
1

Sounds like you want to use GPUImageGaussianSelectiveBlurFilter which is contained inside the GPUImage framework. It should be a faster more efficient way to achieve what you want.

You can hook up the excludeCircleRadius property to a UIPinchGestureRecognizer in order to allow the user to change the size of the non-blurred circle. Then use the 'excludeCirclePoint' property in conjuction with a UIPanGestureRecognizer to allow the user to move the center of the non-blurred circle.

Read more about how to apply the filter here:

https://github.com/BradLarson/GPUImage#processing-a-still-image

brynbodayle
  • 6,546
  • 2
  • 33
  • 49
  • I'm already using GPUImage and selective blur to get the blur effect, but my problem is to get the effect of setting the blur, look what happen when you change the blur radius or location in Instagram - it shows a white layer, kind of a preview that indicate where the blur is. my question is about how to implement this preview. – Eyal Mar 10 '13 at 19:57
  • Have you tried chaining any of the GPUImage filters? So like chain the blur with a white vignette or color overlay? – brynbodayle Mar 10 '13 at 20:46
  • try to use these two method using GPUImage stillImageSource removeAllTargets blurFilter removeAllTargets where GPUImageOutput *blurFilter; GPUImagePicture *stillImageSource; – kb920 Mar 11 '13 at 04:45
  • I don't think it will be wise to do this using another filter/s, it will be a performance pain to change filters every time the user move his finger to change the blur. Actually I don't need to do/show the blur while the user move his finger, I only need to show the preview layer (just a circle - no blur). So this is not a filters question, it's more of a core graphic one... – Eyal Mar 11 '13 at 08:19
1

In Swift if anyone needs it (added pan gesture as well):

BlurFilterMask.swift

import Foundation
import QuartzCore

class BlurFilterMask : CALayer {

    private let GRADIENT_WIDTH : CGFloat = 50.0

    var origin : CGPoint?
    var diameter : CGFloat?

    override init() {
        super.init()
    }

    required init?(coder aDecoder: NSCoder) {
        fatalError("init(coder:) has not been implemented")
    }

    override func drawInContext(ctx: CGContext) {
        let clearRegionRadius : CGFloat  = self.diameter! * 0.5
        let blurRegionRadius : CGFloat  = clearRegionRadius + GRADIENT_WIDTH

        let baseColorSpace = CGColorSpaceCreateDeviceRGB();
        let colours : [CGFloat] = [0.0, 0.0, 0.0, 0.0,     // Clear region
            0.0, 0.0, 0.0, 0.5] // blur region color
        let colourLocations : [CGFloat] = [0.0, 0.4]
        let gradient = CGGradientCreateWithColorComponents (baseColorSpace, colours, colourLocations, 2)


        CGContextDrawRadialGradient(ctx, gradient, self.origin!, clearRegionRadius, self.origin!, blurRegionRadius, .DrawsAfterEndLocation);

    }

}

ViewController.swift

func addMaskOverlay(){
    imageView!.userInteractionEnabled = true
    imageView!.multipleTouchEnabled = true

    let blurFilterMask = BlurFilterMask()

    blurFilterMask.diameter = min(CGRectGetWidth(self.imageView!.bounds), CGRectGetHeight(self.imageView!.bounds))
    blurFilterMask.frame = self.imageView!.bounds
    blurFilterMask.origin = self.imageView!.center
    blurFilterMask.shouldRasterize = true

    self.imageView!.layer.addSublayer(blurFilterMask)

    self.blurFilterMask = blurFilterMask
    self.blurFilterMask!.setNeedsDisplay()

    self.imageView!.addGestureRecognizer(UIPinchGestureRecognizer(target: self, action: "handlePinch:"))
    self.imageView!.addGestureRecognizer(UITapGestureRecognizer(target: self, action: "handleTap:"))
    self.imageView!.addGestureRecognizer(UIPanGestureRecognizer(target: self, action: "handlePan:"))
}

func donePressed(){
    //save photo and add to textview
    let parent : LoggedInContainerViewController? = self.parentViewController as? LoggedInContainerViewController
    let vc : OrderFlowCareInstructionsTextViewController = parent?.viewControllers[(parent?.viewControllers.count)!-2] as! OrderFlowCareInstructionsTextViewController
    vc.addImageToTextView(imageView?.image)
    parent?.popViewController()
}

//MARK: Mask Overlay
func handleTap(sender : UITapGestureRecognizer){
    self.blurFilterMask!.origin = sender.locationInView(self.imageView!)
    self.blurFilterMask!.setNeedsDisplay()
}

func handlePinch(sender : UIPinchGestureRecognizer){
    self.blurFilterMask!.diameter = self.blurFilterMask!.diameter! + sender.velocity*3
    self.blurFilterMask!.setNeedsDisplay()
}

func handlePan(sender : UIPanGestureRecognizer){

    let translation = sender.translationInView(self.imageView!)
    let center = CGPoint(x:self.imageView!.center.x + translation.x,
        y:self.imageView!.center.y + translation.y)
    self.blurFilterMask!.origin = center
    self.blurFilterMask!.setNeedsDisplay()
}
royherma
  • 4,095
  • 1
  • 31
  • 42
  • Hi, @royherma, Do you have working xcode project? I am facing errors in ViewController.swift – iPsych May 02 '20 at 16:29