5

I had a C++ binarization routine that I used for later OCR operation. However I found that it produced unnecessary slanting of text. Searching for alternatives I found GPUImage of great value and it solved the slanting issue.

I am using GPUImage code like this to binarize my input images before applying OCR.

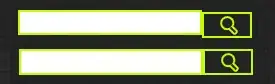
However the threshold value does not cover the range of images I get. See two samples from my input images:

enter image description here

enter image description here

I can't handle both with same threshold value. Low value seems to be fine with later, and higher value is fine with first one.

The second image seems to be of special complexity because I never get all the chars to be binarized right, irrespective of what value I set for threshold. On the other hand, my C++ binarization routine seems to do it right, but I don't have much insights to experiment into it like simplistic threshold value in GPUImage.

How should I handle that?

UPDATE:

I tried with GPUImageAverageLuminanceThresholdFilter with default multiplier = 1. It works fine with first image but the second image continues to be problem.

Some more diverse inputs for binarization:

enter image description here

enter image description here

UPDATE II:

After going through this answer by Brad, tried GPUImageAdaptiveThresholdFilter (also incorporating GPUImagePicture because earlier I was only applying it on UIImage).

With this, I got second image binarized perfect. However first one seems to have lot of noise after binarization when I set blur size is 3.0. OCR results in extra characters added. With lower value of blur size, second image loses precision.

Here it is:

+(UIImage *)binarize : (UIImage *) sourceImage
{
    UIImage * grayScaledImg = [self toGrayscale:sourceImage];
    GPUImagePicture *imageSource = [[GPUImagePicture alloc] initWithImage:grayScaledImg];
    GPUImageAdaptiveThresholdFilter *stillImageFilter = [[GPUImageAdaptiveThresholdFilter alloc] init];
    stillImageFilter.blurSize = 3.0;    

    [imageSource addTarget:stillImageFilter];   
    [imageSource processImage];        

    UIImage *imageWithAppliedThreshold = [stillImageFilter imageFromCurrentlyProcessedOutput];
  //  UIImage *destImage = [thresholdFilter imageByFilteringImage:grayScaledImg];
    return imageWithAppliedThreshold;
}
Community
  • 1
  • 1
Nirav Bhatt
  • 6,940
  • 5
  • 45
  • 89
  • What does your C++ binarization routine look like? Perhaps that can be adapted into a custom filter within the framework. Is it a local adaptive binarization or a globally thresholded one? – Brad Larson Sep 05 '13 at 14:24
  • What C++ routine does is grayscaling + binarization. As for GPUImage, I do grayscaling on my own, then pass the output to GPUImage filter. I use one of the many grayscaling techniques mentioned on stackoverflow. Do you want me to mention that here? Basically I use 3 different programs to do that but results do not differ much so I find it irrelevant. – Nirav Bhatt Sep 05 '13 at 16:06
  • It's not my C++ routine as I said, its supplied by someone else and I can't share it entirely over here, nor I can sum up how it works because I don't have much insights into how it works. It's fairly complex. What I described to you is what I derive from comments in it. – Nirav Bhatt Sep 05 '13 at 16:20
  • I have a commercial but inexpensive binarization code for iOS. Can you give me a tough image sample that you want to binarize so I could try it? – Ilya Evdokimov Sep 06 '13 at 00:23
  • @BradLarson could you kindly look into the final update and suggest me how best I could use GPUImage? – Nirav Bhatt Sep 06 '13 at 14:18

3 Answers3

2

For a pre processing step you need adaptive thresholding here.

I got these results using opencv grayscale and adaptive thresholding methods. Maybe with an addition of low pass noise filtering (gaussian or median) it should work like a charm.

luminance

diverse

I used provisia (its a ui to help you process images fast) to get the block size I need: 43 for the image you supplied here. The block size may change if you take photo from closer or further. If you want a generic algorithm, you need to develop one that should search for the best size (search until numbers are detected)

EDIT: I just saw the last image. It is untreatably small. Even if you apply the best pre-processing algorithm, you are not going to detect those numbers. Sampling up would not be solution since noises will come around.

baci
  • 2,528
  • 15
  • 28
  • +1 for great result demonstrated. Yes, this is the quality I need. However I am complete newbi to Opencv and if there is native iOS code sample that you could point, it will be highly helpful. – Nirav Bhatt Sep 06 '13 at 09:00
  • Well, I already supplied the link but here it is. http://docs.opencv.org/doc/tutorials/ios/table_of_content_ios/table_of_content_ios.html. First of all try to link opencv with your project and run hello world sample. After that check out image processing example. All you need to do is uimage<->cv::mat transformation, actually the code is already there. Then use "cvtColor" and "adaptiveThreshold" methods. These are also documented there. http://docs.opencv.org/modules/imgproc/doc/miscellaneous_transformations.html – baci Sep 06 '13 at 09:09
  • 1
    http://www.cse.iitk.ac.in/users/vision/dipakmj/papers/OReilly%20Learning%20OpenCV.pdf also you can check page 139 (or 155 in pdf). – baci Sep 06 '13 at 09:30
  • What's missing is the link to project code. My current predicament does not allow me to understand it from scratch. If I have to, I could spend most of time experimenting with values to make it accurate, rather than setting things up from scratch. That was one of the reasons I chose GPUImage over core Image. – Nirav Bhatt Sep 06 '13 at 09:32
  • in general, ocr applications allow user to preprocess the image. For example, you can create a trackbar and let the user find the best accuracy for parameters. The best ocr libraries -which are expensive to buy- however, do the preprocessing with an algorithm as I explained. They also use many fonts and scales, many techniques to pre-process. – baci Sep 06 '13 at 09:36
  • Also, gpuimage may not be capable enough. They actually try to wrap up opencv and they may still have missing methods. http://www.freelancer.com/projects/Script-Install-Windows/GPUImage-OpenGL-shader-IOS-OpenCV.html – baci Sep 06 '13 at 09:51
  • 1
    http://stackoverflow.com/questions/10688672/implementing-a-simple-adaptive-threshold-in-gpuimage another link that may be helpful. – baci Sep 06 '13 at 09:55
  • Your comment about GPUImage may not be capable is misguided, neither it is dependent on OpenCV in any way. It is a perfect blackbox (if you don't delve much into the code) to hide underlying complexities, and much more well-documented than opencv as I see it vs opencv link provided by you. I wouldn't adopt a totally different lingo of objects to make it work when I know all I need is the right filter and few correct values to make all my images work. – Nirav Bhatt Sep 07 '13 at 18:36
  • +1 for your link about Adaptive Thresholding, it helped clearing so many things about binarization in general. – Nirav Bhatt Sep 07 '13 at 18:36
  • I later investigated through gpuimage, you are right sir. Of course its all about filters, matrices and convolution; so you can generate every image processing operation. This is the blackbox opencv offers. Because now you should learn what filter you need for adaptive threshold, thats the trade off not using opencv I guess. – baci Sep 08 '13 at 10:48
1

I finally ended up exploring on my own, and here is my result with GPUImage filter:

+ (UIImage *) doBinarize:(UIImage *)sourceImage
{
    //first off, try to grayscale the image using iOS core Image routine
    UIImage * grayScaledImg = [self grayImage:sourceImage];
    GPUImagePicture *imageSource = [[GPUImagePicture alloc] initWithImage:grayScaledImg];
    GPUImageAdaptiveThresholdFilter *stillImageFilter = [[GPUImageAdaptiveThresholdFilter alloc] init];
    stillImageFilter.blurSize = 8.0;

    [imageSource addTarget:stillImageFilter];
    [imageSource processImage];

    UIImage *retImage = [stillImageFilter imageFromCurrentlyProcessedOutput];
    return retImage;
}

+ (UIImage *) grayImage :(UIImage *)inputImage
{    
    // Create a graphic context.
    UIGraphicsBeginImageContextWithOptions(inputImage.size, NO, 1.0);
    CGRect imageRect = CGRectMake(0, 0, inputImage.size.width, inputImage.size.height);

    // Draw the image with the luminosity blend mode.
    // On top of a white background, this will give a black and white image.
    [inputImage drawInRect:imageRect blendMode:kCGBlendModeLuminosity alpha:1.0];

    // Get the resulting image.
    UIImage *outputImage = UIGraphicsGetImageFromCurrentImageContext();
    UIGraphicsEndImageContext();

    return outputImage;
} 

I achieve almost 90% using this - I am sure there must be better options but I tried with blurSize as far as I could and 8.0 is the value that works with most of my input images.

For anyone else, good luck with your trying!

Nirav Bhatt
  • 6,940
  • 5
  • 45
  • 89
0

SWIFT3

SOLUTION 1

extension UIImage {

func doBinarize() -> UIImage? {

    let grayScaledImg = self.grayImage()
    let imageSource = GPUImagePicture(image: grayScaledImg)
    let stillImageFilter = GPUImageAdaptiveThresholdFilter()
    stillImageFilter.blurRadiusInPixels = 8.0 

    imageSource!.addTarget(stillImageFilter)
    stillImageFilter.useNextFrameForImageCapture()
    imageSource!.processImage()


    guard let retImage: UIImage = stillImageFilter.imageFromCurrentFramebuffer(with: UIImageOrientation.up) else {
        print("unable to obtain UIImage from filter")
        return nil
    }

    return retImage
}

func grayImage() -> UIImage? {
    UIGraphicsBeginImageContextWithOptions(self.size, false, 1.0)
    let imageRect = CGRect(x: 0, y: 0, width: self.size.width, height: self.size.height)

    self.draw(in: imageRect, blendMode: .luminosity, alpha:  1.0)

    let outputImage = UIGraphicsGetImageFromCurrentImageContext()
    UIGraphicsEndImageContext()

    return outputImage
}


}

The result would be enter image description here

SOLUTION 2

use GPUImageLuminanceThresholdFilter to achieve 100% black and white effect whithout grey color

   let stillImageFilter = GPUImageLuminanceThresholdFilter() 
   stillImageFilter.threshold = 0.9 

For example I need to detect flash light and this works for me enter image description here

Svitlana
  • 2,938
  • 1
  • 29
  • 38