I'm afraid the solution will require quite a bit more code, hopefully this is something you can adjust so that the code is formatted for you properly.
I believe the best way will be to change your rectangles to be "text frames" so that they can contain text, and text within them can be aligned based on the rectangle/text-frame bounds.
Define Paragraph Styles
First, you'll have to declare a "Paragraph Style" (similar conceptually to CSS) for how you want the text within each of these boxes to be formatted (font, size, color, etc):
<RootParagraphStyleGroup Self="myPara">
    <ParagraphStyle Self="ParagraphStyle/myParaStyle" Name="myParaStyle" FillColor="Color/Paper" PointSize="14" Justification="CenterAlign">
        <Properties>
            <AppliedFont type="string">Arial</AppliedFont>
        </Properties>
    </ParagraphStyle>
</RootParagraphStyleGroup>
Create Boxes
Next, you'll have to declare all of the frames as well as declare a sort of ID as ParentStory="[Story ID]"for which text (we'll define the actual text later) will be inserted into this frame:
<Spread Self="sp1">
    <TextFrame Self="tf1" ParentStory="st1" ContentType="TextType" FillColor="Color/u13b" StrokeWeight="0" StrokeColor="Swatch/None" ItemTransform="1 0 0 1 0 0">
        <Properties>
            <PathGeometry>
                <GeometryPathType PathOpen="false">
                    <PathPointArray>
                        <PathPointType Anchor="0 0" LeftDirection="0 0" RightDirection="0 0" />
                        <PathPointType Anchor="0 50" LeftDirection="0 50" RightDirection="0 50" />
                        <PathPointType Anchor="150 50" LeftDirection="150 50" RightDirection="150 50" />
                        <PathPointType Anchor="150 0" LeftDirection="150 0" RightDirection="150 0" />
                    </PathPointArray>
                </GeometryPathType>
            </PathGeometry>
        </Properties>
        <TextFramePreference VerticalJustification="CenterAlign"></TextFramePreference>
    </TextFrame>
</Spread>
I noticed that it looks like you sized your rectangles by using the ItemTransform keyword, but I would advise against this since it will also transform the text within the frame (will distort the characters). Instead, you'll need to define each box by providing the coordinates of the four corners of each box relative to a single insertion point (the point you click when placing the IDMS file into an InDesign document) - I'd recommend picking the upper leftmost corner of your whole map and using coordinates for each text frame relative to that position - in this case a positive Y value will be below the insertion point. For reference, the units default to Points, which translates to 1" = 72pts.
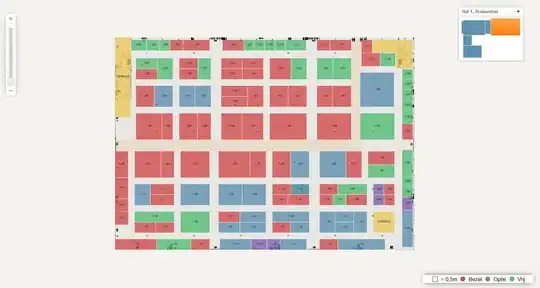
I also noticed that your web version has different colors, you could apply those here by adding additional color definitions right after the opening Document tag, and then assigning the appropriate color's name to FillColor="[color name]" portion of the TextFrame element.
You would add as many TextFrame elements as you need between the Spread tags, and then after closing /Spread, begin defining the text that goes into each frame.
Adding Text to the boxes
Make sure to identify each "story" by assigning Story Self="[Story ID]" to match what you assigned to ParentStory within the TextFrames above:
<Story Self="st1">
    <ParagraphStyleRange AppliedParagraphStyle="ParagraphStyle/myParaStyle">
        <Content>1st Text Box</Content>
    </ParagraphStyleRange>
</Story>
After all of the stories, then you can close the document with /Document.
Sample
A complete file sample with 3 different frames each with their own text would look like this pastebin.