7

I am trying to emboss an image using PIL.

PIL provides a basic way to emboss an image ( using ImageFilter.EMBOSS).

In image editing packages like GIMP, you can vary parameters like Azimuth, depth and elevation in this embossed image.

How to do this with PIL? At the very least I want to adjust the "depth" of the embossed image.

Update: I tried things suggested by Paul (modifying the filterargssuch as scale, offset and the matrix), but I couldn't change the "depth" effect. So still looking for an answer.

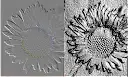
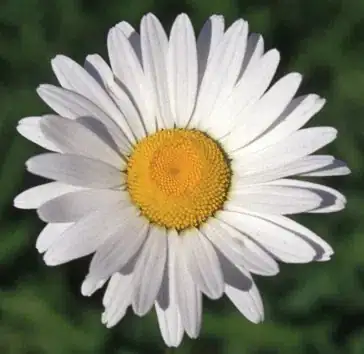
Here is the comparison of embossing effect using PIL (left) and GIMP (right). The original picture is located here, http://www.linuxtopia.org/online_books/graphics_tools/gimp_advanced_guide/gimp_guide_node74.html.

alt text

Community
  • 1
  • 1
cppb
  • 2,319
  • 8
  • 32
  • 37
  • To change "depth" You might try changing the `scale` and `offset` parameters in the EMBOSS filter (I'm going to guess reducing offset and increasing scale). See additions to my answer. – Paul Jan 09 '10 at 18:42
  • unfortunately it doesn't make any difference to the depth if I vary scale and offset params – cppb Jan 10 '10 at 11:59
  • 1
    After installing Gimp and reading this: http://www.linuxtopia.org/online_books/graphics_tools/gimp_advanced_guide/gimp_guide_node74.html , it has become apparent that Gimp and PIL define an emboss differently. Namely that the coloring (Gimp does) is proportional to difference of the gradient on a incident vector, rather than just on the relief itself. This procedure can be precisely duplicated using NumPy if you are so inclined, but there may yet be a PIL solution. Perhaps if you upload example images (orig and desired result) – Paul Jan 10 '10 at 16:23
  • thanks bpowah for following this up..This comment is very useful! I will upload the images soon. I appreciate all your replies. – cppb Jan 10 '10 at 17:18
  • Sorry, I created an example, but I am unable to upload an image. I can send it to you separately... But this should not be image specific.. I want to use GIMP style of embossing in my code (that uses PIL) . So, if there is a general way of acheiving this .. using numpy as you said... can you please post that code? Thank you! – cppb Jan 10 '10 at 17:55
  • 2
    Posting images should not be much of a challenge. http://www.techieblogger.com/2009/09/free-image-hosting-and-photo-sharing-sites.html Are you restricted from these sites in some way? I'm not going to write the code that duplicates the functionality of GIMP for you. But the procedure would go like this: 1) convert the image to B&W. 2) convert it to a numpy array and multiply it by your `depth` value. 3) compute the gradient (just apply the `gradient` function) 4) define your incident vector (from azimuth, elevation) 5) find the difference between grad and vector. 6) convert back to img – Paul Jan 10 '10 at 18:20
  • Of course it should be image independent.. Just would like to know what effect you are after and whether or not it can be approximated using PIL. – Paul Jan 10 '10 at 18:24
  • hi, I have now uploaded the embossed images in the main question. Thanks for the numpy procedure. I will try that out. – cppb Jan 11 '10 at 03:55
  • @bpowah: referring to your comment yesterday.-- "4) define your incident vector from azimuth elevation" --> how this vector expression will look like? I looked at the GIMP code, it defines it as Vx, Vy, Vz But am confused as to how to express this in numpy . Also, while converting back to image, how to specify this diff? I will appreciate your response. – cppb Jan 12 '10 at 18:40
  • Sorry for the delay. I was on vacation. I added some code laying out a simple Numpy approach. hope it helps – Paul Jan 25 '10 at 04:07
  • You can actually script gimp in python, so that might be a much simpler approach. – Jochen Ritzel Jan 25 '10 at 04:54

2 Answers2

10

If you cannot achieve your goal by using or combination of operations (like rotating, then applying the EMBOSS filter, the re-rotating), (or enhancing the contrast then embossing) then you may resort to changing (or creating your own) filter matrix.

Within ImageFilter.py you will find this class:

##
# Embossing filter.

class EMBOSS(BuiltinFilter):
    name = "Emboss"
    filterargs = (3, 3), 1, 128, (
        -1,  0,  0,
        0,  1,  0,
        0,  0,  0
        )

Placing a -1 in a different corner of the matrix will change the azimuth and making it a -2 may have the effect you are looking for.

The matrix is applied pixel-by-pixel. Each element in the matrix corresponds to the current pixel and surrounding pixels; the center value representing the current pixel. The new, transformed current pixel will be created as a combination of all 9 pixels, weighted by the values in the matrix. For example, a matrix with all zeros and a 1 in the center will not change the image.

Additional parameters are scale and offset. For the built-in EMBOSS, the values are 1 (scale) and 128 (offset). Changing these will change the overall strength of the result.

From ImageFilter.py:

# @keyparam scale Scale factor.  If given, the result for each
#    pixel is divided by this value.  The default is the sum
#    of the kernel weights.
# @keyparam offset Offset.  If given, this value is added to the
#    result, after it has been divided by the scale factor.

As I am unfamiliar with the effects of GIMP's "depth" parameter, I cannot say which is most likely to do what you want.

You can also make the matrix a different size. Replace the (3,3) with (5,5), and then create 25-element matrix.

To make temporary changes to the filter without re-saving source code, just do this:

ImageFilter.EMBOSS.filterargs=((3, 3), 1, 128, (-1, 0, 0, 0, 1, 0, 0, 0, 0))

Edit: (taking the NumPy approach)

from PIL import Image
import numpy

# defining azimuth, elevation, and depth
ele = numpy.pi/2.2 # radians
azi = numpy.pi/4.  # radians
dep = 10.          # (0-100)

# get a B&W version of the image
img = Image.open('daisy.jpg').convert('L') 
# get an array
a = numpy.asarray(img).astype('float')
# find the gradient
grad = numpy.gradient(a)
# (it is two arrays: grad_x and grad_y)
grad_x, grad_y = grad
# getting the unit incident ray
gd = numpy.cos(ele) # length of projection of ray on ground plane
dx = gd*numpy.cos(azi)
dy = gd*numpy.sin(azi)
dz = numpy.sin(ele)
# adjusting the gradient by the "depth" factor
# (I think this is how GIMP defines it)
grad_x = grad_x*dep/100.
grad_y = grad_y*dep/100.
# finding the unit normal vectors for the image
leng = numpy.sqrt(grad_x**2 + grad_y**2 + 1.)
uni_x = grad_x/leng
uni_y = grad_y/leng
uni_z = 1./leng
# take the dot product
a2 = 255*(dx*uni_x + dy*uni_y + dz*uni_z)
# avoid overflow
a2 = a2.clip(0,255)
# you must convert back to uint8 /before/ converting to an image
img2 = Image.fromarray(a2.astype('uint8')) 
img2.save('daisy2.png')

I hope this helps. I can see now why you were disappointed with PIL's results. Wolfram Mathworld is a good resource for a vector algebra refresher.

Before

alt text

After

alt text

Community
  • 1
  • 1
Paul
  • 42,322
  • 15
  • 106
  • 123
  • Thank you for answering! Yes, I tried tweaking params in the 3 X 3 matrix. But I am not getting the desired effect ... i.e. I want to "increase the depth effect" . Could you please explain what these matrix elements are .. I couldn't find the explanation... thanks once again! – cppb Jan 09 '10 at 18:02
2

To increase the depth of an emboss filter, increase the radius of the filter's mask. Low depth:

h = [[1, 0, 0]
     [0, 0, 0]
     [0, 0, -1]]

versus high depth:

h = [[1, 0, 0, 0, 0, 0, 0]
     [0, 0, 0, 0, 0, 0, 0]
     [0, 0, 0, 0, 0, 0, 0]
     [0, 0, 0, 0, 0, 0, 0]
     [0, 0, 0, 0, 0, 0, 0]
     [0, 0, 0, 0, 0, 0, 0]
     [0, 0, 0, 0, 0, 0, -1]]

To change the azimuth, place the nonzero coefficients at a different angle:

h = [[0, 0, 1]
     [0, 0, 0]
     [-1, 0, 0]]

I'm not really sure about elevation. You may need to change the nonzero coefficient values? I just know it needs to be a high-pass filter.

In any case, to compute and display the image using a Scipy solution:

import scipy.misc, scipy.signal
im = scipy.misc.imread(filename)
im_out = scipy.signal.convolve2d(im, h, 'same')
scipy.misc.imshow(im_out)

Hope this helps.

EDIT: Okay, as Paul hinted with PIL, you can adjust filter parameters, or even define a completely new kernel. The scale and offset parameters have nothing to do with what you are looking for. The size of the filter is most important for adjusting depth.

Upon further investigation, PIL does not let you change the filter size beyond 5x5. Seems strange. Therefore, you will not get as dramatic a change in depth as you probably expect.

For total control, you may want to try the Scipy solution I and Paul mentioned earlier. Change the filter size to something ridiculous, like 21x21, and see if it makes the type of difference you want.

Paul
  • 42,322
  • 15
  • 106
  • 123
Steve Tjoa
  • 59,122
  • 18
  • 90
  • 101
  • yes, PIL does not let you specify a filter size beyond 5x5. This post was useful (and as both you and bpowah explained, I think numpy/scipy is a good solution. ) – cppb Jan 26 '10 at 17:46