1

I am creating desktop application using C++ and pure WinApi. I need to display image that was given to me as SVG.

Since WinAPI supports only EMF files as vector format, I have used Inkscape to convert the file into EMF. My graphics design skills are at beginner level, but I have managed to convert SVG file into EMF successfully. However, the result is not looking as the original one, it is less "precise" so to say.

If I export the SVG as PNG and display it with GDI+, the result is the same as the original file. Unfortunately I need vector format.

To see exactly what I mean, download SVG, and EMF and PNG that I made here. Just click on Download:test.rar above 5 yellow stars ( see image below ).

enter image description here

Here are the instructions for creating minimal application that reproduces the problem:

1) Create default Win32 project in Visual Studio ( I use VS 2008, but this shouldn't be the problem );

2) Rewrite WM_PAINT like this:

case WM_PAINT:
    {
        hdc = BeginPaint(hWnd, &ps);
        // TODO: Add any drawing code here...

        RECT rcClient;
        GetClientRect( hWnd, &rcClient );

        FillRect( hdc, &rcClient, (HBRUSH)GetStockObject( LTGRAY_BRUSH) );

        // put metafile in the same place your app is
        HENHMETAFILE hemf = GetEnhMetaFile( L".\\test.emf" );
        ENHMETAHEADER emh; 
        GetEnhMetaFileHeader( hemf, sizeof(emh), &emh ); 

        // rescale metafile, and keep proportion
        UINT o_height = emh.rclFrame.bottom - emh.rclFrame.top, 
            o_width =  emh.rclFrame.right - emh.rclFrame.left;

        float scale = 0.5;

        scale = (float)( rcClient.right - rcClient.left ) / o_width;

        if( (float)( rcClient.bottom - rcClient.top ) / o_height  <  scale )
            scale = (float)( rcClient.bottom - rcClient.top ) / o_height;

        int marginX = ( rcClient.right - rcClient.left ) - (int)( o_width * scale );
        int marginY = ( rcClient.bottom - rcClient.top ) - (int)( o_height * scale );

        marginX /= 2;
        marginY /= 2;

        rcClient.left = rcClient.left + marginX;
        rcClient.right = rcClient.right - marginX;
        rcClient.top = rcClient.top + marginY;
        rcClient.bottom = rcClient.bottom - marginY;

        // Draw the picture.  
        PlayEnhMetaFile( hdc, hemf, &rcClient ); 

        // Release the metafile handle.  
        DeleteEnhMetaFile(hemf); 

        EndPaint(hWnd, &ps);
    }
    break;

3) Add following handlers for WM_SIZE and WM_ERASEBKGND just below WM_PAINT :

case WM_SIZE:
    InvalidateRect( hWnd, NULL, FALSE );
    return 0L;
case WM_ERASEBKGND:
    return 1L;

4) Resize the window to the smallest possible size, and then maximize it.

Notice that the bigger the window gets, the better the image quality is, but the smaller it gets the "less precise" the image gets. I tested this on Windows XP.

I am asking your help to get the same graphic quality of the EMF file as the original SVG.

Thank you for your time and efforts. Best regards.

AlwaysLearningNewStuff
  • 2,939
  • 3
  • 31
  • 84
  • Thought it might be you from the question title. :D I remember that image (and the one of the map). I've got to sleep now, though if you haven't seen the question, this seems to provide some good tips: http://stackoverflow.com/questions/1783130/draw-emf-antialiased - notably the presumed approach taken by MSOffice - draw at 2x the size then downsample - you may be able to take advantage of antialiasing if scaling the large result to the desired size with gdi+ - Also, the emf and svg uploads appear broken - I get a 371 byte text response for each (tried twice each). Regards, S. :) – enhzflep Aug 05 '14 at 16:52
  • @enhzflep: I believe that link is fixed now ( uploaded all files as `.rar` ), thank you for trying to help. I didn't want to bother you, since I believe everybody deserves a good rest from work ( except me apparently :smile: ). *draw at 2x the size then downsample* got similar advice at *Super User* ( but they said to do it in Inkscape ) but had no luck... Perhaps you could try something out during comming weekend ( I don't want to bother you ) ? Thanks and good night :) – AlwaysLearningNewStuff Aug 05 '14 at 17:26
  • @enhzflep: [This disscussion](http://superuser.com/questions/791810/svg-exported-to-emf-loses-precision-but-exported-as-png-looks-fine) seems relevant to me. Please take a look and tell me what you think when you get a spare moment, OK? – AlwaysLearningNewStuff Aug 05 '14 at 21:08
  • looks like there are some good points made in that thread on superuser. I note the comments made by `mpy` about the conversion to emf being just fine and more particularly the comment regarding the scaling algorithm used. I tried to draw the emf at the size specified in rclBounds (rather than rclFrame) and then use StretchBlt to size - awful result. I then used SetStretchBltMode with HALFTONE and got a almost pixel-identical result to the png. Still ironing kinks out of the transparency around the logo. I'll have another look after I get back from this meeting. :) – enhzflep Aug 06 '14 at 01:55
  • I forgot to ask a few more things earlier: **1.** Will the image be drawn on a solid background, or will it be on a patterned one (i.e - does the transparency outside the logo need to be transparent, or can it be filled with a solid colour) and **2.** Will the logo be drawn at a fixed size, or does it need to be resized? - I ask because in your demo, at certain scales, some lines are 1 pixel thick and others are considerably thicker - yet at other scales these same lines appear the same width. In either case - approx how large? (in order to avoid re-sampling artefacts) – enhzflep Aug 06 '14 at 05:55
  • @enhzflep: *1. Will the image be drawn on a solid background, or will it be on a patterned one (i.e - does the transparency outside the logo need to be transparent, or can it be filled with a solid colour)* It will be patterned one ( gray hatched brush with white lines - you saw the image before in one of my questions ). Transparency outside logo should remain. *2. Will the logo be drawn at a fixed size, or does it need to be resized?* At the moment logo will be fixed size ( 90 x 120 ) but my employers might change their mind, that's why I must keep the resizing option open. – AlwaysLearningNewStuff Aug 06 '14 at 08:15
  • @enhzflep: Logo is not mine, nor belongs to my employers. It belongs to the third party involved in the project, and in my opinion the quality of the drawing is not so good but it is the only thing I have. I don't know how to improve the quality of the image, and what strikes me even more odd is the fact that I need to resampling on a vector file format. Unbelievable... – AlwaysLearningNewStuff Aug 06 '14 at 08:17
  • 1
    Let us [continue this discussion in chat](http://chat.stackoverflow.com/rooms/58763/discussion-between-enhzflep-and-alwayslearningnewstuff). – enhzflep Aug 06 '14 at 09:47
  • think I can see a way through. I.e draw the image much larger and the down-sample. Then mask the transparent areas and AlphaBlend. I've covered this more in chat and updated my answer with new pics. :) – enhzflep Aug 07 '14 at 02:28

1 Answers1

3

Solved it!

The solution makes much, if not all of the solution I've submitted redundant. I've therefore decided to replace it with this one.

There's a number of things to take into account and a number of concepts that are employed to get the desired result. These include (in no particular order)

  • The need to set a maskColour that closely matches the background, while also not being present in the final computed image. Pixels that straddle the border between transparent/opaque areas are blended values of the mask and the EMF's colour at that point.
  • The need to choose a scaling rate that's appropriate for the source image - in the case of this image and the code I've used, I chose 8. This means that we're drawing this particular EMF at about a megapixel, even though the destination is likely to be in the vicinity of about 85k pixels.
  • The need to manually set the alpha channel of the generated 32bit HBITMAP, since the GDI stretching/drawing functions disregard this channel, yet the AlphaBlend function requires them to be accurate.

I also note that I've used old code to draw the background manually each time the screen is refreshed. A much better approach would be to create a patternBrush once which is then simply copied using the FillRect function. This is much faster than filling the rect with a solid colour and then drawing the lines over the top. I can't be bothered to re-write that part of the code, though I'll include a snippet for reference that I've used in other projects in the past.

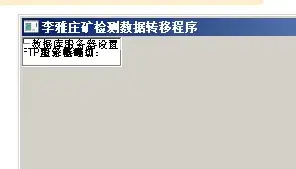
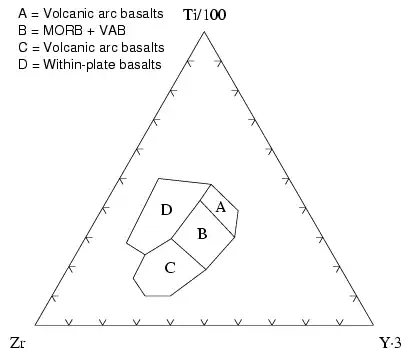
Here's a couple of shots of the result I get from the code below:

enter image description here enter image description here enter image description here

Here's the code I used to achieve it:

#define WINVER 0x0500       // for alphablend stuff

#include <windows.h>
#include <commctrl.h>
#include <stdio.h>
#include <stdint.h>
#include "resource.h"

HINSTANCE hInst;

HBITMAP mCreateDibSection(HDC hdc, int width, int height, int bitCount)
{
    BITMAPINFO bi;
    ZeroMemory(&bi, sizeof(bi));
    bi.bmiHeader.biSize = sizeof(bi.bmiHeader);
    bi.bmiHeader.biWidth = width;
    bi.bmiHeader.biHeight = height;
    bi.bmiHeader.biPlanes = 1;
    bi.bmiHeader.biBitCount = bitCount;
    bi.bmiHeader.biCompression = BI_RGB;
    return CreateDIBSection(hdc, &bi, DIB_RGB_COLORS, 0,0,0);
}

void makePixelsTransparent(HBITMAP bmp, byte r, byte g, byte b)
{
    BITMAP bm;
    GetObject(bmp, sizeof(bm), &bm);
    int x, y;

    for (y=0; y<bm.bmHeight; y++)
    {
        uint8_t *curRow = (uint8_t *)bm.bmBits;
        curRow += y * bm.bmWidthBytes;
        for (x=0; x<bm.bmWidth; x++)
        {
            if ((curRow[x*4 + 0] == b) && (curRow[x*4 + 1] == g) && (curRow[x*4 + 2] == r))
            {
                curRow[x*4 + 0] = 0;      // blue
                curRow[x*4 + 1] = 0;      // green
                curRow[x*4 + 2] = 0;      // red
                curRow[x*4 + 3] = 0;      // alpha
            }
            else
                curRow[x*4 + 3] = 255;    // alpha
        }
    }
}

// Note: maskCol should be as close to the colour of the background as is practical
//       this is because the pixels that border transparent/opaque areas will have
//       their colours derived from a blending of the image colour and the maskColour
//
//       I.e - if drawing to a white background (255,255,255), you should NOT use a mask of magenta (255,0,255)
//              this would result in a magenta-ish border
HBITMAP HbitmapFromEmf(HENHMETAFILE hEmf, int width, int height, COLORREF maskCol)
{
        ENHMETAHEADER emh;
        GetEnhMetaFileHeader(hEmf, sizeof(emh), &emh);
        int emfWidth, emfHeight;
        emfWidth = emh.rclFrame.right - emh.rclFrame.left;
        emfHeight = emh.rclFrame.bottom - emh.rclFrame.top;

        // these are arbitrary and selected to give a good mix of speed and accuracy
        // it may be worth considering passing this value in as a parameter to allow
        // fine-tuning
        emfWidth /= 8;
        emfHeight /= 8;

        // draw at 'native' size
        HBITMAP emfSrcBmp = mCreateDibSection(NULL, emfWidth, emfHeight, 32);

        HDC srcDC = CreateCompatibleDC(NULL);
        HBITMAP oldSrcBmp = (HBITMAP)SelectObject(srcDC, emfSrcBmp);

        RECT tmpEmfRect, emfRect;
        SetRect(&tmpEmfRect, 0,0,emfWidth,emfHeight);

        // fill background with mask colour
        HBRUSH bkgBrush = CreateSolidBrush(maskCol);
        FillRect(srcDC, &tmpEmfRect, bkgBrush);
        DeleteObject(bkgBrush);

        // draw emf
        PlayEnhMetaFile(srcDC, hEmf, &tmpEmfRect);

        HDC dstDC = CreateCompatibleDC(NULL);
        HBITMAP oldDstBmp;
        HBITMAP result;
        result = mCreateDibSection(NULL, width, height, 32);
        oldDstBmp = (HBITMAP)SelectObject(dstDC, result);

        SetStretchBltMode(dstDC, HALFTONE);
        StretchBlt(dstDC, 0,0,width,height, srcDC, 0,0, emfWidth,emfHeight, SRCCOPY);

        SelectObject(srcDC, oldSrcBmp);
        DeleteDC(srcDC);
        DeleteObject(emfSrcBmp);

        SelectObject(dstDC, oldDstBmp);
        DeleteDC(dstDC);

        makePixelsTransparent(result, GetRValue(maskCol),GetGValue(maskCol),GetBValue(maskCol));

        return result;
}

int rectWidth(RECT &r)
{
    return r.right - r.left;
}

int rectHeight(RECT &r)
{
    return r.bottom - r.top;
}

void onPaintEmf(HWND hwnd, HENHMETAFILE srcEmf)
{
    PAINTSTRUCT ps;
    RECT mRect, drawRect;
    HDC hdc;
    double scaleWidth, scaleHeight, scale;
    int spareWidth, spareHeight;
    int emfWidth, emfHeight;
    ENHMETAHEADER emh;

    GetClientRect( hwnd, &mRect );

    hdc = BeginPaint(hwnd, &ps);

        // calculate the draw-size - retain aspect-ratio.
        GetEnhMetaFileHeader(srcEmf, sizeof(emh), &emh );

        emfWidth =  emh.rclFrame.right - emh.rclFrame.left;
        emfHeight = emh.rclFrame.bottom - emh.rclFrame.top;

        scaleWidth = (double)rectWidth(mRect) / emfWidth;
        scaleHeight = (double)rectHeight(mRect) / emfHeight;
        scale = min(scaleWidth, scaleHeight);

        int drawWidth, drawHeight;
        drawWidth = emfWidth * scale;
        drawHeight = emfHeight * scale;

        spareWidth = rectWidth(mRect) - drawWidth;
        spareHeight = rectHeight(mRect) - drawHeight;

        drawRect = mRect;
        InflateRect(&drawRect, -spareWidth/2, -spareHeight/2);

        // create a HBITMAP from the emf and draw it
        // **** note that the maskCol matches the background drawn by the below function ****
        HBITMAP srcImg = HbitmapFromEmf(srcEmf, drawWidth, drawHeight, RGB(230,230,230) );

        HDC memDC;
        HBITMAP old;
        memDC = CreateCompatibleDC(hdc);
        old = (HBITMAP)SelectObject(memDC, srcImg);

        byte alpha = 255;
        BLENDFUNCTION bf = {AC_SRC_OVER,0,alpha,AC_SRC_ALPHA};
        AlphaBlend(hdc, drawRect.left,drawRect.top, drawWidth,drawHeight,
                   memDC, 0,0,drawWidth,drawHeight, bf);

        SelectObject(memDC, old);
        DeleteDC(memDC);
        DeleteObject(srcImg);

    EndPaint(hwnd, &ps);
}

void drawHeader(HDC dst, RECT headerRect)
{
    HBRUSH b1;
    int i,j;//,headerHeight = (headerRect.bottom - headerRect.top)+1;

        b1 = CreateSolidBrush(RGB(230,230,230));
        FillRect(dst, &headerRect,b1);
        DeleteObject(b1);
        HPEN oldPen, curPen;
        curPen = CreatePen(PS_SOLID, 1, RGB(216,216,216));
        oldPen = (HPEN)SelectObject(dst, curPen);
        for (j=headerRect.top;j<headerRect.bottom;j+=10)
        {
            MoveToEx(dst, headerRect.left, j, NULL);
            LineTo(dst, headerRect.right, j);
        }

        for (i=headerRect.left;i<headerRect.right;i+=10)
        {
            MoveToEx(dst, i, headerRect.top, NULL);
            LineTo(dst, i, headerRect.bottom);
        }
        SelectObject(dst, oldPen);
        DeleteObject(curPen);
        MoveToEx(dst, headerRect.left,headerRect.bottom,NULL);
        LineTo(dst, headerRect.right,headerRect.bottom);
}

BOOL CALLBACK DlgMain(HWND hwndDlg, UINT uMsg, WPARAM wParam, LPARAM lParam)
{
    static HENHMETAFILE hemf;

    switch(uMsg)
    {
        case WM_INITDIALOG:
        {
            hemf = GetEnhMetaFile( "test.emf" );
        }
        return TRUE;

        case WM_PAINT:
            onPaintEmf(hwndDlg, hemf);
        return 0;

        case WM_ERASEBKGND:
        {
            RECT mRect;
            GetClientRect(hwndDlg, &mRect);
            drawHeader( (HDC)wParam, mRect);
        }
        return true;

        case WM_SIZE:
            InvalidateRect( hwndDlg, NULL, true );
            return 0L;

        case WM_CLOSE:
        {
            EndDialog(hwndDlg, 0);
        }
        return TRUE;

        case WM_COMMAND:
        {
            switch(LOWORD(wParam))
            {
            }
        }
        return TRUE;
    }
    return FALSE;
}

int APIENTRY WinMain(HINSTANCE hInstance, HINSTANCE hPrevInstance, LPSTR lpCmdLine, int nShowCmd)
{
    hInst=hInstance;
    InitCommonControls();
    return DialogBox(hInst, MAKEINTRESOURCE(DLG_MAIN), NULL, (DLGPROC)DlgMain);
}

Finally, here's an example of creating a patternBrush for filling the background using the FillRect function. This approach is suitable for any tileable background.

HBRUSH makeCheckerBrush(int squareSize, COLORREF col1, COLORREF col2)
{
    HDC memDC, tmpDC = GetDC(NULL);
    HBRUSH result, br1, br2;
    HBITMAP old, bmp;
    RECT rc, r1, r2;

    br1 = CreateSolidBrush(col1);
    br2 = CreateSolidBrush(col2);

    memDC = CreateCompatibleDC(tmpDC);
    bmp = CreateCompatibleBitmap(tmpDC, 2*squareSize, 2*squareSize);
    old = (HBITMAP)SelectObject(memDC, bmp);

    SetRect(&rc, 0,0, squareSize*2, squareSize*2);
    FillRect(memDC, &rc, br1);

    // top right
    SetRect(&r1, squareSize, 0, 2*squareSize, squareSize);
    FillRect(memDC, &r1, br2);

    // bot left
    SetRect(&r2, 0, squareSize, squareSize, 2*squareSize);
    FillRect(memDC, &r2, br2);

    SelectObject(memDC, old);
    DeleteObject(br1);
    DeleteObject(br2);
    ReleaseDC(0, tmpDC);
    DeleteDC(memDC);

    result = CreatePatternBrush(bmp);
    DeleteObject(bmp);
    return result;
}

Example of result, created with:

HBRUSH bkBrush = makeCheckerBrush(8, RGB(153,153,153), RGB(102,102,102)); enter image description here

enhzflep
  • 12,927
  • 2
  • 32
  • 51
  • I had a problem since Visual Studio 2008 can't find `#include` but have managed to solve it by searching through SO. The code works, picture is consistent after I resize the window, so I have officially accepted the solution ( I have upvoted earlier ). Can we "meet at chat" ( **when you have spare time** ), so I can ask you some questions "in person" ( they popped up after reading your answer )? If interested, leave me a comment with the time and day it suits you ( I promise not to bore you, and I think the questions are smart enough to capture your attention ). Best regards! – AlwaysLearningNewStuff Aug 17 '14 at 17:53
  • Hia! It's been a rough week. Oh yeah, sorry for using gcc and not realizing that the uintX_t types weren't going to be available in VS. Glad to hear you find the result acceptable - it was a fun and interesting problem solving task. (Much like many of the ones on the code-golf StackExchange site). A quick check tells me that 3.57pm here = 7.57am in (what I think is) your part of the world. - We're currently using GMT+10 as our time. I'll check the chat-room tonight at around 8pm and can try again at a time you designate if that's not a good time for you. Interested, but somewhat busy. :) – enhzflep Aug 20 '14 at 06:02
  • Take your time. I have done a little research on my own and I think you used *Wu algorithm* ( 8x8 or 8x4 ? I am not sure... ). I have tried to draw metafile into 8 times bigger bitmap and then scale it down with `StretchBlt` and have achieved same results. The problem arise when maximizing the window, image doesn't show up! I guess it is because bitmap can't be allocated ( too big ). I have noticed significant performance overhead in my case ( slightly the same in yours ) but it must be because of too much memory usage... See you at 8 PM, Australian time ( that is 12 PM in my time zone ). – AlwaysLearningNewStuff Aug 20 '14 at 08:08
  • I will be on our chat, the one in your comment at the top of this post( *Let us continue this discussion on chat* ). Hopefully you will manage to be there at 8 PM, Australian time ( if not, no problem, we shall talk some other time ). Thanks again and best regards 'till then! – AlwaysLearningNewStuff Aug 20 '14 at 08:45
  • My pardon for disturbing, can you take a look at [this problem](http://stackoverflow.com/questions/25895351/window-size-of-edit-control-combobox-is-not-properly-adjusted-when-using-movewin) I have faced? I hope that you will find its solution useful. Best regards :) – AlwaysLearningNewStuff Sep 17 '14 at 16:23
  • Thank you so much! But be warned: this might be very tricky one! Please read carefully the question ( I have posted on CP as well ). I am 100% sure that you will find this useful. Best regards. – AlwaysLearningNewStuff Sep 17 '14 at 16:34
  • Pleasure's mine. I'm sure there's a useful trick in here for me to stash away somewhere till another time. Cheers my friend. :) – enhzflep Sep 17 '14 at 17:37