34

I'm trying to draw a shadow and a corner radius on an image. I can add them separately, but I've got no way to add both effects at the same time. I'm adding a shadow with:

[layer setShadowOffset:CGSizeMake(0, 3)];
[layer setShadowOpacity:0.4];
[layer setShadowRadius:3.0f];
[layer setShouldRasterize:YES];

Here, layer is a CALayer of a UIView subclass. So this works whenever I set

[layer setMasksToBounds:NO];

Now to add a corner radius I do this:

[layer setCornerRadius:7.0f];

but I need to set MasksToBounds to YES in order for this to work:

[layer setMasksToBounds:YES];

Is there anyway I can get both of these effects to add?

Thanks for your time,

Denis

Peter Hosey
  • 95,783
  • 15
  • 211
  • 370
Denis
  • 417
  • 1
  • 5
  • 14

4 Answers4

60

Yes, yes there is...

If you want both a corner radius and a drop shadow, you don't turn on -masksToBounds, but rather set the corner radius and set the bezier path of the shadow with a rounded rect. Keep the radius of the two the same:

[layer setShadowOffset:CGSizeMake(0, 3)];
[layer setShadowOpacity:0.4];
[layer setShadowRadius:3.0f];
[layer setShouldRasterize:YES];

[layer setCornerRadius:12.0f];
[layer setShadowPath:
                   [[UIBezierPath bezierPathWithRoundedRect:[self bounds]
                                               cornerRadius:12.0f] CGPath]];

You might want to check your performance without the -shouldRasterize parameter set once you're setting the shadow path. Drawing performance tends to be very good once you've set a shadow path.

UPDATE

I hadn't looked at this problem in quite awhile, but it appears that you no longer need to set a shadowPath in order to get this to work. Simply setting the cornerRadius and shadowOpacity will work now. I think this has been the case since iOS5 (as far as I can tell). Providing this update is probably unnecessary since setting those parameters 'just works', but I'll provide it for posterity sake. To recap, this is now all you need:

[layer setShadowOpacity:0.4];
[layer setCornerRadius:12.0f];

If you still need better performance, you can go ahead and set the shouldRasterize parameter as well:

[layer setShouldRasterize:YES];

And speaking of performance, it's worth noting that if you are noticing sluggish animations, you will want to use the technique of setting the shadow path after all. This update was really just to point out that setting the path is no longer required to achieve the effect of displaying both a corner radius and a shadow at the same time. If performance is your priority, though, use a path.

UPDATE 2

Since people seem to be having trouble getting this to work in some instances, I'll post a more complete code snippet here from a sample project I created:

- (void)viewDidLoad
{
  [super viewDidLoad];

  CALayer *layer = [CALayer layer];
  [layer setBounds:CGRectMake(0.0f, 0.0f, 100.0f, 200.0f)];
  [layer setPosition:[[self view] center]];
  [layer setBackgroundColor:[[UIColor lightGrayColor] CGColor]];
  [layer setShadowOpacity:0.55f];
  [layer setCornerRadius:8.0f];
  [layer setBorderWidth:1.0f];

  [[[self view] layer] addSublayer:layer];

  [[[self testView] layer] setShadowOpacity:0.55f];
  [[[self testView] layer] setShadowRadius:15.0f];
  [[[self testView] layer] setCornerRadius:8.0f];
  [[[self testView] layer] setBorderWidth:1.0f];
}

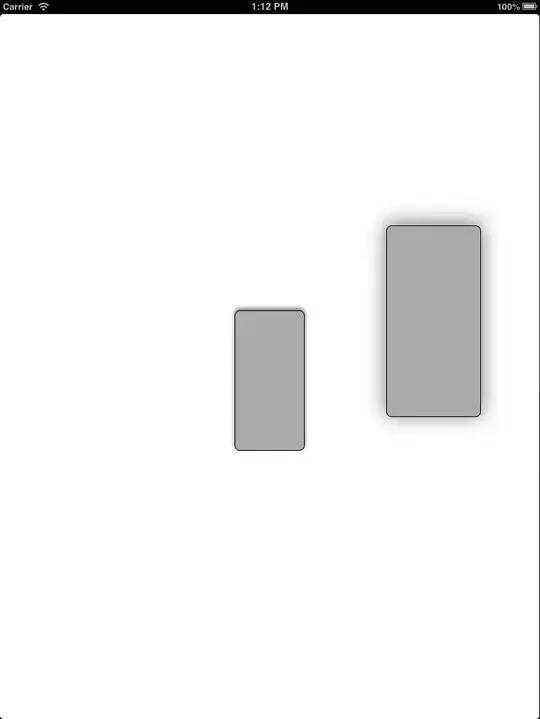
The testView is a UIView I added in Interface Builder and set an outlet on. This is to make sure it's working the same on both layers you add explicitly as well as the layers within subviews.

I've tested this on the simulators for iOS5 through iOS6.1. It gives this result for me in each of them:

enter image description here

Matt Long
  • 24,438
  • 4
  • 73
  • 99
  • 1
    Is there any reason not to set shouldRasterize to YES? – memmons Nov 09 '10 at 02:50
  • 2
    It depends on how often you're updating the layer. If you intend to set it once and not update it again, rasterizing it will help performance if you're animating the layer. However, if the layer's content gets updated often, it will render that content as an image every time the content changes which could actually hurt your scrolling performance (assuming you're scrolling/animating). – Matt Long Nov 09 '10 at 04:44
  • Needs a space between UIBezierPath and bezierPathWithRoundedRect. – Ari Braginsky Jan 29 '11 at 03:13
  • Thanks Ari. I fixed it in the answer. – Matt Long Jan 31 '11 at 16:11
  • Maybe something changed in iOS 5, but I can't seem to get this working in awakeFromNib on a UIImageView for some reason... I need to set masksToBounds to NO for the shadow to appear. – taber Dec 31 '11 at 07:35
  • I noticed that if we use this technique to a UIImageView and assume that the image content fills the whole frame, then the image would "bleed" at the 4 corners. Setting masksToBounds would fix the bleeding, but obviously the shadow disappears. Pity. – Wayne Liu May 16 '12 at 16:46
  • Great answer Bezier path rocks – Nicolas Manzini Aug 28 '12 at 22:54
  • I tried this and for me, the shadow now has a corner radius but the image does not. I can't find a way for corner radius to work without setting maskToBounds to YES (which kills the shadow). – Paul Batum Nov 25 '12 at 08:56
  • 2
    @PaulBatum Another trick I've used is to use multiple layers. Use masksToBounds:YES on your image layer, and then create a layer behind the image layer that provide the shadow. – Matt Long Nov 26 '12 at 22:49
  • Pretty sure using the shadowPath option is faster, since it doesn't involve drawing your layer and then creating a shadow based on that image. – nielsbot Jan 14 '13 at 18:21
  • I think you're right, @nielsbot, however, the question is about displaying both a corner radius and a drop shadow at the same time. I was simply wanting to note that it's no longer **necessary** to set a bezier path to achieve that. I'll add that clarification to the update. Thanks. – Matt Long Jan 14 '13 at 18:24
  • This did not work for me (although it seems to have worked for other people), is there something different with iOS6? The corners are not rounded here, but the shadows exist. I would like both. Thanks @MattLong – GangstaGraham May 28 '13 at 19:51
  • @JoshSmith I'm not sure what the problem might be. I've added another update to my answer that will hopefully help you get it working. Let me know. – Matt Long Aug 05 '13 at 19:17
  • Look for Swift 3 & IBInspectable extension solution: http://stackoverflow.com/a/43958505/3052059 – Thomás Pereira May 13 '17 at 22:23
  • If you put an image on a view that has corner and shadow, this link is useful. https://fluffy.es/rounded-corner-shadow/ A container view has both properties, and the put an image view with corner on the container view. – alones Aug 31 '19 at 14:48
3

The following Swift 3 code shows how to draw a shadow and a corner radius on an image by using CAShapeLayer and CALayer.

import UIKit

class ViewController: UIViewController {

    override func viewDidLoad() {
        super.viewDidLoad()

        // constants
        let radius: CGFloat = 20, offset = 8
        let rect = CGRect(x: 0, y: 0, width: 200, height: 200)

        // roundedView
        let roundedView = UIView()
        view.addSubview(roundedView)

        // shadow layer
        let shadowLayer = CALayer()
        shadowLayer.shadowColor = UIColor.darkGray.cgColor
        shadowLayer.shadowPath = UIBezierPath(roundedRect: rect, cornerRadius: radius).cgPath
        shadowLayer.shadowOffset = CGSize(width: offset, height: offset)
        shadowLayer.shadowOpacity = 0.8
        shadowLayer.shadowRadius = 2
        roundedView.layer.addSublayer(shadowLayer)

        // mask layer
        let maskLayer = CAShapeLayer()
        maskLayer.path = UIBezierPath(roundedRect: rect, cornerRadius: radius).cgPath

        // image layer
        let imageLayer = CALayer()
        imageLayer.mask = maskLayer
        imageLayer.frame = rect
        imageLayer.contentsGravity = kCAGravityResizeAspectFill
        imageLayer.contents = UIImage(named: "image")?.cgImage
        roundedView.layer.addSublayer(imageLayer)

        // auto layout
        roundedView.translatesAutoresizingMaskIntoConstraints = false
        roundedView.widthAnchor.constraint(equalToConstant: rect.width).isActive = true
        roundedView.heightAnchor.constraint(equalToConstant: rect.height).isActive = true
        roundedView.centerXAnchor.constraint(equalTo: view.centerXAnchor).isActive = true
        roundedView.centerYAnchor.constraint(equalTo: view.centerYAnchor).isActive = true
    }

}

This code generates the following display:

enter image description here


The previous code can be refactored into the following swift files:

CustomView.swift

import UIKit

class CustomView: UIView {

    var imageLayer: CALayer!
    var image: UIImage? {
        didSet { refreshImage() }
    }

    override var intrinsicContentSize:


        CGSize {
        return CGSize(width: 200, height: 200)
    }

    func refreshImage() {
        if let imageLayer = imageLayer, let image = image {
            imageLayer.contents = image.cgImage
        }
    }

    override func layoutSubviews() {
        super.layoutSubviews()

        if imageLayer == nil {
            let radius: CGFloat = 20, offset: CGFloat = 8

            let shadowLayer = CALayer()
            shadowLayer.shadowColor = UIColor.darkGray.cgColor
            shadowLayer.shadowPath = UIBezierPath(roundedRect: bounds, cornerRadius: radius).cgPath
            shadowLayer.shadowOffset = CGSize(width: offset, height: offset)
            shadowLayer.shadowOpacity = 0.8
            shadowLayer.shadowRadius = 2
            layer.addSublayer(shadowLayer)

            let maskLayer = CAShapeLayer()
            maskLayer.path = UIBezierPath(roundedRect: bounds, cornerRadius: radius).cgPath

            imageLayer = CALayer()
            imageLayer.mask = maskLayer
            imageLayer.frame = bounds
            imageLayer.backgroundColor = UIColor.red.cgColor
            imageLayer.contentsGravity = kCAGravityResizeAspectFill
            layer.addSublayer(imageLayer)
        }


        refreshImage()
    }

}

ViewController.swift

import UIKit

class ViewController: UIViewController {

    override func viewDidLoad() {
        super.viewDidLoad()

        let roundedView = CustomView()
        roundedView.translatesAutoresizingMaskIntoConstraints = false
        view.addSubview(roundedView)

        // auto layout
        let horizontalConstraint = roundedView.centerXAnchor.constraint(equalTo: view.centerXAnchor)
        let verticalConstraint = roundedView.centerYAnchor.constraint(equalTo: view.centerYAnchor)
        NSLayoutConstraint.activate([horizontalConstraint, verticalConstraint])

        roundedView.image = UIImage(named: "image")
    }

}

You can find more ways to combine images with rounded corners and shadow on this Github repo.

Imanou Petit
  • 89,880
  • 29
  • 256
  • 218
3

Because I use a UIButton with a background image none of these answers worked for me. I keep getting either no shadow or no round edges on my buttons.

The easiest way in my scenario was to just add another view behind the button and add the shadow to it like so:

button.clipsToBounds=YES;
button.layer.cornerRadius = 25;

UIView *shadowView = [[UIView alloc]initWithFrame:button.frame];

shadowView.backgroundColor = [UIColor whiteColor];//needs this to cast shadow
shadowView.layer.cornerRadius = 25;
shadowView.clipsToBounds = YES;
shadowView.layer.masksToBounds = NO;
shadowView.layer.shadowOffset = CGSizeMake(0, 2);
shadowView.layer.shadowRadius = 1;
shadowView.layer.shadowOpacity = 0.2;


[[button superview]addSubview:shadowView];
[[button superview]bringSubviewToFront:button];
Dirk de Boer
  • 365
  • 1
  • 3
  • 15
-1
view.layer.cornerRadius=4;
[view.layer setMasksToBounds:YES];
[view.layer setShadowColor:SHADOW_COLOR];
[view.layer setShadowOpacity:4 ];
[view.layer setShadowRadius:4];
[view.layer setShadowOffset:0];    
[view.layer setShadowPath: [[UIBezierPath bezierPathWithRoundedRect:[view bounds] cornerRadius:CORNER_RADIUS] CGPath]];
view.layer.borderColor=[[UIColor lightGrayColor] colorWithAlphaComponent:.5].CGColor;
view.layer.borderWidth=.4;
Mahesh
  • 19
  • 1