9

I am creating a template in SendGrid and I was trying to put an image in the center, and the URL I would like to be a tag so I can substitute dynamically in my code, because it will come from my database.

I tried to simply place a tag in the input field, but it doesn't accept that. Is there a way I can accomplish that?

Thank you!

denyzprahy
  • 820
  • 11
  • 24

3 Answers3

9

I assume that you have managed to trigger the SendGrid API via Node.js, since you're tagging the question with the Express tag.

I'm currently trying to build transactional email template using SendGrid as well, and I managed to accomplish this.

You'd probably want to add a new image element first using the builder.

add an image

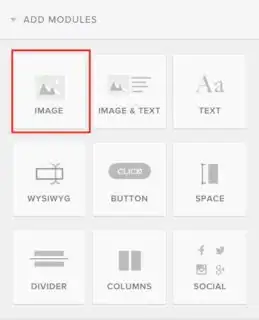
Then upload an image. Once your image is uploaded, double click on the image element. Grab the name of your image file and copy it.

image file

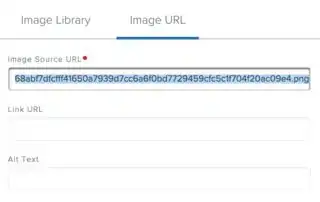
Switch over to the code view.

code view

In the code view, find the html tag that contains your name of your image file. Here's an example in my case.

code to replace

Replace this code with your "substitution tag".

substitution tag

Save the template. Your template should be ready to use. In your Node.js code, set the substitution tag.

mail.personalizations[0].addSubstitution(new helper.Substitution("your-subtitution-tag", "image-url"));

I used this library: https://github.com/sendgrid/sendgrid-nodejs Hopefully your email should contain the new image.

email result

I blurred out some sensitive contents above. This is the email result on my end. Hope this helps!

nic
  • 2,125
  • 1
  • 18
  • 33
  • Nicholas, thank you for your very complete answer! I posted this while ago, and I had already managed how to do it. I did a little bit different. I placed a tag in the `src` attribute in the `img` tag, something like: `https://-url-`. But I just saw here on the template, that the result is the same as yours. Hope this helps more people! Thanks! :) – denyzprahy Dec 30 '16 at 01:52
  • 3
    I am having trouble finding the option to switch over to "code" view. They must have made changes in their UI b/c the main code view I know is inside an entirely different template where you have to choose code or design mode when you create it. From design mode I can get to a code view for the image module, but it won't take my edits of adding an src attribute that includes my sub tag. – RudyOnRails Jan 31 '18 at 03:59
  • I can't remember anymore but I think I had to do it on another project and I got it work by editing the module's code like suggested. But I'm fuzzy. – RudyOnRails Mar 05 '19 at 17:27
7

So as many noticed, Sendgrid has changed the ability to switch between "code-based" editor to "design WYSIWYG" editor after an email template has been initially created, thus making Nicholas's answer irrelevant (sorry mate). One must select at the creation point and then it sticks as that type of editor mode.

I assume that many of you (I know I do!) would like to retain the ability of having a visual editor of your emails (allowing designers and copy writers do their work without bothering developers with their changes) while not giving up on the customization goodies Sendgrid's dynamic emails offer.

I have found an alternative that, although a bit cumbersome, delivers the desired result.

Follow this set of instructions to insert a dynamic value to the src attribute of the img tags in your "wysiwyg" template editor:

  1. Create a new Design Editor template (it will allow you to select this once you add your first version of that template).
  2. Design your email - add texts, images and what not.
  3. Select an image item box (the one you want to inject later the SRC URL to), and click on the view code icon to see the code behind (code-behind button).
  4. Copy aside the URL value that's currently there (I assume you selected a temp image just to stylize your email on step 2) and then close this dialog without making any changes.
  5. Go to the Import/Export section on the left Build sidebar (way down there), then click on Export HTML. Save the file and open it in a text editor.
  6. Search for the URL you copied on step (4) and replace it with your dynamic variable of your choice (example: {{my_dynamic_logo_url}}).
  7. Copy the entire file contents (after your changes in the previous step), then go back to the Sendgrid editor, and click on the Import button in the same Import/Export section from step (5).
  8. Paste the file content in there and click Ok. It will look all the same (maybe only the image itself will vanish, but it's ok - trust me. Save your template now.
  9. Voila - send your email via API, while injecting the desired URL to {{my_dynamic_logo_url}} - you should now be able to see that dynamic image displayed on the received email.
  10. Just make it a nice round 10 here :P
    Attaching image that can help with the process
Gonen
  • 71
  • 1
  • 2
  • Does this apply only to transactional emails? Or can I also use it from the "Marketing> Templates" section? – Paco Zevallos Oct 22 '19 at 18:13
  • @PacoZevallos to the best of my knowledge, this applies to Transactional Emails only. sorry for the late reply missed the notifications :). – Gonen Dec 29 '19 at 17:10
  • This worked for me perfectly, thank you very much! 1 point though after step 3, I basically only had to do step 6 where all I did was change the src tag with the dynamic handlebars i.e {{my_dynamic_image_url}} which meant I didn't have to do any of the other steps and it still worked. I have done all 8 steps before though another time when adding dynamic iteration to the email, so that's really helpful too! thank you – Andrew Irwin May 28 '20 at 16:41
  • sure thing :) maybe they fixed a few bugs or changed the way the editor works over time (this was originally written in March 2019), as I did notice some changes working on their editor for the last few months.. – Gonen May 31 '20 at 11:20
4

This worked for me, if helps anyone using the new dynamic transaction email templates. I added a blank image from the build screen. Then clicked on the icon to show the raw HTML code for that image. I simply added the appropriate property to the "src" attribute using the handlebars syntax. No other change was needed.

For example: src="{{ imageURI }}""

abalikai
  • 101
  • 1
  • 7