i'll give you the working code. This is something i've made for my app's landing page hope this might help solve your problem.
import UIKit

class ViewController: UIViewController {

    @IBOutlet weak var topView: UIView!
    //Create an outlet for your scrollview
    @IBOutlet weak var scrollView: UIScrollView!
    @IBOutlet weak var registerButton: UIButton!

    //Create your image array and caption if any
    var imageArray = [UIImage]()
    var labelArray = [String]()

    //Timer init if u want auto slide
    var timer = Timer()

    override func viewDidLoad() {
        super.viewDidLoad()

        //on viewload set ur scrollview to parent view frame

        scrollView.frame = view.frame

        /*create image literals and set the images you want in the
       content if its not images then make an array of your content
       depending on ur need*/

        imageArray = [#imageLiteral(resourceName: "landing-slide1"),#imageLiteral(resourceName: "landing-slide2"),#imageLiteral(resourceName: "landing-slide3")]
        labelArray = ["Learn mindfulness practices to cope with stress","Choose from a specially designed selection of proven programs","Learn to be completely present in the moment!"]
        // now lets loop for the number of slides you want
        for i in 0..<imageArray.count{
            // CREATE AN IMAGE VIEW IF UR OPTING FOR IMAGE SLIDER
            // OR CREATE A UIVIEW INSTEAD
            let imageView = UIImageView()
            let labelView = UILabel()

            // SETTINGS YOU NEED FOR THE VIEW HEIGHT AND UI DESIGN OF
            // YOUR CHOICE

            let imageViewHeight = scrollView.frame.height - 170
            let xPos = (self.view.frame.width * CGFloat(i)) + 10
            // SET THE CONTENT HERE
            imageView.image = imageArray[i]
            imageView.frame = CGRect(x: xPos, y: 20, width: self.scrollView.frame.width - 20, height: imageViewHeight)
            imageView.backgroundColor = UIColor(red: 1/255.5, green: 110/255.5, blue: 125/255.5, alpha: 1.0)
            imageView.layer.cornerRadius = 20.0
            // FOR ROUNDED CORNERS SET THIS ITS IMPORTANT
            imageView.clipsToBounds = true

            labelView.text = labelArray[i]
            labelView.frame = CGRect(x: xPos + 6, y: imageView.frame.height/2, width: self.scrollView.frame.width - 30, height: 70)
            labelView.textColor = UIColor.white
            labelView.textAlignment = .center
            labelView.font = UIFont(name: "Helvetica Neue", size: 12)
            labelView.font = UIFont.boldSystemFont(ofSize: 18)
            labelView.numberOfLines = 0

            registerButton.layer.cornerRadius = 20.0

            // CREATE NSLAYOUT CONSTRAINTS FOR THE VIEWS
            NSLayoutConstraint(item: labelView, attribute: NSLayoutAttribute.centerX, relatedBy: NSLayoutRelation.equal, toItem: labelView, attribute: NSLayoutAttribute.centerX, multiplier: 1, constant: 0).isActive = true
            NSLayoutConstraint(item: labelView, attribute: NSLayoutAttribute.centerY, relatedBy: NSLayoutRelation.equal, toItem: labelView, attribute: NSLayoutAttribute.centerY, multiplier: 1, constant: 0).isActive = true
            // ADD THE SUBVIEWS TO THE SCROLLVIEW
            scrollView.addSubview(labelView)
            scrollView.contentMode = .scaleAspectFit
            scrollView.contentSize.width = scrollView.frame.width * CGFloat(i + 1)
            scrollView.addSubview(imageView)
            scrollView.bringSubview(toFront: labelView)

        }
    }
    // FUNCTION TO SLIDE THE SCROLL VIEW
    func slideScrollView(){
        var offset = self.view.frame.width
        var currentPos = self.scrollView.contentOffset.x

        if(currentPos >= (offset * 2)){

            offset = 0
            currentPos = 0
            self.scrollView.setContentOffset(CGPoint(x: (currentPos + offset), y: 0), animated: true)

        }
        else{

            self.scrollView.setContentOffset(CGPoint(x: (currentPos + offset), y: 0), animated: true)

        }
    }
    // JUST SOME EXTRA CODE FOR MY APP YOU CAN IGNORE SOME OF IT
    // ELSE PART IS IMPORTANT TO YOUR CODE
    override func viewDidAppear(_ animated: Bool) {
        if(LoggedIn()){
            let moodSurveyCotroller = self.storyboard?.instantiateViewController(withIdentifier: "moodSurvey") as! MoodSurvey
            self.present(moodSurveyCotroller, animated: true, completion: nil)
        }
        else{
         // START YOUR TIMER FOR THE SLIDER LIKE THIS WITHIN THE
         //VIEWDIDAPPEAR
        timer = Timer.scheduledTimer(timeInterval: 5.0, target: self, selector: #selector(slideScrollView), userInfo: nil, repeats: true)

        }
    }

    override func didReceiveMemoryWarning() {
        super.didReceiveMemoryWarning()
        // Dispose of any resources that can be recreated.
    }

    @IBAction func registerPage(_ sender: UIButton) {

        let registerController = self.storyboard?.instantiateViewController(withIdentifier: "registerViewController") as! RegisterController
        self.present(registerController, animated: true, completion: nil)

    }

    @IBAction func loginButtonPressed(_ sender: UIButton) {

        let loginController =  self.storyboard?.instantiateViewController(withIdentifier: "loginViewController") as! LoginViewController
        self.present(loginController,animated: true, completion: nil)

    }

}
So what this code does is it creates a slider it could be an image slider, or a content slider as you design.
First things first you need to create a viewcontroller and add a scrollview to it and add the necessary constraints.
then create the view controller cocoatouch class file and add the above code only after you have linked all your story board content.
Do not copy paste the code as it is, u will have to do some work this works perfectly and tested code. So just give it a try and let me know if you have any doubt.
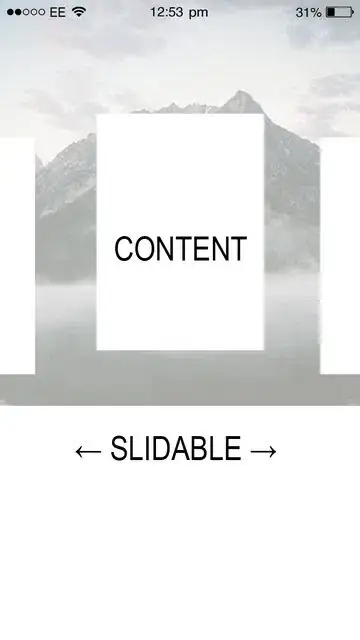
here is the screenshot of the output