51

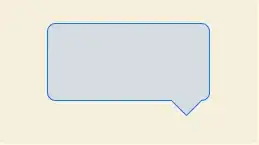
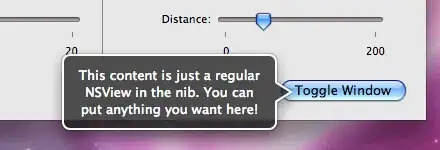
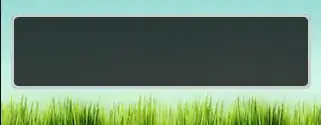
I'm trying to get a "speech bubble" effect similar to the one in Mac OS X when you right click on something in the dock. Here's what I have now:

alt text

I need to get the "triangle" part of the lower portion. Is there any way I can draw something like that and get a border around it? This will be for an iPhone app.

Thanks in advance!

EDIT: Many thanks to Brad Larson, here's what it looks like now: alt text

Avt
  • 16,927
  • 4
  • 52
  • 72
sudo rm -rf
  • 29,408
  • 19
  • 102
  • 161

12 Answers12

53

I've actually drawn this exact shape before (rounded rectangle with a pointing triangle at the bottom). The Quartz drawing code that I used is as follows:

CGRect currentFrame = self.bounds;

CGContextSetLineJoin(context, kCGLineJoinRound);
CGContextSetLineWidth(context, strokeWidth);
CGContextSetStrokeColorWithColor(context, [MyPopupLayer popupBorderColor]); 
CGContextSetFillColorWithColor(context, [MyPopupLayer popupBackgroundColor]);

// Draw and fill the bubble
CGContextBeginPath(context);
CGContextMoveToPoint(context, borderRadius + strokeWidth + 0.5f, strokeWidth + HEIGHTOFPOPUPTRIANGLE + 0.5f);
CGContextAddLineToPoint(context, round(currentFrame.size.width / 2.0f - WIDTHOFPOPUPTRIANGLE / 2.0f) + 0.5f, HEIGHTOFPOPUPTRIANGLE + strokeWidth + 0.5f);
CGContextAddLineToPoint(context, round(currentFrame.size.width / 2.0f) + 0.5f, strokeWidth + 0.5f);
CGContextAddLineToPoint(context, round(currentFrame.size.width / 2.0f + WIDTHOFPOPUPTRIANGLE / 2.0f) + 0.5f, HEIGHTOFPOPUPTRIANGLE + strokeWidth + 0.5f);
CGContextAddArcToPoint(context, currentFrame.size.width - strokeWidth - 0.5f, strokeWidth + HEIGHTOFPOPUPTRIANGLE + 0.5f, currentFrame.size.width - strokeWidth - 0.5f, currentFrame.size.height - strokeWidth - 0.5f, borderRadius - strokeWidth);
CGContextAddArcToPoint(context, currentFrame.size.width - strokeWidth - 0.5f, currentFrame.size.height - strokeWidth - 0.5f, round(currentFrame.size.width / 2.0f + WIDTHOFPOPUPTRIANGLE / 2.0f) - strokeWidth + 0.5f, currentFrame.size.height - strokeWidth - 0.5f, borderRadius - strokeWidth);
CGContextAddArcToPoint(context, strokeWidth + 0.5f, currentFrame.size.height - strokeWidth - 0.5f, strokeWidth + 0.5f, HEIGHTOFPOPUPTRIANGLE + strokeWidth + 0.5f, borderRadius - strokeWidth);
CGContextAddArcToPoint(context, strokeWidth + 0.5f, strokeWidth + HEIGHTOFPOPUPTRIANGLE + 0.5f, currentFrame.size.width - strokeWidth - 0.5f, HEIGHTOFPOPUPTRIANGLE + strokeWidth + 0.5f, borderRadius - strokeWidth);
CGContextClosePath(context);
CGContextDrawPath(context, kCGPathFillStroke);

// Draw a clipping path for the fill
CGContextBeginPath(context);
CGContextMoveToPoint(context, borderRadius + strokeWidth + 0.5f, round((currentFrame.size.height + HEIGHTOFPOPUPTRIANGLE) * 0.50f) + 0.5f);
CGContextAddArcToPoint(context, currentFrame.size.width - strokeWidth - 0.5f, round((currentFrame.size.height + HEIGHTOFPOPUPTRIANGLE) * 0.50f) + 0.5f, currentFrame.size.width - strokeWidth - 0.5f, currentFrame.size.height - strokeWidth - 0.5f, borderRadius - strokeWidth);
CGContextAddArcToPoint(context, currentFrame.size.width - strokeWidth - 0.5f, currentFrame.size.height - strokeWidth - 0.5f, round(currentFrame.size.width / 2.0f + WIDTHOFPOPUPTRIANGLE / 2.0f) - strokeWidth + 0.5f, currentFrame.size.height - strokeWidth - 0.5f, borderRadius - strokeWidth);
CGContextAddArcToPoint(context, strokeWidth + 0.5f, currentFrame.size.height - strokeWidth - 0.5f, strokeWidth + 0.5f, HEIGHTOFPOPUPTRIANGLE + strokeWidth + 0.5f, borderRadius - strokeWidth);
CGContextAddArcToPoint(context, strokeWidth + 0.5f, round((currentFrame.size.height + HEIGHTOFPOPUPTRIANGLE) * 0.50f) + 0.5f, currentFrame.size.width - strokeWidth - 0.5f, round((currentFrame.size.height + HEIGHTOFPOPUPTRIANGLE) * 0.50f) + 0.5f, borderRadius - strokeWidth);
CGContextClosePath(context);
CGContextClip(context);     

The clipping path at the end can be left out if you're not going to use a gradient or some other more fill that's more complex than a simple color.

Brad Larson
  • 170,088
  • 45
  • 397
  • 571
  • It looks great! I'm sure I'm missing a lot of key information here, as I tried defining some constants for `HEIGHTOFPOPUPTRIANGLE`, `WIDTHOFPOPUPTRIANGLE`, `borderRadius`, and `strokeWidth`, but it gives me about 25 errors. One says "Too few arguments to function `CGContextMoveToPoint`" Any ideas? Did this work for you? – sudo rm -rf Dec 14 '10 at 21:01
  • @sudo - In my implementation, `strokeWidth` and `borderRadius` are instance variables, with `HEIGHTOFPOPUPTRIANGLE` and `HEIGHTOFPOPUPTRIANGLE` as defined constants. The context of course needs to be drawn from what is used in the NSView, UIView, or CALayer's overridden drawing method. The "Too few arguments" error sounds like there may have been a stray semicolon in your compiler constant definition, or something like that. – Brad Larson Dec 14 '10 at 21:48
  • @Brad Larson Thanks for the clarification, it was a stray semicolon that was the offender. I've gotten it looking pretty good, but I'd love to have the popup come from the bottom. Is there an easy way of either rotating the view, or flipping around some calculations? Thank you for your help! :) – sudo rm -rf Dec 14 '10 at 22:21
  • 1
    Never mind, I just used `theView.transform = CGAffineTransformMakeRotation(3.14);` – sudo rm -rf Dec 14 '10 at 22:34
  • 1
    For all who use Brad's code in the future, to achieve the look in my post above I made `HEIGHTOFPOPUPTRIANGLE` **= 20**, `WIDTHOFPOPUPTRIANGLE` **= 40**, `borderRadius` **= 8**, and `strokeWidth` **= 3**. I set the view *alpha* to **0.75**. – sudo rm -rf Dec 14 '10 at 22:51
  • 1
    @sudo - Yes, the reason for the inverted coordinate space is that I had reoriented my layers to match the Mac's (and Quartz's) default coordinate space. You can also achieve this flipping without rotation using `CGContextTranslateCTM(context, 0.0f, self.bounds.size.height); CGContextScaleCTM(context, 1.0f, -1.0f);` before the drawing code above. – Brad Larson Dec 15 '10 at 04:21
  • Hi guys really thanks for this but I want to one think using CGContextTranslateCTM(context, 0.0f, self.bounds.size.height); CGContextScaleCTM(context, 1.0f, -1.0f); or theView.transform = CGAffineTransformMakeRotation(3.14); my view rotate and text of this view and any other content also rotate but I want to rotate only my view not content of this view like text field, image view etc. can u please tell me about that ? how to get this ? – Rahul Sharma Apr 27 '15 at 12:41
  • I want to add a drop shadow to this shape? What should I do? – Vignesh PT Aug 07 '17 at 13:10
16

I get here looking for a solution to draw "arrows" in an existing view.
I'm pleased to share you some code that I hope usefull - Swift 2.3 compatible -

public extension UIView {

  public enum PeakSide: Int {
        case Top
        case Left
        case Right
        case Bottom
    }

    public func addPikeOnView(side side: PeakSide, size: CGFloat = 10.0) {
        self.layoutIfNeeded()
        let peakLayer = CAShapeLayer()
        var path: CGPathRef?
        switch side {
        case .Top:
            path = self.makePeakPathWithRect(self.bounds, topSize: size, rightSize: 0.0, bottomSize: 0.0, leftSize: 0.0)
        case .Left:
            path = self.makePeakPathWithRect(self.bounds, topSize: 0.0, rightSize: 0.0, bottomSize: 0.0, leftSize: size)
        case .Right:
            path = self.makePeakPathWithRect(self.bounds, topSize: 0.0, rightSize: size, bottomSize: 0.0, leftSize: 0.0)
        case .Bottom:
            path = self.makePeakPathWithRect(self.bounds, topSize: 0.0, rightSize: 0.0, bottomSize: size, leftSize: 0.0)
        }
        peakLayer.path = path
        let color = (self.backgroundColor ?? .clearColor()).CGColor
        peakLayer.fillColor = color
        peakLayer.strokeColor = color
        peakLayer.lineWidth = 1
        peakLayer.position = CGPoint.zero
        self.layer.insertSublayer(peakLayer, atIndex: 0)
    }


    func makePeakPathWithRect(rect: CGRect, topSize ts: CGFloat, rightSize rs: CGFloat, bottomSize bs: CGFloat, leftSize ls: CGFloat) -> CGPathRef {
        //                      P3
        //                    /    \
        //      P1 -------- P2     P4 -------- P5
        //      |                               |
        //      |                               |
        //      P16                            P6
        //     /                                 \
        //  P15                                   P7
        //     \                                 /
        //      P14                            P8
        //      |                               |
        //      |                               |
        //      P13 ------ P12    P10 -------- P9
        //                    \   /
        //                     P11

        let centerX = rect.width / 2
        let centerY = rect.height / 2
        var h: CGFloat = 0
        let path = CGPathCreateMutable()
        var points: [CGPoint] = []
        // P1
        points.append(CGPointMake(rect.origin.x, rect.origin.y))
        // Points for top side
        if ts > 0 {
            h = ts * sqrt(3.0) / 2
            let x = rect.origin.x + centerX
            let y = rect.origin.y
            points.append(CGPointMake(x - ts, y))
            points.append(CGPointMake(x, y - h))
            points.append(CGPointMake(x + ts, y))
        }

        // P5
        points.append(CGPointMake(rect.origin.x + rect.width, rect.origin.y))
        // Points for right side
        if rs > 0 {
            h = rs * sqrt(3.0) / 2
            let x = rect.origin.x + rect.width
            let y = rect.origin.y + centerY
            points.append(CGPointMake(x, y - rs))
            points.append(CGPointMake(x + h, y))
            points.append(CGPointMake(x, y + rs))
        }

        // P9
        points.append(CGPointMake(rect.origin.x + rect.width, rect.origin.y + rect.height))
        // Point for bottom side
        if bs > 0 {
            h = bs * sqrt(3.0) / 2
            let x = rect.origin.x + centerX
            let y = rect.origin.y + rect.height
            points.append(CGPointMake(x + bs, y))
            points.append(CGPointMake(x, y + h))
            points.append(CGPointMake(x - bs, y))
        }

        // P13
        points.append(CGPointMake(rect.origin.x, rect.origin.y + rect.height))
        // Point for left side
        if ls > 0 {
            h = ls * sqrt(3.0) / 2
            let x = rect.origin.x
            let y = rect.origin.y + centerY
            points.append(CGPointMake(x, y + ls))
            points.append(CGPointMake(x - h, y))
            points.append(CGPointMake(x, y - ls))
        }

        let startPoint = points.removeFirst()
        self.startPath(path: path, onPoint: startPoint)
        for point in points {
            self.addPoint(point, toPath: path)
        }
        self.addPoint(startPoint, toPath: path)
        return path
    }

    private func startPath(path path: CGMutablePath, onPoint point: CGPoint) {
        CGPathMoveToPoint(path, nil, point.x, point.y)
    }

    private func addPoint(point: CGPoint, toPath path: CGMutablePath) {
        CGPathAddLineToPoint(path, nil, point.x, point.y)
    }

}

In this way you can call this for every kind of view:

let view = UIView(frame: frame)
view.addPikeOnView(side: .Top)

In a future I'll add offset for pike position.

  • yes, names are definitely improvable!

SWIFT 3 Version

public extension UIView {

    public enum PeakSide: Int {
        case Top
        case Left
        case Right
        case Bottom
    }

    public func addPikeOnView( side: PeakSide, size: CGFloat = 10.0) {
        self.layoutIfNeeded()
        let peakLayer = CAShapeLayer()
        var path: CGPath?
        switch side {
        case .Top:
            path = self.makePeakPathWithRect(rect: self.bounds, topSize: size, rightSize: 0.0, bottomSize: 0.0, leftSize: 0.0)
        case .Left:
            path = self.makePeakPathWithRect(rect: self.bounds, topSize: 0.0, rightSize: 0.0, bottomSize: 0.0, leftSize: size)
        case .Right:
            path = self.makePeakPathWithRect(rect: self.bounds, topSize: 0.0, rightSize: size, bottomSize: 0.0, leftSize: 0.0)
        case .Bottom:
            path = self.makePeakPathWithRect(rect: self.bounds, topSize: 0.0, rightSize: 0.0, bottomSize: size, leftSize: 0.0)
        }
        peakLayer.path = path
        let color = (self.backgroundColor?.cgColor)
        peakLayer.fillColor = color
        peakLayer.strokeColor = color
        peakLayer.lineWidth = 1
        peakLayer.position = CGPoint.zero
        self.layer.insertSublayer(peakLayer, at: 0)
    }


    func makePeakPathWithRect(rect: CGRect, topSize ts: CGFloat, rightSize rs: CGFloat, bottomSize bs: CGFloat, leftSize ls: CGFloat) -> CGPath {
        //                      P3
        //                    /    \
        //      P1 -------- P2     P4 -------- P5
        //      |                               |
        //      |                               |
        //      P16                            P6
        //     /                                 \
        //  P15                                   P7
        //     \                                 /
        //      P14                            P8
        //      |                               |
        //      |                               |
        //      P13 ------ P12    P10 -------- P9
        //                    \   /
        //                     P11

        let centerX = rect.width / 2
        let centerY = rect.height / 2
        var h: CGFloat = 0
        let path = CGMutablePath()
        var points: [CGPoint] = []
        // P1
        points.append(CGPoint(x:rect.origin.x,y: rect.origin.y))
        // Points for top side
        if ts > 0 {
            h = ts * sqrt(3.0) / 2
            let x = rect.origin.x + centerX
            let y = rect.origin.y
            points.append(CGPoint(x:x - ts,y: y))
            points.append(CGPoint(x:x,y: y - h))
            points.append(CGPoint(x:x + ts,y: y))
       }

        // P5
        points.append(CGPoint(x:rect.origin.x + rect.width,y: rect.origin.y))
        // Points for right side
        if rs > 0 {
            h = rs * sqrt(3.0) / 2
            let x = rect.origin.x + rect.width
           let y = rect.origin.y + centerY
           points.append(CGPoint(x:x,y: y - rs))
           points.append(CGPoint(x:x + h,y: y))
           points.append(CGPoint(x:x,y: y + rs))
        }

        // P9
        points.append(CGPoint(x:rect.origin.x + rect.width,y: rect.origin.y + rect.height))
        // Point for bottom side
        if bs > 0 {
            h = bs * sqrt(3.0) / 2
            let x = rect.origin.x + centerX
            let y = rect.origin.y + rect.height
            points.append(CGPoint(x:x + bs,y: y))
            points.append(CGPoint(x:x,y: y + h))
            points.append(CGPoint(x:x - bs,y: y))
        }

        // P13
        points.append(CGPoint(x:rect.origin.x, y: rect.origin.y + rect.height))
        // Point for left sidey:
        if ls > 0 {
            h = ls * sqrt(3.0) / 2
            let x = rect.origin.x
            let y = rect.origin.y + centerY
            points.append(CGPoint(x:x,y: y + ls))
            points.append(CGPoint(x:x - h,y: y))
            points.append(CGPoint(x:x,y: y - ls))
        }

        let startPoint = points.removeFirst()
        self.startPath(path: path, onPoint: startPoint)
        for point in points {
            self.addPoint(point: point, toPath: path)
        }
        self.addPoint(point: startPoint, toPath: path)
        return path
    }

    private func startPath( path: CGMutablePath, onPoint point: CGPoint) {
        path.move(to: CGPoint(x: point.x, y: point.y))
    }

    private func addPoint(point: CGPoint, toPath path: CGMutablePath) {
       path.addLine(to: CGPoint(x: point.x, y: point.y))
    }
}
Whiteshadow
  • 188
  • 6
Luca Davanzo
  • 21,000
  • 15
  • 120
  • 146
  • Thanks! Is there any way to add some way to have this peak and clipToBounds on the UIView? – ClockWise Apr 12 '17 at 09:04
  • hi i need P15 side arrow from given below image. kindly please help me for this – Prissy Eve Oct 01 '18 at 08:14
  • 1
    @Luca Davanzo it works but a question, how do you round the corners? If I set the cornerRadius = 7 and then masksToBounds = true I lose the pike. But if I don't set masksToBounds I keep the pike but lose the rounded corners. – Lance Samaria Oct 24 '18 at 23:44
15

Swift 2 code that creates UIBezierPath:

var borderWidth : CGFloat = 4 // Should be less or equal to the `radius` property
var radius : CGFloat = 10
var triangleHeight : CGFloat = 15

private func bubblePathForContentSize(contentSize: CGSize) -> UIBezierPath {
    let rect = CGRectMake(0, 0, contentSize.width, contentSize.height).offsetBy(dx: radius, dy: radius + triangleHeight)
    let path = UIBezierPath();
    let radius2 = radius - borderWidth / 2 // Radius adjasted for the border width

    path.moveToPoint(CGPointMake(rect.maxX - triangleHeight * 2, rect.minY - radius2))
    path.addLineToPoint(CGPointMake(rect.maxX - triangleHeight, rect.minY - radius2 - triangleHeight))
    path.addArcWithCenter(CGPointMake(rect.maxX, rect.minY), radius: radius2, startAngle: CGFloat(-M_PI_2), endAngle: 0, clockwise: true)
    path.addArcWithCenter(CGPointMake(rect.maxX, rect.maxY), radius: radius2, startAngle: 0, endAngle: CGFloat(M_PI_2), clockwise: true)
    path.addArcWithCenter(CGPointMake(rect.minX, rect.maxY), radius: radius2, startAngle: CGFloat(M_PI_2), endAngle: CGFloat(M_PI), clockwise: true)
    path.addArcWithCenter(CGPointMake(rect.minX, rect.minY), radius: radius2, startAngle: CGFloat(M_PI), endAngle: CGFloat(-M_PI_2), clockwise: true)
    path.closePath()
    return path
}

Now you could do whatever you want with this path. For example use it with CAShapeLayer:

let bubbleLayer = CAShapeLayer()
bubbleLayer.path = bubblePathForContentSize(contentView.bounds.size).CGPath
bubbleLayer.fillColor = fillColor.CGColor
bubbleLayer.strokeColor = borderColor.CGColor
bubbleLayer.lineWidth = borderWidth
bubbleLayer.position = CGPoint.zero
myView.layer.addSublayer(bubbleLayer)

enter image description here

Avt
  • 16,927
  • 4
  • 52
  • 72
13

Perhaps a simpler question is "Is there code that does this for me already", to which the answer is "Yes".

Behold MAAttachedWindow:

alt text

Granted, you may not want the whole "Attached window" behavior, but at least the drawing code is already there. (And Matt Gemmell's code is high quality stuff)

Dave DeLong
  • 242,470
  • 58
  • 448
  • 498
  • 6
    While Matt's MAAttachedWindow is a great component for the Mac, I believe he's looking for something that also works on the iPhone (based on the tags). – Brad Larson Dec 14 '10 at 21:51
  • Yep, that looks great, but yes...I was looking for an iPhone way to do this. I'll update my title... – sudo rm -rf Dec 14 '10 at 22:04
  • 4
    @sudo @Brad true it's for Mac, but the code he's using is easily applicable to iPhone; just swap `NSMakePoint` with `CGPointMake` and `NSBezierPath` for `UIBezierPath` and you're pretty much done. – Dave DeLong Dec 14 '10 at 22:10
7

There are two ways you might be able to accomplish this:

  1. Add a UIImageView with a triangle image in the right place. Make sure the rest of the image is transparent so as not to block your background.
  2. Override the drawRect: method on your UIView to custom-draw the view. You can then add linear path components for your triangle, filling and bordering the path as necessary.

To draw a simple triangle using drawRect:, you might do something like this. This snippet will draw a triangle pointing downwards at the bottom of your view.

// Get the context
CGContextRef context = UIGraphicsGetCurrentContext();

// Pick colors
CGContextSetStrokeColorWithColor(context, [[UIColor blackColor] CGColor]);
CGContextSetFillColorWithColor(context, [[UIColor redColor] CGColor]);

// Define triangle dimensions
CGFloat baseWidth = 30.0;
CGFloat height = 20.0;

// Define path
CGContextMoveToPoint(context, self.bounds.size.width / 2.0 - baseWidth / 2.0, 
                              self.bounds.size.height - height);
CGContextAddLineToPoint(context, self.bounds.size.width / 2.0 + baseWidth / 2.0, 
                                 self.bounds.size.height - height);
CGContextAddLineToPoint(context, self.bounds.size.width / 2.0, 
                                 self.bounds.size.height);

// Finalize and draw using path
CGContextClosePath(context);
CGContextStrokePath(context);

For more info, see the CGContext reference.

Tim
  • 59,527
  • 19
  • 156
  • 165
  • 2
    Try changing the last line to `CGContextDrawPath(context, kCGPathFillStroke);` to fill as well as stroke. –  Dec 14 '10 at 19:11
  • I ran this in Xcode and saw a black triangle drawn in my view, so I'm not sure what's going wrong for you - can you describe what kind of view hierarchy and subclasses you're using? – Tim Dec 14 '10 at 19:12
  • @Tim Okay, I got it to display. However, I can't get it to fill. I tried using `CGContextFillPath(context)` and `CGContextDrawPath(context, kCGPathFillStroke)` and I still get this: http://i.imgur.com/y99nt.png What I'm doing is creating a new view that is drawn using `drawRect:(CGRect)rect` to draw a triangle that is below another rect I'm drawing in that view. – sudo rm -rf Dec 14 '10 at 19:27
  • Did you make sure to set your fill color before you call `CGContextFillPath()`? – Tim Dec 14 '10 at 19:33
  • I did what you said and did this: ` CGContextSetFillColorWithColor(context, [[UIColor redColor] CGColor]);` I'm thinking I should just make a completely new view for just this little triangle and see if I can make it work there. – sudo rm -rf Dec 14 '10 at 19:44
  • Okay, just got it to display. The problem was that `CGContextStrokePath(context);` was destroying the fill, it seems. Removed it and it's all dandy. – sudo rm -rf Dec 14 '10 at 20:18
  • For those who can't get anything displayed, your class must be "UIView" not "UIImageView". I learnt it a hard way ;) – Jason Leung Jan 15 '16 at 03:22
3

For those using swift 2.0 based on the answer by Brad Larson

override func drawRect(rect: CGRect) {
    super.drawRect(rect) // optional if a direct UIView-subclass, should be called otherwise.

    let HEIGHTOFPOPUPTRIANGLE:CGFloat = 20.0
    let WIDTHOFPOPUPTRIANGLE:CGFloat = 40.0
    let borderRadius:CGFloat = 8.0
    let strokeWidth:CGFloat = 3.0

    // Get the context
    let context: CGContextRef = UIGraphicsGetCurrentContext()!
    CGContextTranslateCTM(context, 0.0, self.bounds.size.height)
    CGContextScaleCTM(context, 1.0, -1.0)
    //
    let currentFrame: CGRect = self.bounds
    CGContextSetLineJoin(context, CGLineJoin.Round)
    CGContextSetLineWidth(context, strokeWidth)
    CGContextSetStrokeColorWithColor(context, UIColor.whiteColor().CGColor)
    CGContextSetFillColorWithColor(context, UIColor.blackColor().CGColor)
    // Draw and fill the bubble
    CGContextBeginPath(context)
    CGContextMoveToPoint(context, borderRadius + strokeWidth + 0.5, strokeWidth + HEIGHTOFPOPUPTRIANGLE + 0.5)
    CGContextAddLineToPoint(context, round(currentFrame.size.width / 2.0 - WIDTHOFPOPUPTRIANGLE / 2.0) + 0.5, HEIGHTOFPOPUPTRIANGLE + strokeWidth + 0.5)
    CGContextAddLineToPoint(context, round(currentFrame.size.width / 2.0) + 0.5, strokeWidth + 0.5)
    CGContextAddLineToPoint(context, round(currentFrame.size.width / 2.0 + WIDTHOFPOPUPTRIANGLE / 2.0) + 0.5, HEIGHTOFPOPUPTRIANGLE + strokeWidth + 0.5)
    CGContextAddArcToPoint(context, currentFrame.size.width - strokeWidth - 0.5, strokeWidth + HEIGHTOFPOPUPTRIANGLE + 0.5, currentFrame.size.width - strokeWidth - 0.5, currentFrame.size.height - strokeWidth - 0.5, borderRadius - strokeWidth)
    CGContextAddArcToPoint(context, currentFrame.size.width - strokeWidth - 0.5, currentFrame.size.height - strokeWidth - 0.5, round(currentFrame.size.width / 2.0 + WIDTHOFPOPUPTRIANGLE / 2.0) - strokeWidth + 0.5, currentFrame.size.height - strokeWidth - 0.5, borderRadius - strokeWidth)
    CGContextAddArcToPoint(context, strokeWidth + 0.5, currentFrame.size.height - strokeWidth - 0.5, strokeWidth + 0.5, HEIGHTOFPOPUPTRIANGLE + strokeWidth + 0.5, borderRadius - strokeWidth)
    CGContextAddArcToPoint(context, strokeWidth + 0.5, strokeWidth + HEIGHTOFPOPUPTRIANGLE + 0.5, currentFrame.size.width - strokeWidth - 0.5, HEIGHTOFPOPUPTRIANGLE + strokeWidth + 0.5, borderRadius - strokeWidth)
    CGContextClosePath(context)
    CGContextDrawPath(context, CGPathDrawingMode.FillStroke)

    // Draw a clipping path for the fill
    CGContextBeginPath(context)
    CGContextMoveToPoint(context, borderRadius + strokeWidth + 0.5, round((currentFrame.size.height + HEIGHTOFPOPUPTRIANGLE) * 0.50) + 0.5)
    CGContextAddArcToPoint(context, currentFrame.size.width - strokeWidth - 0.5, round((currentFrame.size.height + HEIGHTOFPOPUPTRIANGLE) * 0.50) + 0.5, currentFrame.size.width - strokeWidth - 0.5, currentFrame.size.height - strokeWidth - 0.5, borderRadius - strokeWidth)
    CGContextAddArcToPoint(context, currentFrame.size.width - strokeWidth - 0.5, currentFrame.size.height - strokeWidth - 0.5, round(currentFrame.size.width / 2.0 + WIDTHOFPOPUPTRIANGLE / 2.0) - strokeWidth + 0.5, currentFrame.size.height - strokeWidth - 0.5, borderRadius - strokeWidth)
    CGContextAddArcToPoint(context, strokeWidth + 0.5, currentFrame.size.height - strokeWidth - 0.5, strokeWidth + 0.5, HEIGHTOFPOPUPTRIANGLE + strokeWidth + 0.5, borderRadius - strokeWidth)
    CGContextAddArcToPoint(context, strokeWidth + 0.5, round((currentFrame.size.height + HEIGHTOFPOPUPTRIANGLE) * 0.50) + 0.5, currentFrame.size.width - strokeWidth - 0.5, round((currentFrame.size.height + HEIGHTOFPOPUPTRIANGLE) * 0.50) + 0.5, borderRadius - strokeWidth)
    CGContextClosePath(context)
    CGContextClip(context)
}
Community
  • 1
  • 1
kdgwill
  • 2,129
  • 4
  • 29
  • 46
2

Here is a swift 5 @IBDesignable UIView version

@IBDesignable
class SpeechBubble: UIView {

@IBInspectable var lineWidth: CGFloat = 4 { didSet { setNeedsDisplay() } }
@IBInspectable var cornerRadius: CGFloat = 8 { didSet { setNeedsDisplay() } }

@IBInspectable var strokeColor: UIColor = .red { didSet { setNeedsDisplay() } }
@IBInspectable var fillColor: UIColor = .gray { didSet { setNeedsDisplay() } }

@IBInspectable var peakWidth: CGFloat  = 10 { didSet { setNeedsDisplay() } }
@IBInspectable var peakHeight: CGFloat = 10 { didSet { setNeedsDisplay() } }
@IBInspectable var peakOffset: CGFloat = 0 { didSet { setNeedsDisplay() } }

override func draw(_ rectangle: CGRect) {
    
    //Add a bounding area so we can fit the peak in the view
    let rect = bounds.insetBy(dx: peakHeight, dy: peakHeight)
    
    let centerX = rect.width / 2
    //let centerY = rect.height / 2
    var h: CGFloat = 0
    
    //create the path
    let path = UIBezierPath()
    path.lineWidth = lineWidth
    
    // Start of bubble (Top Left)
    path.move(to: CGPoint(x: rect.minX, y: rect.minY + cornerRadius))
    path.addQuadCurve(to: CGPoint(x: rect.minX + cornerRadius, y: rect.minY),
                      controlPoint: CGPoint(x: rect.minX, y: rect.minY))
    
    //Add the peak
    h = peakHeight * sqrt(3.0) / 2

    let x = rect.origin.x + centerX
    let y = rect.origin.y
    path.addLine(to: CGPoint(x: (x + peakOffset) - peakWidth, y: y))
    path.addLine(to: CGPoint(x: (x + peakOffset), y: y - h))
    path.addLine(to: CGPoint(x: (x + peakOffset) + peakWidth, y: y))
    
    // Top Right
    path.addLine(to: CGPoint(x: rect.maxX - cornerRadius, y: rect.minY))
    path.addQuadCurve(to: CGPoint(x: rect.maxX, y: rect.minY + cornerRadius),
                      controlPoint: CGPoint(x: rect.maxX, y: rect.minY))
    
    // Bottom Right
    path.addLine(to: CGPoint(x: rect.maxX, y: rect.maxY - cornerRadius))
    path.addQuadCurve(to: CGPoint(x: rect.maxX - cornerRadius, y: rect.maxY),
                      controlPoint: CGPoint(x: rect.maxX, y: rect.maxY))
    //Bottom Left
    path.addLine(to: CGPoint(x: rect.minX + cornerRadius, y: rect.maxY))
    path.addQuadCurve(to: CGPoint(x: rect.minX, y: rect.maxY - cornerRadius), controlPoint: CGPoint(x: rect.minX, y: rect.maxY))
    // Back to start
    path.addLine(to: CGPoint(x: rect.origin.x, y: rect.minY + cornerRadius))
    
    //set and draw stroke color
    strokeColor.setStroke()
    path.stroke()
    
    //set and draw fill color
    fillColor.setFill()
    path.fill()
    
  }
}
1

See the triangle on the pop up menu in the image below, thats drawn with Core Graphics funcs and is completely scalable.

alt text

Done like this to do an equilateral triangle (old-school function names, sorry):

#define triH(v) (v * 0.866)    

func(CGContextRef inContext, CGRect arrowRect, CustomPushButtonData* controlData) {
// Draw the triangle
float   arrowXstart, arrowYstart;
float   arrowXpos, arrowYpos, arrowHpos; 

if (controlData->controlEnabled && controlData->controlActive) {

    CGContextSetRGBFillColor(inContext, 0., 0., 0., 1.);

} else {

    CGContextSetRGBFillColor(inContext, 0., 0., 0., 0.5);

}

arrowHpos = triH(arrowRect.size.height);

// Point C

CGContextBeginPath(inContext);

arrowXstart = arrowXpos = (arrowRect.origin.x + ((float)(arrowRect.size.width / 2.) - (arrowSize / 2.)));

arrowYstart = arrowYpos = (arrowRect.origin.y + (float)((arrowRect.size.height / 2.) - (float)(arrowHpos / 2.)));

CGContextMoveToPoint(inContext, arrowXpos, arrowYpos);

// Point A

arrowXpos += arrowSize;

CGContextAddLineToPoint(inContext, arrowXpos, arrowYpos);

// Point B

arrowYpos += arrowHpos;

arrowXpos -= (float)(arrowSize / 2.0);

CGContextAddLineToPoint(inContext, arrowXpos, arrowYpos);

// Point C
CGContextAddLineToPoint(inContext, arrowXstart, arrowYstart);

CGContextClosePath(inContext);

CGContextFillPath(inContext);

}

Note that the triH(x) func is an optimized formula for calculating the height of an equitlateral triangle e.g. h = 1/2 * sqrt(3) * x . Since 1/2 * sqrt(3) never changes, I optimized it into that define.

ExitToShell
  • 460
  • 4
  • 14
1

Swift 4 Update

Here's a Swift 4 version of AVT's original code.

 private func bubblePathForContentSize(contentSize: CGSize) -> UIBezierPath {
    let rect = CGRect(origin: .zero, size: CGSize(width: contentSize.width, height: contentSize.height)).offsetBy(dx: radius, dy: radius + triangleHeight)
    let path = UIBezierPath();
    let radius2 = radius - borderWidth / 2 // Radius adjasted for the border width

    path.move(to: CGPoint(x: rect.maxX - triangleHeight * 2, y: rect.minY - radius2))
    path.addLine(to: CGPoint(x: rect.maxX - triangleHeight, y: rect.minY - radius2 - triangleHeight))
    path.addArc(withCenter: CGPoint(x: rect.maxX, y: rect.minY),
                radius: radius2,
                startAngle: CGFloat(-(Double.pi/2)), endAngle: 0, clockwise: true)
    path.addArc(withCenter: CGPoint(x: rect.maxX, y: rect.maxY),
                radius: radius2,
                startAngle: 0, endAngle: CGFloat(Double.pi/2), clockwise: true)
    path.addArc(withCenter: CGPoint(x: rect.minX, y: rect.maxY),
                radius: radius2,
                startAngle: CGFloat(Double.pi/2),endAngle: CGFloat(Double.pi), clockwise: true)
    path.addArc(withCenter: CGPoint(x: rect.minX, y: rect.minY),
                radius: radius2,
                startAngle: CGFloat(Double.pi), endAngle: CGFloat(-(Double.pi/2)), clockwise: true)
    path.close()
    return path
}

//Example usage:
 let bubbleLayer = CAShapeLayer()
 bubbleLayer.path = bubblePathForContentSize(contentView.bounds.size).CGPath
 bubbleLayer.fillColor = fillColor.CGColor
 bubbleLayer.strokeColor = borderColor.CGColor
 bubbleLayer.lineWidth = borderWidth
 bubbleLayer.position = CGPoint.zero
 myView.layer.addSublayer(bubbleLayer)
James Jordan Taylor
  • 1,560
  • 3
  • 24
  • 38
0

If anyone comes along looking for the Swift 3 answer, this does the trick! Thanks to those who contributed before I did, lovely piece of code!

    let rRect = CGRect(x: start.x, y: start.y, width: defaultHeightWidth.0, height: defaultHeightWidth.1)


    context?.translateBy(x: 0, y: rRect.size.height - 3)
    context?.scaleBy(x: 1.0, y: -1.0)


    context?.setLineJoin(.bevel)
    context?.setLineWidth(strokeWidth)
    context?.setStrokeColor(UIColor.black.cgColor)
    context?.setFillColor(UIColor.white.cgColor)

    // draw and fill the bubble
    context?.beginPath()
    context?.move(to: CGPoint(x: borderRadius + strokeWidth + 0.5, y: strokeWidth + triangleHeight + 0.5))
    context?.addLine(to: CGPoint(x: round(rRect.size.width / 2.0 - triangleWidth / 2.0) + 0.5, y: triangleHeight + strokeWidth + 0.5))
    context?.addLine(to: CGPoint(x: round(rRect.size.width / 2.0) + 0.5, y: strokeWidth + 0.5))
    context?.addLine(to: CGPoint(x: round(rRect.size.width / 2.0 + triangleWidth / 2.0), y: triangleHeight + strokeWidth + 0.5))
    context?.addArc(tangent1End: CGPoint(x: rRect.size.width - strokeWidth - 0.5, y: strokeWidth + triangleHeight + 0.5), tangent2End: CGPoint(x: rRect.size.width - strokeWidth - 0.5, y: rRect.size.height - strokeWidth - 0.5), radius: borderRadius - strokeWidth)
    context?.addArc(tangent1End: CGPoint(x: rRect.size.width - strokeWidth - 0.5, y: rRect.size.height - strokeWidth - 0.5), tangent2End: CGPoint(x: round(rRect.size.width / 2.0 + triangleWidth / 2.0) - strokeWidth + 0.5, y: rRect.size.height - strokeWidth - 0.5), radius: borderRadius - strokeWidth)
    context?.addArc(tangent1End: CGPoint(x: strokeWidth + 0.5, y: rRect.size.height - strokeWidth - 0.5), tangent2End: CGPoint(x: strokeWidth + 0.5, y: triangleHeight + strokeWidth + 0.5), radius: borderRadius - strokeWidth)
    context?.addArc(tangent1End: CGPoint(x: strokeWidth + 0.5, y: strokeWidth + triangleHeight + 0.5), tangent2End: CGPoint(x: rRect.size.width - strokeWidth - 0.5, y: triangleHeight + strokeWidth + 0.5), radius: borderRadius - strokeWidth)
    context?.closePath()
    context?.drawPath(using: .fillStroke)

In my case triangleWidth = 10 and triangleHeight = 5 for a much smaller view than what's in OPs version.

pbush25
  • 5,228
  • 2
  • 26
  • 35
0

Here is the swift 3 solution of Brad Larson

override func draw(_ rect: CGRect) {
        super.draw(rect) // optional if a direct UIView-subclass, should be called otherwise.

        let HEIGHTOFPOPUPTRIANGLE:CGFloat = 20.0
        let WIDTHOFPOPUPTRIANGLE:CGFloat = 40.0
        let borderRadius:CGFloat = 8.0
        let strokeWidth:CGFloat = 3.0

        // Get the context
        let context: CGContext = UIGraphicsGetCurrentContext()!
        context.translateBy(x: 0.0, y: self.bounds.size.height)
        context.scaleBy(x: 1.0, y: -1.0)
        //
        let currentFrame: CGRect = self.bounds
        context.setLineJoin(CGLineJoin.round)
        context.setLineWidth(strokeWidth)
        context.setStrokeColor(UIColor.white.cgColor)
        context.setFillColor(UIColor.black.cgColor)
        // Draw and fill the bubble
        context.beginPath()

        context.move(to: CGPoint(x: borderRadius + strokeWidth + 0.5, y: strokeWidth + HEIGHTOFPOPUPTRIANGLE + 0.5))

            context.addLine(to: CGPoint(x: round(currentFrame.size.width / 2.0 - WIDTHOFPOPUPTRIANGLE / 2.0) + 0.5, y: HEIGHTOFPOPUPTRIANGLE + strokeWidth + 0.5))
        context.addLine(to: CGPoint(x: round(currentFrame.size.width / 2.0) + 0.5, y: strokeWidth + 0.5))
        context.addLine(to: CGPoint(x: round(currentFrame.size.width / 2.0 + WIDTHOFPOPUPTRIANGLE / 2.0) + 0.5, y: HEIGHTOFPOPUPTRIANGLE + strokeWidth + 0.5))

        context.addArc(tangent1End: CGPoint(x: currentFrame.size.width - strokeWidth - 0.5, y: strokeWidth + HEIGHTOFPOPUPTRIANGLE + 0.5), tangent2End: CGPoint(x: currentFrame.size.width - strokeWidth - 0.5, y: currentFrame.size.height - strokeWidth - 0.5), radius: borderRadius - strokeWidth)

        context.addArc(tangent1End: CGPoint(x: currentFrame.size.width - strokeWidth - 0.5, y: currentFrame.size.height - strokeWidth - 0.5) , tangent2End: CGPoint(x: round(currentFrame.size.width / 2.0 + WIDTHOFPOPUPTRIANGLE / 2.0) - strokeWidth + 0.5, y: currentFrame.size.height - strokeWidth - 0.5) , radius: borderRadius - strokeWidth)

        context.addArc(tangent1End: CGPoint(x: strokeWidth + 0.5, y: currentFrame.size.height - strokeWidth - 0.5), tangent2End: CGPoint(x: strokeWidth + 0.5, y: HEIGHTOFPOPUPTRIANGLE + strokeWidth + 0.5), radius: borderRadius - strokeWidth)

        context.addArc(tangent1End: CGPoint(x: strokeWidth + 0.5, y :strokeWidth + HEIGHTOFPOPUPTRIANGLE + 0.5), tangent2End: CGPoint(x: currentFrame.size.width - strokeWidth - 0.5 ,y: HEIGHTOFPOPUPTRIANGLE + strokeWidth + 0.5), radius: borderRadius - strokeWidth)

        context.closePath()
        context.drawPath(using: CGPathDrawingMode.fillStroke)

        // Draw a clipping path for the fill
        context.beginPath()

        context.move(to: CGPoint(x: borderRadius + strokeWidth + 0.5, y: round((currentFrame.size.height + HEIGHTOFPOPUPTRIANGLE) * 0.50) + 0.5))
        context.addArc(tangent1End: CGPoint(x: currentFrame.size.width - strokeWidth - 0.5, y: round((currentFrame.size.height + HEIGHTOFPOPUPTRIANGLE) * 0.50) + 0.5), tangent2End: CGPoint(x: currentFrame.size.width - strokeWidth - 0.5, y: currentFrame.size.height - strokeWidth - 0.5), radius: borderRadius - strokeWidth)

        context.addArc(tangent1End: CGPoint(x: currentFrame.size.width - strokeWidth - 0.5, y: currentFrame.size.height - strokeWidth - 0.5) , tangent2End: CGPoint(x: round(currentFrame.size.width / 2.0 + WIDTHOFPOPUPTRIANGLE / 2.0) - strokeWidth + 0.5, y: currentFrame.size.height - strokeWidth - 0.5), radius: borderRadius - strokeWidth)
        context.addArc(tangent1End: CGPoint(x: strokeWidth + 0.5, y: currentFrame.size.height - strokeWidth - 0.5), tangent2End: CGPoint(x: strokeWidth + 0.5, y: HEIGHTOFPOPUPTRIANGLE + strokeWidth + 0.5), radius: borderRadius - strokeWidth)
        context.addArc(tangent1End: CGPoint(x: strokeWidth + 0.5, y: round((currentFrame.size.height + HEIGHTOFPOPUPTRIANGLE) * 0.50) + 0.5), tangent2End: CGPoint(x: currentFrame.size.width - strokeWidth - 0.5, y: round((currentFrame.size.height + HEIGHTOFPOPUPTRIANGLE) * 0.50) + 0.5), radius: borderRadius - strokeWidth)

        context.closePath()
        context.clip()
    }
Yetispapa
  • 2,174
  • 2
  • 30
  • 52
-3

I would probably make the whole image (including the triangle) in Photoshop, and then display it on the screen at the appropriate time using the:

CGRect myRect = CGRectMake(10.0f, 0.0f, 300.0f, 420.0f);
UIImageView *myImage = [[UIImageView alloc] initWithFrame:myRect];
[myImage setImage:[UIImage imageNamed:@"ThisIsMyImageName.png"]];
myImage.opaque = YES;
[self.view addSubview:myImage];
[myImage release];
Linuxmint
  • 4,716
  • 11
  • 44
  • 64