89

I check other question on google or stackoverflow, they are talking about run cv2.imshow in script, but my code run in jupyter notebook.

Here is my configuration:

  1. ubuntu 16.4x64

  2. python 3.5

  3. opencv 3.1.0

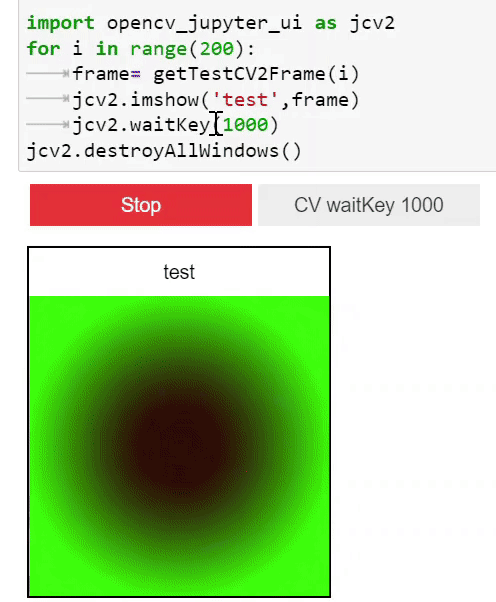
I start a jupyter notebook: here is the code I put it notebook:

%pylab notebook
import cv2

cvim2disp = cv2.imread('data/home.jpg')
cv2.imshow('HelloWorld', cvim2disp)
cv2.waitKey() #image will not show until this is called
cv2.destroyWindow('HelloWorld') #make sure window closes cleanly

When I execute these code. image will show in a pop up window, but I can not close this window by clicking the x on the top right corner, and a moment later, system will prompt me that the window is not responding, it will give me 2 choices: "wait" , "fore quit". if I hit wait, then It will show the same prompt later, If I hit 'fore quit', then the jupyter notebook kernel die and I have to start over.

I google around, many solution suggest that I should add this code

cv2.startWindowThread()

before imshow, but situation get worse, the kernel hang forever!. anybody have some idea what's going on.

Here is the pic of my error: enter image description here

Christoph Rackwitz
  • 11,317
  • 4
  • 27
  • 36
scott huang
  • 2,478
  • 4
  • 21
  • 36
  • 11
    `cv.imshow` doesn't really make sense in a client/server environment like Jupyter. You want something that will display the image as part of the notebook (on the client side), not to run a GUI window on the server side -- that might kinda "work" when the client and server are on the same machine, but that's about it. | You already use the `imshow` function from matplotlib (not numpy as you seem to think), so stick with that (keeping in mind that it uses RGB rather than BGR order of color planes). – Dan Mašek Sep 15 '17 at 10:39
  • Did you find a solution to this, I'm having the same issue, I've used opencv quite a bit so not a waitkey issue. It only happens at the last imshow() before the program finishes, so you show and destroy windows, until you need to close the final window(even if it's identical to all before such as the last iteration in a loop). – aheigins Feb 07 '19 at 19:55

12 Answers12

96
%matplotlib inline
#The line above is necesary to show Matplotlib's plots inside a Jupyter Notebook

import cv2
from matplotlib import pyplot as plt

#Import image
image = cv2.imread("input_path")

#Show the image with matplotlib
plt.imshow(image)
plt.show()
Mitodina
  • 580
  • 2
  • 5
  • 11
Ritu dhoot
  • 977
  • 6
  • 5
  • 8
    Can you add more detail to your answer, please? – CodeF0x Oct 31 '18 at 09:31
  • 1
    It uses the matplotlib Python library in inline mode (so you can see it on the Notebook). Then, it loads an image with cv2 and then show the figure using matplotlib – Mitodina Nov 19 '18 at 21:02
  • [This gist](https://gist.github.com/mstfldmr/45d6e47bb661800b982c39d30215bc88) has a bit more info if interested – Masud Jan 29 '19 at 21:19
  • 3
    This isn't an answer this is showing how to use matplotlib instead of opencv. – eric Dec 24 '19 at 00:50
  • 1
    matplotlib is a good workaround as it doesn't seem possible to show opencv images inline in a jupyter notebook – user391339 Feb 18 '20 at 03:49
  • 17
    This produces an incorrect output of the image because OpenCV uses BGR array instead of RGB. We need to convert BGR to RGB using `cv2.cvtColor(image, cv2.COLOR_BGR2RGB)` before using plt. – Krishnakanth Allika Oct 21 '20 at 10:16
81

I was having a similar problem, and could not come to a good solution with cv2.imshow() in the Jupyter Notebook. I followed this stackoverflow answer, just using matplotlib to display the image.

import matplotlib.pyplot as plt
# load image using cv2....and do processing.
plt.imshow(cv2.cvtColor(image, cv2.COLOR_BGR2RGB))
# as opencv loads in BGR format by default, we want to show it in RGB.
plt.show()
Krissh
  • 328
  • 3
  • 14
mannyglover
  • 2,139
  • 14
  • 18
  • 7
    cv2.BGR2RGB is now called cv2.COLOR_BGR2RGB – sebas Jun 03 '19 at 21:16
  • I encounter the same issue when trying to display too many large figures in a loop. It happens on both the `plt.show()` and simply `dislay(image) ` – Jason Sep 11 '19 at 23:25
16

The API documentation for cv2.waitKey() notes the following:

This function is the only method in HighGUI that can fetch and handle events, so it needs to be called periodically for normal event processing unless HighGUI is used within an environment that takes care of event processing.

So perhaps calling the function in an endless loop would make the window responsive? I haven't tested this, but maybe you would like to try the following:

import cv2

cvim2disp = cv2.imread('data/home.jpg')
cv2.imshow('img', cvim2disp)
while(True):
    k = cv2.waitKey(33)
    if k == -1:  # if no key was pressed, -1 is returned
        continue
    else:
        break
cv2.destroyWindow('img')
Saibot
  • 176
  • 1
  • 6
10

This will help you understand what is happening:

import cv2
cvim2disp = cv2.imread('data/home.jpg')
cv2.imshow('HelloWorld', cvim2disp)
cv2.waitKey(0) 
cv2.destroyWindow('HelloWorld')

waitKey(0) method is waiting for an input infinitely. When you see a frame of the corresponding image, do not try to close the image using close in top right corner.

Instead press some key. waitkey method will take that as an input and it will return back a value. Further you can also check which key was pressed to close the frame.

Additionally waitKey(33) will keep the frame active for 33 ms and then close it automatically.

destroyWindow() will destroy the current frame if there. destroyAllWindows() will destroy all the frames currently present.

This will solve.

Taysky
  • 4,331
  • 2
  • 20
  • 28
Vivek Kumar
  • 133
  • 1
  • 4
6

if your facing problem in google collab ,you can use this patch

from google.colab.patches import cv2_imshow
cv2_imshow(img)
Akash Desai
  • 498
  • 5
  • 11
3
%matplotlib inline
from matplotlib import pyplot as plt

img = cv2.imread(valid_img_paths[1])
plt.imshow(cv2.cvtColor(img, cv2.COLOR_BGR2RGB))
plt.show()
Livid
  • 86
  • 3
  • 3
    This is a good answer putting together the answers of Ritu dhoot and mannyglover. While it's OK to do that, please cite your sources when you copy part of someone else's answer into yours. – joanis Nov 05 '21 at 13:28
2

I have just developed a library that is exactly similar to cv2.imshow and it can be used in both Jupyter and colab. It can update the window. Therefore you can easily see the video inside it. It uses HTML canvas and is browser friendly :)

Installation:

pip install opencv_jupyter_ui

Usage:

This is the replacement of cv2.imshow for Jupiter. you need only to replace cv2.imshow with jcv2.imshow. It will work in Jupiter.

First:

please import the library

import opencv_jupyter_ui as jcv2

Then:

change cv2.imshow ->jcv2.imshow

More details exist on the Github Repository. Binder Demo gif

It also supports jcv2.waitKey(100) and jcv2.destroyAllWindows(). In case of the absence of Jupyter, it fallbacks to original cv2 functionality. In order to change the default keys you can use jcv2.setKeys(['a','b','esc']). Please follow the document for more information

Ali
  • 460
  • 6
  • 13
1

The following code works fine in Jupyter to show one image

%matplotlib inline
import cv2
from matplotlib import pyplot as plt
cap = cv2.VideoCapture(videoFName)
ret, image = cap.read()
image=cv2.resize(image,None,fx=0.25,fy=0.25,interpolation=cv2.INTER_AREA)
plt.imshow(image)
plt.show()

If you want to show the video instead of an image in a separate window, use the following code:

import cv2
cap = cv2.VideoCapture(videoFName)
while cap.isOpened():
    ret, image = cap.read()
    image=cv2.resize(image,None,fx=0.25,fy=0.25,interpolation=cv2.INTER_AREA)
    cv2.imshow('image',image)

    k = cv2.waitKey(30) & 0xff # press ESC to exit
    if k == 27 or cv2.getWindowProperty('image', 0)<0:
        break
cv2.destroyAllWindows()
cap.release()

Make sure the window name match, otherwise it will not work. In this case I use 'image' as window name.

Kardi Teknomo
  • 1,375
  • 16
  • 24
1

The new window that opens up from Jupyter uses the same kernel as notebook. Just add this below to the code and it would work fine.

cv2.waitKey(0)
cv2.destroyAllWindows()
1
image = cv2.imread(file_path)
while True:
    # Press 'q' for exit
    exit_key = ord('q')
    if cv2.waitKey(exit_key) & 255 == exit_key:
        cv2.destroyAllWindows()
        break
    cv2.imshow('Image_title', image)
Mazhar
  • 1,044
  • 6
  • 11
  • 3
    While this code may provide a solution to the question, it's better to add context as to why/how it works. This can help future users learn, and apply that knowledge to their own code. You are also likely to have positive feedback from users in the form of upvotes, when the code is explained. – borchvm May 11 '20 at 05:40
  • In addition to what @borchvm says, it’s also useful when answering old threads with a lot of existing answers to explain why your approach is a good alternative to the other proposals. That way, when people are skimming through the answers they can get a quick idea of why they should consider this approach over others. – Jeremy Caney May 11 '20 at 18:34
0

I'm very satisfied using this way using cv2.startWindowThread()

at this link:

cv2.imshow command doesn't work properly in opencv-python

cv2.imwrite('model_median_frame.jpg', median_frame)

cap.set(cv2.CAP_PROP_POS_FRAMES, 0)
gray_median_frame = cv2.cvtColor(median_frame, cv2.COLOR_BGR2GRAY)
cv2.startWindowThread()
cv2.imshow('Gray', gray_median_frame)
cv2.waitKey(0)

Istead using : opencv-jupyter-ui : https://pypi.org/project/opencv-jupyter-ui/

If I running code below it generate error : (and need extra effort for installing on anaconda)

cv2.imwrite('model_median_frame.jpg', median_frame)

cap.set(cv2.CAP_PROP_POS_FRAMES, 0)
gray_median_frame = cv2.cvtColor(median_frame, cv2.COLOR_BGR2GRAY)
#cv2.startWindowThread()
jcv2.imshow('Gray', gray_median_frame)
jcv2.waitKey(0)


File ~\anaconda3\envs\py310\lib\site-packages\opencv_jupyter_ui\cv2_imshow.py:75, in cv2_imshow(name, image, width, height, colorspace, force_clear)
     72     showWarning('warning an error occured! maybe cv2 not found-> it may cause performance issue')
     74 canvas=windows[name].children[1]
---> 75 if colorspace=='bgr': image=image[:,:,::-1] # convert to rgb
     76 with hold_canvas(canvas):
     77     if image is None:
-1

I am not sure if you can open a window from Jupyter Notebook. cv2.imshow expects a waitKey which doesn't work in Jupyter.

Here is what I have done (using OpenCV 3.3):

from IPython.display import display, HTML
import cv2
import base64

def imshow(name, imageArray):
     _, png = cv2.imencode('.png', imageArray)
     encoded = base64.b64encode(png)
     return HTML(data='''<img alt="{0}" src="data:image/png;base64, {1}"/>'''.format(name, encoded.decode('ascii')))

img = cv2.imread('./media/baboon.jpg',cv2.IMREAD_COLOR)
imshow('baboon', img)

If you don't need to use cv2, just:

from IPython.display import Image
Image('./media/baboon.jpg')
Fred Guth
  • 1,537
  • 1
  • 15
  • 27