Due to what we have chatted in the comments. Now I know what you real want is the Circular crop to your ImageView and also a TextView. So after a dedicated work I have decided to form the solution that will result to an output that is shown in the image below:
 .
.
Dont worry about the textView you can position it anywhere. Even on top of the image! And change its size!
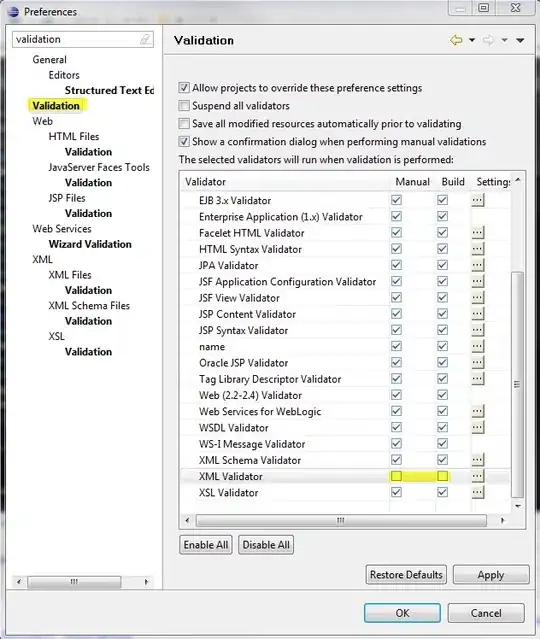
First you will have to know there is no default implementation on this meaning there is no default View class that provides Circular cropped Views in android. So here are the two alternatives for solving this trick using XML ONLY!
FIRST ALTERNATIVE ( BEST OPTION )
We are going to use a FrameLayout which is a layout that add Views on top of each other. That means if you put the first then the second will be on top of the first etc.
Requirements
To fit an image well in a circular view then it should be SQUARE(this is just logical) so you we will need to set width and height equal values.
We will need a circular shape with stroke (The idea is to put it on top of a well calculated view sizes!)
Inside your drawable folder make a file called circular_image_crop.xml. And paste the code (dont worry will describe it later!) do not forget to read the comments in it:
<?xml version="1.0" encoding="utf-8"?>
 <shape xmlns:android="http://schemas.android.com/apk/res/android"
       android:shape="oval">
  <solid android:color="#00ffffff"/>
   <!--The above colour is completely transparent!-->
  <stroke android:width="20dp" android:color="#ec407a" />
  <size android:width="140dp" android:height="140dp"/>
</shape>
After making that drawable file we will have to make our FrameLayout (This frame layout is not a root view of any view just copy it inside any view you want to show this layout) Go on and paste the code below (we will explain it later!) again read the comments in it:
<FrameLayout
        android:layout_width="match_parent"
        android:layout_height="wrap_content"
        android:background="#ec407a">

        <!-- This is our framelayout! Notice our background color is the same as the one in the stroke of our drawable. Also this is your image view notice the it has width and height similar (square) do use match parent or wrap content just define a square and views will be position by adjust view bounds true-->

        <ImageView
            android:id="@+id/image_view_user_profile_image"
            android:layout_width="100dp"
            android:layout_height="100dp"
            android:layout_gravity="center_horizontal"
            android:layout_marginTop="20dp"
            android:adjustViewBounds="true"
            android:contentDescription="@string/your_image_description"
            android:src="@drawable/your_image" />

        <!-- Ooh here we have another image! This is an image just for displaying our drawable and crop our image (how?? dont worry!) -->

        <ImageView
            android:layout_width="140dp"
            android:layout_height="140dp"
            android:layout_gravity="center_horizontal"
            android:contentDescription="@string/also_your_image_description_if_any"
            android:src="@drawable/circular_image_crop" />
        <!--This text view we almost forget here it is!-->
        <TextView
            android:id="@+id/your_text_view_id"
            android:layout_width="match_parent"
            android:layout_height="wrap_content"
            android:layout_gravity="bottom"
            android:layout_marginBottom="8dp"
            android:layout_marginTop="125dp"
            android:gravity="center"
            android:text="John Nanai Noni"
            android:textColor="#ffffff"
            android:textSize="16sp"
            android:textStyle="bold" />
    </FrameLayout>
How it works and customizations!???
The good thing is that we used our Frame Layout and position our real View at the centre horizontal(square image). The we made our drawable which is a circular and also have a circular hole(space) at the centre which matches the height and with our picture. Lastly we add our textview and put on top of all those but at the bottom (it should not obscure out image right?).
So the way that we can understand this is viewing the following image as an outline to whats needed.(dont think its complicated):
So from there we can see how it went on the image at the middle the Circular crop and etc

The next stage:
From there we can apply the same background colour to our whole layout (FrameLayout) to hide the Circular things and leave our own visible space.

And yes we have finished our layout! What about customization.
Customization
For colours you can put your own colour anywhere in the FrameLayout background well as well as the stroke of the drawable. But never change the <solid> colour it should always be completely transparent always.
For customization of the radius of the circular crop lets dig into its mathematics formula to figure out the coverage of the image!
Mathematics
Let your width or height(the image is square remember) of your image be x dps. Then the values in your drawable are
stroke= 0.2071 * x
size(height and width)=stroke + x
You can 2 or 3 dps for elimination of truncation errors!
Actually the mathematics behind is based on the formula below. The formula works if your interested how comment below:
SECOND ALTERNATIVE
Another alternative which I think is good for someone who DOES NOT care about the space between the circular view is by making the ImageView inside the CardView and making the corner radius half the size of the CardView for example this code:
<?xml version="1.0" encoding="utf-8"?>
<android.support.v7.widget.CardView
      xmlns:android="http://schemas.android.com/apk/res/android"
      xmlns:app="http://schemas.android.com/apk/res-auto"
    android:layout_width="280dp"
    android:layout_height="280dp"
    android:layout_gravity="center_horizontal"
    android:layout_margin="30dp"
    app:cardCornerRadius="140dp"
    app:cardElevation="12dp">

    <ImageView
        android:layout_width="200dp"
        android:layout_height="200dp"
        android:layout_gravity="center"
        android:adjustViewBounds="true"
        android:src="@drawable/login_back_ground" />

 </android.support.v7.widget.CardView>
This is an output I get In android Studio. Also I cant guarantee how is this is going to look like in various devices especially old ones!

CONCLUSION
Both methods are good and useful. Understanding both can even lead to more customizations like making using the first alternative with the second to bring about customizations like adding elevations of circular image. But the first method fits number of daily uses and it also bring equal experiences to all android devices.
I hope this will even help future users who might have the same problem.


