10

The Preface

I have a working custom UITableViewCell dismissal animation on iOS 10. The way it is implemented is as follows:

  1. User presses the submit button
  2. A custom view is created, positioned and inserted at index zero of the UITableViewCell's subviews (underneath the cell's contentView)
  3. The contentView is animated out of frame while the custom view's alpha is animated to 1.0
  4. When the contentView is fully out-of-frame, the native UITableView method deleteRows(at: [indexPath], with: .top) is called. The UITableViewCell collapses and the custom view is masked behind the previous UITableViewCell as it collapses.
  5. The cell (and hence all of it's subviews including my custom view) is deleted.

Below is a slow-animation of it working:

UITableViewCell mask working on iOS 10

Note: The tableView has a clear background color, allowing a custom view (the blue) to show behind it. Each cell has a containerView which contains all the content of the cell. The containerView and contentView both have clear background colors. All is fine and dandy.

The Problem

Migrating my app to iOS 11, this animation no longer works properly. Below is a slow-animation of it no longer working anymore.

UITableViewCell mask working on iOS 11

As you can see, the custom view is overlayed on top of the previous cell upon cell dismissal with no changes to my code.

Investigation thus far

So far I've determined that the anatomy of a UITableView has changed from this:

UITableView
    UITableViewWrapperView
        cell
            custom view
            contentView
            cell separator view
        cell
        cell
        cell
    UIView
    UIImageView  (scroll view indicator bottom)
    UIImageView  (scroll view indicator right)

To this: (UITableViewWrapperView has been removed)

UITableView
    cell
        custom view
        contentView
        cell separator view
    cell
    cell
    cell
    UIView
    UIImageView (scroll view indicator bottom)
    UIImageView (scroll view indicator right)

One thing I noticed about this UITableWrapperView is that its layer's isOpaque property is true and masksToBounds property is false while the UITableView and all of the UITableViewCells are opposite. Since this view was removed in iOS 11 this might contribute to why I'm having the erroneous effect. I really don't know.

Edit: Another thing I found was that the UITableWrapperView in the working example inserts a mystery UIView at the zero index of it's subviews (all the UITableViewCells) which properties isOpaque is set to true and it has a compositingFilter. This view is subsequently removed after the animation is complete. Since UITableWrapperView is removed in iOS 11, this view is, by association, also missing.

Question

First of all, does anybody know why this this change in behavior is occurring? If not, is there an alternative way to achieve the effect that was working in iOS 10 in a better way? I want clear UITableViewCells but have a custom view that displays behind each cell upon dismissal that is masked by the other clear UITableViewCells when dismissed as shown in the first gif example above.

Aaron
  • 6,466
  • 7
  • 37
  • 75

5 Answers5

1

Before you delete the row, send the cell you're deleting to the back of the table view's subviews.

tableView.sendSubview(toBack: cell)
tableView.deleteRows(at: [indexPath], with: .top)

If you don't have the cell, you can retrieve it using the index path.

guard let cell = tableView.cell(for: indexPath) else { return }

// ...

This should work with an adjustment to the view hierarchy.

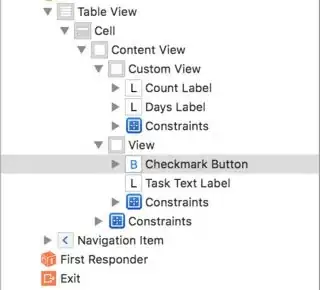
View hierarchy adjustment

CardTableViewController.swift

class CardTableViewController: UITableViewController, CardTableViewCellDelegate {

    // MARK: Outlets

    @IBOutlet var segmentedControl: UISegmentedControl!

    // MARK: Properties

    private var cards: [Card] = [
        Card(text: "Etiam porta sem malesuada magna mollis euismod. Maecenas faucibus mollis interdum."),
        Card(text: "Nulla vitae elit libero, a pharetra augue. Cras justo odio, dapibus ac facilisis in, egestas eget quam."),
        Card(text: "Aenean eu leo quam. Pellentesque ornare sem lacinia quam venenatis vestibulum. Sed posuere consectetur est at lobortis.")
    ]

    var selectedIndex: Int { return segmentedControl.selectedSegmentIndex }
    var tableCards: [Card] {
        return cards.filter { selectedIndex == 0 ? !$0.isDone : $0.isDone }
    }

    // MARK: UITableViewDataSource

    override func tableView(_ tableView: UITableView, numberOfRowsInSection section: Int) -> Int {

        return tableCards.count
    }

    override func tableView(_ tableView: UITableView, cellForRowAt indexPath: IndexPath) -> UITableViewCell {

        let cell = tableView.dequeueReusableCell(withIdentifier: "Cell", for: indexPath) as! CardTableViewCell

        cell.card = tableCards[indexPath.row]

        return cell
    }

    override func tableView(_ tableView: UITableView, heightForRowAt indexPath: IndexPath) -> CGFloat {

        return UITableViewAutomaticDimension
    }

    // MARK: CardTableViewCellDelegate

    func cardTableViewCell(_ cell: CardTableViewCell, didTouchUpInsideCheckmarkButton button: UIButton) {

        guard let indexPath = tableView.indexPath(for: cell) else { return }

        cell.card?.isDone = button.isSelected
        cell.card?.dayCount += button.isSelected ? 1 : -1
        cell.customView?.dayCount = cell.card?.dayCount

        UIView.animate(withDuration: 0.7, delay: 0.3, options: .curveEaseIn, animations: {
            cell.checkmarkButton?.superview?.transform = .init(translationX: cell.frame.width, y: 0)
            cell.customView?.alpha = 1
        }) { _ in
            self.tableView.sendSubview(toBack: cell)
            self.tableView.deleteRows(at: [indexPath], with: .top)
        }
    }

    // MARK: Actions

    @IBAction func didChangeSegmentedControl(_ sender: UISegmentedControl) {

        tableView.reloadData()
    }
}

CardTableViewCell.swift

@objc protocol CardTableViewCellDelegate {
    func cardTableViewCell(_ cell: CardTableViewCell, didTouchUpInsideCheckmarkButton button: UIButton)
}

@IBDesignable class CardTableViewCell: UITableViewCell {

    // MARK: Outlets

    @IBOutlet var checkmarkButton: UIButton?
    @IBOutlet var customView: CardCustomView?
    @IBOutlet var delegate: CardTableViewCellDelegate?
    @IBOutlet var taskTextLabel: UILabel?

    // MARK: Properties

    var card: Card? {
        didSet {
            updateOutlets()
        }
    }

    // MARK: Lifecycle

    override func awakeFromNib() {

        super.awakeFromNib()

        checkmarkButton?.layer.borderColor = UIColor.black.cgColor
    }

    override func prepareForReuse() {

        super.prepareForReuse()

        card = nil
    }

    // MARK: Methods

    private func updateOutlets() {

        checkmarkButton?.isSelected = card?.isDone == true ? true : false
        checkmarkButton?.superview?.transform = .identity

        customView?.alpha = 0
        customView?.dayCount = card?.dayCount

        taskTextLabel?.text = card?.text
    }

    // MARK: Actions

    @IBAction func didTouchUpInsideCheckButton(_ sender: UIButton) {

        sender.isSelected = !sender.isSelected

        delegate?.cardTableViewCell(self, didTouchUpInsideCheckmarkButton: sender)
    }
}

class CardCustomView: UIView {

    // MARK: Outlets

    @IBOutlet var countLabel: UILabel?
    @IBOutlet var daysLabel: UILabel?

    // MARK: Properties

    var dayCount: Int? {
        didSet { 
            updateOutlets()
        }
    }

    override func awakeFromNib() {

        super.awakeFromNib()

        updateOutlets()
    }

    // MARK: Methods

    private func updateOutlets() {

        let count = dayCount.flatMap { $0 } ?? 0

        countLabel?.text = "\(dayCount.flatMap { $0 } ?? 0)"
        daysLabel?.text = "Day\(count == 1 ? "" : "s") in a row"
    }
}

Card.swift

class Card: NSObject {

    // MARK: Properties

    var dayCount: Int = 0
    var isDone: Bool = false
    var text: String

    // MARK: Lifecycle

    init(text: String) {
        self.text = text
    }
}
Callam
  • 11,409
  • 2
  • 34
  • 32
  • Unfortunately this did not work. `UITableView` already stacks cells with the top cell on top of the stack so the cell being animated away is already underneath. Regardless, this didn't solve the issue but thanks for trying! – Aaron Nov 03 '17 at 16:57
  • @Aaron the cells are ordered in the view hierarchy as they are ordered in the table so the last cell is the uppermost view. I recreated your UI and the issue in your GIF, and `sendSubview(toBack:` fixed it. The only thing I failed to mention was that I had put the custom view in the cell's content view and the original contents of the content view inside its own above the custom view. I'm guessing that's what's making it work for me so I have updated my answer to include a screenshot of the view structure. – Callam Nov 03 '17 at 21:05
  • This is a similar proposed solution to @Marek R but to no avail. I wish it solved it! – Aaron Nov 07 '17 at 00:54
1

First of all I don't think a missing UITableViewWrapperView is a problem. This is parent view and parents can't obscure child views.

Note that problem is which cell obscures which. In first case row A obscures row B and in second row B obscures row A (in this case your custom B cell has transparent background).

So looks like Apple has screw up relations between cells. To fix it I would try to fix this relations. So before second part of animation starts I would try:

bring cell to back

cell.superview.sendSubview(toBack: cell)

This shouldn't break anything (on older iOS versions) and should resolve issue wiht iOS 11.

Marek R
  • 32,568
  • 6
  • 55
  • 140
  • First off, the cell's superview is the UITableView in iOS 11 so I could just call directly from that. That said, it does send the cell to the back but it doesn't produce any different result. The custom view is still not masked "behind" any other views in the table view unfortunately. – Aaron Nov 07 '17 at 00:53
1

I spent many days studying but failing.

iOS10

After deleteRows, TableViewCell has a view with a compositingFilter property, the value is copy, which that the view hide all view behind this.

We can try to remove subview of TableViewCell generated while deleteRows. Then iOS 10 will behave like iOS11.

Then we can try add a view(UIView()) to TableViewCell again and set compositingFilter to copy (String), it will re achieve in iOS10 again.

But any action failure in iOS11. It will produce a black background in iOS11.

I believe the behavior of layer was changed on iOS11.

Maybe we have to think about give up temporarily use up animation in ios11 when the background of TableViewCell is transparent.

Codus
  • 1,433
  • 1
  • 14
  • 18
  • Yes I posted about this `compositingFilter` in my original question. I assume that it had something to do with how the cell animation is behaving differently. – Aaron Nov 07 '17 at 00:55
1

I faced such an issue after reviewing the app on iOS 11, the issue was the animation when deleting rows from the table view:

enter image description here

It is clear that collapsing animation is improper because there is more than one row to be deleted.

Here is the responsible code for expanding/collapsing the rows:

// inserting rows:                
tableView.beginUpdates()
tableView.insertRows(at: [IndexPath(row: 4 + count, section: 0), IndexPath(row: 5 + count, section: 0), IndexPath(row: 6 + count, section: 0)], with: .automatic)
tableView.endUpdates()

// deleting rows:
tableView.beginUpdates()
tableView.deleteRows(at: [IndexPath(row: 4 + count, section: 0), IndexPath(row: 5 + count, section: 0), IndexPath(row: 6 + count, section: 0)], with: .automatic)
tableView.endUpdates()

obviously, there is also code to edit the data source array.


The reason of causing this issue was -simply- the assigned UITableViewRowAnimation to automatic; All I did was changing the animation to be fade:

// inserting rows:                
tableView.beginUpdates()
tableView.insertRows(at: [IndexPath(row: 4 + count, section: 0), IndexPath(row: 5 + count, section: 0), IndexPath(row: 6 + count, section: 0)], with: .fade)
tableView.endUpdates()

// deleting rows:
tableView.beginUpdates()
tableView.deleteRows(at: [IndexPath(row: 4 + count, section: 0), IndexPath(row: 5 + count, section: 0), IndexPath(row: 6 + count, section: 0)], with: .fade)
tableView.endUpdates()

And the output has been fixed to be:

enter image description here

Also

You might want to check the following question that could be related to your issue:

Ahmad F
  • 30,560
  • 17
  • 97
  • 143
0

I found the solution for the UITableView with fixed sized cells

presentation of the solution in action

In this approach, I decided to add a supplementary view to the content view of the UITableViewCell and animate it's height constraint to 0 alongside the row delete animation.

To keep things simple I will present only the key points of this solution.

  • User taps remove button.
  • Cell moves the inner content view to the right.
  • Table view calls deleteRows(at:with:) method.
  • Cell animates the height of the supplementary view to 0.

I won't be describing entire auto layout setup here because it will obscure the main idea of the solution. All the building blocks are fairly simple but there are a few of them. You can find a full working project in this GitHub repository.


Unfortunately, this solution doesn't work very well with dynamic height cells due to the animation timing. I'm not sure that it will solve your problem because as far as I can see you are using the dynamic height cells. However, I hope it will push you in the right direction or help someone having a similar problem.

Kamil Szostakowski
  • 2,153
  • 13
  • 19
  • You're right, unfortunately it doesn't work so well with the dynamic height cells that I have. – Aaron Nov 07 '17 at 00:55