7

So I have this image below: enter image description here

As you can see, there is some noisy green outline in the image. This is by far, my latest output with OpenCV with Python. And I'm still a beginner with this so I need your help.

Assuming I were to create a completely new script and feed this image and 'clean' the image, how will I do it?

EDIT: This is the original image: enter image description here

Jeru Luke
  • 20,118
  • 13
  • 80
  • 87
Jude Maranga
  • 865
  • 2
  • 9
  • 27
  • 1
    is the greenish part inside or outside of the object border? Imho it is possible that there was green-light reflection from the surface shining on the object. e.g. in the face it looks like reflection, at the fingers it looks more like the green comes from a bad mask – Micka Aug 07 '18 at 06:19

4 Answers4

8

Here is a rather simple approach.

Background:

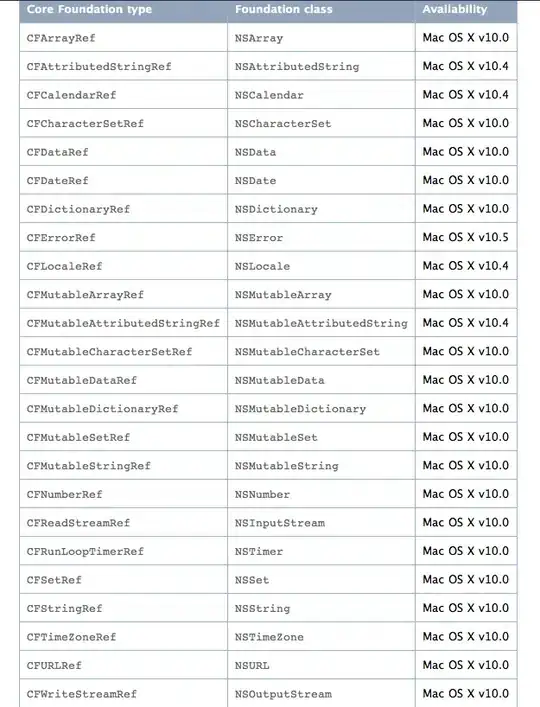
Dominant colors like red, green, blue and yellow can be segmented pretty easily when analyzed in LAB color space. LAB space has 3 channels, out of which only 2 are color channels while 1 is a brightness channel:

  • L-channel: represents the brightness
  • A-channel: represents the amount of red/green color
  • B-channel: represents the amount of blue/yellow color

enter image description here

Observing the plot above:

  1. a-axis clearly shows red/green color on its extremes
  2. b-axis shows blue/yellow color on its extremes

Applying a suitable threshold in the corresponding channels makes it easy for us to segment these colors.

Approach:

We will use the above info as a base to approach the problem at hand:

1. Perform basic masking:

-> Convert image to LAB space -> Threshold a-channel to isolate green background -> Masking original image with binary mask

img = cv2.imread('green_background.jpg')
lab = cv2.cvtColor(img, cv2.COLOR_BGR2LAB)
a_channel = lab[:,:,1]
th = cv2.threshold(a_channel,127,255,cv2.THRESH_BINARY+cv2.THRESH_OTSU)[1]
masked = cv2.bitwise_and(img, img, mask = th)    # contains dark background
m1 = masked.copy()
m1[th==0]=(255,255,255)                          # contains white background

enter image description here

2. Remove green shade along the border:

-> Convert masked image LAB space -> Normalize the a-channel mlab[:,:,1] to use the entire intensity range between [0-255] -> Inverse binary threshold to select area with green borders

mlab = cv2.cvtColor(masked, cv2.COLOR_BGR2LAB)
dst = cv2.normalize(mlab[:,:,1], dst=None, alpha=0, beta=255,norm_type=cv2.NORM_MINMAX, dtype=cv2.CV_8U)

enter image description here

Above image is the a-channel with dark pixels around the border.

threshold_value = 100
dst_th = cv2.threshold(dst, threshold_value, 255, cv2.THRESH_BINARY_INV)[1]

Above is the threshold image to segment green shaded regions.

enter image description here

In the a-channel, having green color represents the lower end of the range [0-255], while red color represents the higher end. We will set intensity value in the a-channel of the selected pixels to 127:

mlab2 = mlab.copy()
mlab[:,:,1][dst_th == 255] = 127

enter image description here

Now in the above image, we do not see the dark borders around the person.

Convert the image to BGR and the pixels that were dark (0) in the threshold image are set to white (255, 255, 255) in the color image

img2 = cv2.cvtColor(mlab, cv2.COLOR_LAB2BGR)
img2[th==0]=(255,255,255)

enter image description here

The resulting image looks like nothing much has changed, so here is a zoomed in comparison:

Before Step 2:

enter image description here

After Step 2:

enter image description here

Conclusion:

The noisy green outline around the border has improved to a certain extent. You can try varying threshold_value and experiment.

The green shade present within the person's face still remains. Sophisticated methods will be needed to get rid of those. Hope this approach helps.

Jeru Luke
  • 20,118
  • 13
  • 80
  • 87
  • Hi @Jeru Luke! Thanks for the answer! Could you give some hints/overview on how to remove the green left on the face? – hannarud Jan 02 '23 at 20:31
5

Here is a variation on @Jeru Luke's answer using Python/OpenCV. It does the same thresholding in LAB colorspace, but I simply anti-alias using a blur and a stretch of half the input range of gray values on the A channel. It has the benefit of reducing some green and smoothing the result so that it will blend smoothly into any background image.

Adjust the blur sigma values and/or the input clip values in the rescale_intensity to adjust the smoothing and amount of green showing.

Input:

enter image description here

import cv2
import numpy as np
import skimage.exposure

# load image
img = cv2.imread('greenscreen.jpg')

# convert to LAB
lab = cv2.cvtColor(img,cv2.COLOR_BGR2LAB)

# extract A channel
A = lab[:,:,1]

# threshold A channel
thresh = cv2.threshold(A, 0, 255, cv2.THRESH_BINARY+cv2.THRESH_OTSU)[1]

# blur threshold image
blur = cv2.GaussianBlur(thresh, (0,0), sigmaX=5, sigmaY=5, borderType = cv2.BORDER_DEFAULT)

# stretch so that 255 -> 255 and 127.5 -> 0
mask = skimage.exposure.rescale_intensity(blur, in_range=(127.5,255), out_range=(0,255)).astype(np.uint8)

# add mask to image as alpha channel
result = img.copy()
result = cv2.cvtColor(img,cv2.COLOR_BGR2BGRA)
result[:,:,3] = mask

# save output
cv2.imwrite('greenscreen_thresh.png', thresh)
cv2.imwrite('greenscreen_mask.png', mask)
cv2.imwrite('greenscreen_antialiased.png', result)

# Display various images to see the steps
cv2.imshow('A',A)
cv2.imshow('thresh', thresh)
cv2.imshow('blur', blur)
cv2.imshow('mask', mask)
cv2.imshow('result', result)

cv2.waitKey(0)
cv2.destroyAllWindows()

Threshold Image:

enter image description here

Mask Image (for alpha channel):

enter image description here

Result:

enter image description here

fmw42
  • 46,825
  • 10
  • 62
  • 80
2

Use Canny Edge Detection on your image. Then depending how it looks like use Morphological Dilation (cv.dilate()) to make the edges a bit thicker. Afterwards remove the edges from the green channel of the image or reduce the brightness of green channel. Or make the pixels transparent.

This post states the following approach:

1.) Convert green pixels to transparency. Basically uses a filtering rule in the HSV color space.

2.) On the hair and some boundary pixels colors are mixed with green. To reduce this problem these pixels are filtered and balanced to reduce their green proportion.

3.) Apply a gradient transparency to all boundary pixels.

Joe
  • 6,758
  • 2
  • 26
  • 47
  • Hi @Joe, thank you for reaching out. I was wondering, would it be better if I had the original green image again and process it 'properly' (i.e. not the way I did it which resulted to that image I shared above)? I shared the original image above – Jude Maranga Aug 07 '18 at 05:46
  • This seems to be the same problem: https://stackoverflow.com/questions/2810970/how-to-remove-a-green-screen-portrait-background – Joe Aug 07 '18 at 05:53
  • Yeah already saw that post. Unfortunately, there is no genuine answer except for that Java solution and I'm not quite familiar with Java. – Jude Maranga Aug 07 '18 at 05:55
  • The approach described there is probably even better, he is only working on channels, no edges at all. – Joe Aug 07 '18 at 05:55
  • All the operations described in there are available in OpenCV. It is simply picking pixels by color and make them transparent. – Joe Aug 07 '18 at 05:57
  • https://stackoverflow.com/questions/10948589/choosing-the-correct-upper-and-lower-hsv-boundaries-for-color-detection-withcv – Joe Aug 07 '18 at 05:59
  • Oh I see. The problem is that I'm still a beginner with OpenCV and I'm having a hard time converting to from this to that :/ – Jude Maranga Aug 07 '18 at 06:02
  • On HSV filtering: https://stackoverflow.com/questions/47483951/how-to-define-a-threshold-value-to-detect-only-green-colour-objects-in-an-image/47483966#47483966 – Joe Aug 07 '18 at 06:10
1

Try to make a custom threshould, like:

def color_filter(img, r, g, b):
    colors = [b, g, r]
    result = np.zeros(img.shape, dtype=np.uint8)
    for i in range(3):
        result[:, :, i] = np.where(img[:, :, i] < colors[i], 0, 255)
    return result.astype(np.uint8)

UPDATE: here another solution https://codereview.stackexchange.com/a/184059/15056

To threshould every color channel with a different value.

You can find the best configuration for you using

def test_colors(img):
    cv.imshow("test_colors", img)
    r = 100
    g = 100
    b = 100
    while True:
        k = chr(cv.waitKey(0))
        if k == 'a':
            r += 1
        elif k == 'q':
            r -= 1
        elif k == 's':
            g += 1
        elif k == 'w':
            g -= 1
        elif k == 'd':
            b += 1
        elif k == 'e':
            b -= 1
        elif k == 't':
            r += 1
            g += 1
            b += 1
        elif k == 'g':
            r -= 1
            g -= 1
            b -= 1
        elif k == 'r':
            r = 100
            g = 100
            b = 100
            cv.imshow("test_colors", img)
            continue
        elif k == 'x':
            cv.destroyAllWindows()   
            print("The RGB is ", (r, g, b))
            break
        else:
            continue
        cv.imshow("test_colors", color_filter(img, r, g, b))
FindOutIslamNow
  • 1,169
  • 1
  • 14
  • 33