155

I'm quite new to Android Development and just came across Preferences. I found PreferenceScreen and wanted to create a login functionality with it. The only problem I have is that I don't know how I could add a "Login" button to the PreferenceScreen.

Here's what my PreferenceScreen looks like:

<PreferenceScreen xmlns:android="http://schemas.android.com/apk/res/android">
...
    <PreferenceScreen android:title="@string/login" android:key="Login">
        <EditTextPreference android:persistent="true" android:title="@string/username" android:key="Username"></EditTextPreference>
        <EditTextPreference android:title="@string/password" android:persistent="true" android:password="true" android:key="Password"></EditTextPreference>
    </PreferenceScreen>
...
</PreferenceScreen>

The Button should be right under the two EditTextPreferences.

Is there a simple solution for this problem? The one solution I found was not working because I use sub PreferenceScreens.

Update:

I figured out that i can add buttons this way:

<PreferenceScreen android:title="@string/login" android:key="Login">
        <EditTextPreference android:persistent="true" android:title="@string/username" android:key="Username"></EditTextPreference>
        <EditTextPreference android:title="@string/password" android:persistent="true" android:password="true" android:key="Password"></EditTextPreference>
        <Preference android:layout="@layout/loginButtons" android:key="loginButtons"></Preference>
</PreferenceScreen>

and the layout file (loginButtons.xml) looks that way:

<?xml version="1.0" encoding="utf-8"?>
<LinearLayout xmlns:android="http://schemas.android.com/apk/res/android"
    android:layout_height="wrap_content"
    android:layout_width="fill_parent"
    android:weightSum="10" 
    android:baselineAligned="false" android:orientation="horizontal">
    <Button android:text="Login" android:layout_width="fill_parent"
        android:layout_weight="5" android:layout_height="wrap_content"
        android:id="@+id/loginButton" android:layout_gravity="left"></Button>
    <Button android:text="Password?" android:layout_width="fill_parent"
        android:layout_weight="5" android:layout_height="wrap_content"
        android:id="@+id/forgottenPasswordButton"></Button>
</LinearLayout>

So now the buttons appear but I can't access them in code. I tried it with findViewById() but this is returning null. Any ideas how I could access these buttons?
Community
  • 1
  • 1
Van Naaktgeboren
  • 1,551
  • 2
  • 10
  • 4
  • Look at this question http://stackoverflow.com/questions/2697233/how-to-add-a-button-to-preferencescreen – Juozas Kontvainis Aug 05 '11 at 08:49
  • 2
    BTW, @neelabh answer is most simple - you can achieve the required behaviour by specifing event hanlder in the xml-layout: just add `android:onClick="method"` to each button, where method is defined in the activity as `public void method(View v)`. – Stan Oct 04 '13 at 20:30

10 Answers10

339

For the xml:

<Preference
    android:title="Acts like a button"
    android:key="@string/myCoolButton"
    android:summary="This is a cool button"
/>

Then for the java in your onCreate()

Preference button = findPreference(getString(R.string.myCoolButton));
button.setOnPreferenceClickListener(new Preference.OnPreferenceClickListener() {
    @Override
    public boolean onPreferenceClick(Preference preference) { 
        //code for what you want it to do 
        return true;
    }
});

This will appear like a normal Preference, with just a title and a summary, so it will look like it belongs.

Reed
  • 14,703
  • 8
  • 66
  • 110
  • 8
    Many of the pre-loaded google apps use this approach, and thus it is a good idea to follow that! I found a standard grey button looks out of place on a preferences screen, and thanks to you I found a nice way to make it look standardised :) – Tom Mar 29 '12 at 06:37
  • @Jakar This doesn't seem to work for me, 2.3.3. It throws a null pointer exception because `findPreference()` returns null – Jimmy May 24 '12 at 14:40
  • 5
    Make sure that `android:key="key"` and `findPreference("key");` are using the same key. – Reed May 25 '12 at 21:30
  • 5
    actually this does not display a button at all, which will confuse the user and isn't what the OP asked. correct answer to actually show a button is Nicolas's. – mutable2112 May 05 '15 at 18:10
  • 1
    @user636066, it doesn't show a button but it isn't necessarily gonna confuse a user. That depends on the specific implementation of the UI and the `Preference` or `Button` (whichever is used). In some apps I made, a button would not have provided enough info (because `Preference` has the summary) and would have looked out of place with the rest of the app. There are plenty of situations where the `Preference` is a better solution than adding a `Button`. And there are also situations where the converse is true. – Reed May 07 '15 at 17:10
  • 7
    I just noticed that I posted this in 2011 at 1:11. Haha. – Reed Aug 13 '15 at 16:20
  • 4
    Should have done that 1 month and 11 days later: 11/1/'11 - 1:11 :) – P Kuijpers Jul 26 '16 at 20:43
  • how can we save this prefrence – H Raval Sep 06 '16 at 08:36
  • 3
    Keep in mind that if you are using PreferenceFragments (API 11 and up), call `findPreference` from `onCreate` of your `PreferenceFragment`, not the `PreferenceActivity` – kit Sep 01 '17 at 08:29
49

I suppouse its too late. This is what i have done for a Button Preference.

The preference in preference.xml file in xml folder

....
    <Preference
        android:key="resetBD"
        android:title="@string/ajustes_almacenamiento"
        android:summary="@string/ajustes_almacenamiento_desc"
        android:widgetLayout="@layout/pref_reset_bd_button" 
    ></Preference>
  ...

and pref_reset_bd_button.xml in layout folder

 <?xml version="1.0" encoding="utf-8"?>
   <Button
       xmlns:android="http://schemas.android.com/apk/res/android"
        android:id="@+id/resetButton" 
        android:text="@string/ajustes_almacenamiento_bt" 
        android:layout_width="wrap_content"
        android:layout_height="wrap_content"
        android:onClick="resetearBD">

   </Button>
Nicolas
  • 491
  • 4
  • 2
  • `android:widgetLayout` is the perfect connection between fragments and and preferences (one or both defined in XML). Thanks a lot. [Here](http://developer.android.com/reference/android/preference/Preference.html#attr_android:widgetLayout) – peter_the_oak Oct 20 '15 at 10:37
  • Hi @Nicolas. Your code work, but one question... How can you do that the button works in a class that extends PreferenceActivity – S.P. Apr 15 '16 at 12:12
  • 5
    Please tell me how to find this button with id "resetButton" thanks! – Ben Jima Jun 16 '16 at 03:27
  • 3
    I found using android:layout superior to android:widgetLayout. Using widgetLayout, my button became what I can only describe as layout_alignParentRight="true", but that behavior went away when using android:layout instead – JoeHz Dec 22 '16 at 17:05
  • 1
    And I cannot get this to fire an onPreferenceChange or Click event handler – JoeHz Dec 23 '16 at 11:37
  • @BenJima to find the button, you need create a custom Preference class and override onBindView https://code.luasoftware.com/tutorials/android/override-layout-of-android-preference/#widget-layout – Desmond Lua Apr 05 '18 at 17:19
  • Thanks! I substituted `Button` with `ImageButton`. To react on click you should create a method `fun resetearBD(view: View)` in `PreferenceActivity` (you can access `SettingsFragment` from there). If not making this function you will get an error described in https://stackoverflow.com/questions/38392359/could-not-find-method-in-parent-or-ancestor-context. – CoolMind Jul 10 '20 at 15:01
38

I wanted to add an Exit link to the preferences and was able to modify Jakar's code to make it work like this:

<PreferenceScreen xmlns:android="http://schemas.android.com/apk/res/android" >   
   <PreferenceCategory android:title="Settings">
       <Preference android:title="Click to exit" android:key="exitlink"/>       
   </PreferenceCategory>    
</PreferenceScreen>

Originally the 'Preference' was a 'EditTextPreference' which I hand edited.

Then in the class:

public class MyPreferences extends PreferenceActivity {
@Override
public void onCreate(Bundle savedInstanceState) {
    super.onCreate(savedInstanceState);
    addPreferencesFromResource(R.xml.mypreferences);

    Preference button = (Preference)getPreferenceManager().findPreference("exitlink");      
    if (button != null) {
        button.setOnPreferenceClickListener(new Preference.OnPreferenceClickListener() {
            @Override
            public boolean onPreferenceClick(Preference arg0) {
                finish();   
                return true;
            }
        });     
    }
}
}
Tony_A
  • 138
  • 1
  • 8
Dunfield
  • 785
  • 6
  • 11
8

Add

setContentView(R.layout.buttonLayout);

Below

addPreferencesFromResource(R.xml.yourPreference);

buttonLayout:

<RelativeLayout
    xmlns:android="http://schemas.android.com/apk/res/android"
    android:layout_width="match_parent"
    android:layout_height="match_parent">

<RelativeLayout
        android:id="@+id/top_control_bar"
        android:layout_width="match_parent"
        android:layout_height="wrap_content">
</RelativeLayout>

<LinearLayout
        android:id="@+id/bottom_control_bar"
        android:layout_width="match_parent"
        android:layout_height="wrap_content"
        android:layout_alignParentBottom="true">

    <Button
            android:id="@+id/button"
            android:layout_width="match_parent"
            android:layout_height="70dp"
            android:text="@string/saveAlarm"/>
</LinearLayout>

<ListView
        android:id="@android:id/list"
        android:layout_width="fill_parent"
        android:layout_height="0dip"
        android:layout_above="@id/bottom_control_bar"
        android:layout_below="@id/top_control_bar"
        android:choiceMode="multipleChoice">
</ListView>

Access Button by:

Button button = (Button) findViewById(R.id.button);
button.setOnClickListener(new OnClickListener() {
    @Override
    public void onClick(View v) {
        //Your event
    }
});

You can get the button on top or on bottom of the screen by putting the button in RelativeLayout:

  • top_control_bar
  • bottom_control_bar

bottom_control_bar

This worked for me. I hope I can help someone with this piece of code.

Thijs Limmen
  • 624
  • 7
  • 9
  • I used this in my app, it keeps the button on top of the list which looks better and is more user friendly for OK and Cancel buttons. Thank you. – Grux Jun 03 '15 at 02:39
1

You can also customise the layout of a Preference by overriding Preference.onCreateView(parent). The example below uses an anonymous inner class to make red preferences.

    screen.addPreference(
        new Preference(context) {
            @Override
            protected View onCreateView(ViewGroup parent) {
                View view = super.onCreateView(parent);
                view.setBackgroundColor(Color.RED);
                return view;
            }
        });

You could use this technique to add a button to the default view.

Roger Keays
  • 3,117
  • 1
  • 31
  • 23
1

I don't think there is an easy way to just add a Button to a preference screen. Preferences are limited to:

EditTextPreference
ListPreference
RingtonePreference
CheckboxPreference

While using a preference screen, you are limited to the use of these options, and there are no single "button-preference" which could be easily used for your need.

I've been looking for similar functionality, with adding buttons to the preference screen, but it seems like you need to build your own screen for this, managing the change to preferences in your own implementation.

Eric Nordvik
  • 14,656
  • 8
  • 42
  • 50
  • Had the same problem, If you want a button in your preferences you have to use a selfmade pref screen :( – Janusz Mar 14 '11 at 12:26
1

If you'd like to catch a user click on one of the Preferences items and your app is using PreferenceFragmentCompat, then you can do this:

<PreferenceScreen
...
>
...
<Preference
    android:key="@string/pref_key_clickable_item"
    android:persistent="false"
    android:title="Can be clicked"
    android:summary="Click this item so stuff will happen"/>
...
</PreferenceScreen>

Java:

@Override
onPreferenceTreeClick(Preference preference) {
    if (preference.getKey().equals(getContext().getString(R.string.pref_key_clickable_item))) {
       // user clicked the item
       // return "true" to indicate you handled the click
       return true;
    }
    return false;
}

Kotlin:

override fun onPreferenceTreeClick(preference: Preference): Boolean {
    if (preference.key == context?.getString(R.string.pref_key_clickable_ite)) {
       // user clicked the item
       // return "true" to indicate you handled the click
       return true
    }
    return false
}
Csaba Toth
  • 10,021
  • 5
  • 75
  • 121
1

You can do it like this to access the button!

 View footerView = ((LayoutInflater) this.getSystemService(Context.LAYOUT_INFLATER_SERVICE)).inflate(R.layout.layoutButtons, null, false);

Don't forget to add android:id to the LinearLayout that contains the button in layoutButtons.xml, i.e. android:id="@+id/mylayout"

 LinearLayout mLayout = (LinearLayout) footerView.findViewById(R.id.mylayout);
 Button login = (Button) footerView.findViewById(R.id.loginButton);
 login.setOnClickListener(this);
 ListView lv = (ListView) findViewById(android.R.id.list);
 lv.addFooterView(footerView);

 // Lines 2 and 3 can be used in the same way for a second Button!
Jose_GD
  • 2,279
  • 1
  • 21
  • 34
Shah
  • 4,990
  • 10
  • 48
  • 70
1

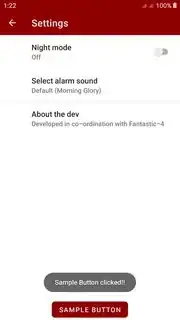
Create a custom layout for the SettingsFragment.java i.e layout_settings.xml

<?xml version="1.0" encoding="utf-8"?>
<androidx.coordinatorlayout.widget.CoordinatorLayout xmlns:android="http://schemas.android.com/apk/res/android"
    xmlns:app="http://schemas.android.com/apk/res-auto"
    xmlns:tools="http://schemas.android.com/tools"
    android:layout_width="match_parent"
    android:layout_height="match_parent"
    tools:context=".ui.settings.SettingsFragment"
    tools:ignore="NewApi">

    <com.google.android.material.appbar.AppBarLayout
        android:id="@+id/appBarSettings"
        android:layout_width="match_parent"
        android:layout_height="wrap_content"
        android:theme="@style/AppBarOverlay">

        <com.google.android.material.appbar.MaterialToolbar
            android:id="@+id/toolbarSettings"
            android:layout_width="match_parent"
            android:layout_height="wrap_content"
            android:minHeight="?attr/actionBarSize"
            app:title="@string/fragment_title_settings" />
    </com.google.android.material.appbar.AppBarLayout>

    <!--this works as the container for the SettingsFragment.java
    put the code for the Button above or below this FrameLayout
    according to your requirement-->

    <FrameLayout
        android:id="@android:id/list_container"
        android:layout_width="match_parent"
        android:layout_height="wrap_content"
      app:layout_behavior="com.google.android.material.appbar.AppBarLayout$ScrollingViewBehavior" />


    <com.google.android.material.button.MaterialButton
        android:id="@+id/btnSample"
        android:layout_width="wrap_content"
        android:layout_height="wrap_content"
        android:layout_gravity="bottom|center"
        android:text="@string/button_sample_text" />

</androidx.coordinatorlayout.widget.CoordinatorLayout>

Then, refer to the layout file in your styles.xml:

<style name="AppTheme" parent="....">
      ...............
      ...............
      <item name="preferenceTheme">@style/MyPreferenceThemeOverlay</item>
</style>

<style name="MyPreferenceThemeOverlay" parent="PreferenceThemeOverlay">
      <item name="android:layout>@layout/layout_settings</item>
</style>

And then, in the onViewCreated() method of your SettingsFragment.java, you can use the button like this:

    @Override
    public void onViewCreated(@NonNull View view, @Nullable Bundle 
                             savedInstanceState) {

        MaterialButton btnSample = view.findViewById(R.id.btnSample);
        btnSample.setOnClickListener(new View.OnClickListener() {
            @Override
            public void onClick(View v) {
                Toast.makeText(requireContext(), "Sample Button 
                   clicked!!", Toast.LENGTH_LONG).show();
            }
        });
    }

Sample Settings Screen with Button

hata
  • 11,633
  • 6
  • 46
  • 69
cgb_pandey
  • 985
  • 1
  • 11
  • 18
-2

try android:onClick="myMethod" works like a charm for simple onclick events

neelabh
  • 479
  • 6
  • 19