0

Im retyping a processing script into python so i can use it in a gimp-python script. Im having trouble with strokeWeight(0.3), which means a thickness of less than 1 pixel.

I have followed suggestions as to blend the rgb colors with alpha but that didnt work. It would seem that processing is doing something else. I have tried to look up the strokeWeight function in the processing sourcecode but i couldnt really make sense of it. I have also tried to compare color values with an strokeWeight of 1 against those with an strokeWeight of 0.3 but i also couldnt make sense of it.

Does anybody know what processing does when setting strokeWeight to 0.3, how would one simulate this?

The script i am using is:

String filename = "image2";
String fileext = ".jpg";
String foldername = "./";

// run, after 30 iterations result will be saved automatically
// or press SPACE

int max_display_size = 800; // viewing window size (regardless image size)

/////////////////////////////////////
int n=2000;
float [] cx=new float[n];
float [] cy=new float[n];

PImage img;
int len;

// working buffer
PGraphics buffer; 

String sessionid; 

void setup() {
  sessionid = hex((int)random(0xffff),4);
  img = loadImage(foldername+filename+fileext);

  buffer = createGraphics(img.width, img.height);
  buffer.beginDraw();
  //buffer.noFill();
  //buffer.smooth(8);
  //buffer.strokeWeight(1);
  buffer.strokeWeight(0.3);
  buffer.background(0);
  buffer.endDraw();

  size(300,300);

  len = (img.width<img.height?img.width:img.height)/6;

  background(0);
  for (int i=0; i<n; i++) {
    cx[i] = i; // changed to a none random number for testing 
    cy[i] = i; 
  //for (int i=0;i<n;i++) {
  //  cx[i]=random(img.width);
  //  cy[i]=random(img.height);
  }
}

int tick = 0;

void draw() {  
  buffer.beginDraw();
  for (int i=1;i<n;i++) {
    color c = img.get((int)cx[i], (int)cy[i]);
    buffer.stroke(c);
    buffer.point(cx[i], cy[i]);
    // you can choose channels: red(c), blue(c), green(c), hue(c), saturation(c) or brightness(c)
    cy[i]+=sin(map(hue(c),0,255,0,TWO_PI));
    cx[i]+=cos(map(hue(c),0,255,0,TWO_PI));
  }

  if (frameCount>len) {
    frameCount=0;
    println("iteration: " + tick++);
    //for (int i=0;i<n;i++) {
    //  cx[i]=random(img.width);
    //  cy[i]=random(img.height);
    for (int i=0; i<n; i++) {
      cx[i] = i; // changed to a none random number for testing 
      cy[i] = i;
    }

  }

  buffer.endDraw();
  if(tick == 30) keyPressed();

  image(buffer,0,0,width,height);
}

void keyPressed() {
  buffer.save(foldername + filename + "/res_" + sessionid + hex((int)random(0xffff),4)+"_"+filename+fileext);
  println("image saved");
}

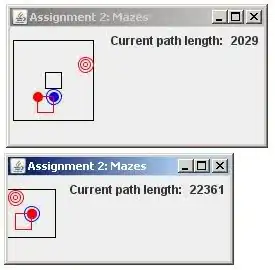
Here are some test results, (scaled 200%): (it should be noted that this is a fairly straight line for comparison purpose. The actual code uses random coordinates.) 1 iteration with strokeWeight(0.3) 1 iteration with strokeWeight(1) 10 iterations with strokeWeight(0.3) 10 iterations with strokeWeight(1)

cbecker
  • 36
  • 6
  • Hacky suggestion, but would it be possible to scale coordinates up so the strokeWeight in Gimp will be equivalent to 1 pixel ? (You could then bicubic sharper scale down the drawing, any maybe overlay a high pass filtered version of the drawing to keep edges from blurring too much). Do Gimp brush not allow for sub pixel thickness ? – George Profenza Aug 21 '19 at 10:57
  • Your suggestion is interesting, but not really an solution to this specific problem. Im using a script called 'drawing generative' quite a lot and want to be able to use it in gimp. Im trying to make the script work as identical as the orginal as possible. – cbecker Aug 21 '19 at 11:14
  • It might be worth sharing your attempt to port to gimp-python and the source sketch, hopefully people more experienced with the api can guide you – George Profenza Aug 21 '19 at 15:12
  • Maybe, is hould have mentioned, that while planning to make a gimp-python script, i only have an python script yet. Its easier to test and when everything works its easy to make a gimp script out of it. I have already replicated the processing sketch in python, giving the same result when i test it with strokeWeight(1). The alst step in getting the exact same result as the processing sketch would be the strokeWeight set at 0.3, which it should be. So i figured my question is not about python (or gimp), but a question about what processing does when the strokeWeight is set below 1 pixel. – cbecker Aug 21 '19 at 18:43

2 Answers2

0

A stroke weight of 0.3 pixels means that on the whole 3/10 of a pixel would be colored(*), so, assuming that the path crosses the pixels in the middle, the pixels is painted with a 3/10 opacity (with possibly some adjustments for linear/perceptual).

(*) of course if the path is near the edge of the pixel, this could be a bit less, and the neighboring pixels would be slightly colored as well.

xenoid
  • 8,396
  • 3
  • 23
  • 49
  • Yes i have tried this, but the result doesnt look like what processing is doing. I have checked what you said on some single colored pixels and arounud them, but this also doesnt tell me much. Some pixels, like for instance 255,0,0 arent even coloring. It is very puzzling to me. Perhaps it has something to do in relation to other pixels, but i wouldnt really know how i can find out. – cbecker Aug 22 '19 at 11:18
  • Can you add to you question: a code extract, a screenshot of the path (with enough zoom), and a sample picture? – xenoid Aug 22 '19 at 21:59
  • I have added the code and added a few test images. From iteration 10 it certainly looks like opacity is an important part of the strokeweight below 1 pixel, but as can be seen from one iteration, there is something else going on. – cbecker Aug 23 '19 at 11:10
  • Where is Gimp implied? This isn't the Gimp API. Is the "processing" you mention the [processing](https://processing.org/) software? If so it would be useful to tag your question with `processing` instead of `gimp`. – xenoid Aug 23 '19 at 16:15
  • Yes i explained that to George Profenza who edited my question and put the tags python and gimp there. Im not sure how this works on stackoverflow. Should i remove the tags again? It is true i said i was in the process of making an gimp-python script out of the processing script, but i also thought i mentioned clearly that my question was about the working of the strokeWeight function in processing. I suppose it wasn't clear enough, and those tags are indeed not helping. – cbecker Aug 23 '19 at 16:32
  • @cbecker Correct me if I'm wrong, this what I understand: you have a Processing sketch you'd like to port from Processing to gimp-python ("use it in a gimp-python script"). If that's the case that's why I added the gimp/python tags and my suggestion is to test: 1. are there any tools in Gimp that have a size smaller than a pixel (e.g. Ink) ? 2. if yes, can you access that tool through the gimp-python API ? 3. if yes, set the tools size to `0.3` and test if the output is similar to Processing's output. What's the outcome of using Gimp ? (it learning Gimp scripting/saving an image/etc.?) – George Profenza Aug 23 '19 at 17:32
  • Yes i understand what you mean, and i hadn't thought about testing the ink tool which can be set to size 0.3. Thank you for this suggestion. I apologize if i came off offensive. I suppose the reason i was and still am looking for what processing does because i need the code to be able to handle large images, lets say more than 9000 * 9000. Using something like the ink tool would limit me with iterations over pixels, where i rather want to explore for example numpy arrays for faster calculations. – cbecker Aug 23 '19 at 18:53
  • If you want to use numpy with Gimp, see [here](https://stackoverflow.com/a/47554384/6378557). Otherwise if you need to draw narrow lines with the Gimp API, you can create "paths" (ie, bezier splines) and "stroke" them (requires Gimp 2.10). – xenoid Aug 23 '19 at 19:18
  • @cbecker No worries at all, I got confused by your comment above and thought I misunderstood your question, maybe you did want a Processing only answer ? If you do want to use Processing I do have a couple of suggestions: 1. looking into [fragment shaders](https://processing.org/tutorials/pshader/), you can make calculation parallel on the GPU, much faster than looping on the CPU (the gist of the script is doing polar to cartesian and random sampling from an image (I hope it's not 9000x9000), however for 9000x9000 you'll hit a texture size limit on your GPU... – George Profenza Aug 23 '19 at 22:08
  • @cbecker ...That being said, you make up 9000x9000 in coordinates, but split the scene into tiles that can fit on your GPUs memory and saved on disk, then put the tiles together as one image – George Profenza Aug 23 '19 at 22:09
  • @xenoid I was already aware of the answer you linked to. Well not that it was your answer. It helped me when i was making an other script. But for this question, i dont really believe stroking paths would be suited, since the script randomly colors single pixels, or am i missing something? Can you stroke single points, why not, for example, using the ink tool? Still i would very much be interested in how i can emulate the way that processing draws a pixel with an size of 0.3. – cbecker Aug 25 '19 at 17:22
  • @George Profenze Well i guess my question is a processing only anwer. My question is: what does processing do when drawing pixels with a weight less than 1 pixel. I realize that it might be something more complicate, but i was hoping for some formula like r+g+b * somevalue, or something like that. I want to use this to emulate how processing draws a 0.3 pixel. Since, it looks like i will be stuck with Processing for now, your suggested fragment shaders sounds promising to at least speed things up. Being able to speed things up is one of the reasons i want to port this script to python. – cbecker Aug 25 '19 at 17:23
  • @cbecker could you post image.jpg that you use with your sketch ? (do you plan to sample an image that is 9000x9000 as for the large version, or simply sample pixels from a 800x800 image for example, just use the same analysis and synthesis rules for larger canvas ?). Regarding `strokeWeight(0.3)` I wandered if it's related to [this question](https://stackoverflow.com/questions/54408259/pgraphics-nosmooth-alpha-drawing-artifacts/54420174#54420174), and that small `EPSILON` may have something it, however it's more complex: the `JAVA2D` render uses `java.awt.BasicStroke` while ... – George Profenza Aug 25 '19 at 20:15
  • ...`P2D`/`P3D` use the geometry tessellator in `PGraphicsOpenGL.java` – George Profenza Aug 25 '19 at 20:15
  • I'm not sure i understand what you mean, but the script returns images of the same size as the input. As i understand it EPSILON relates to position. That might be also part of the problem (i really hope it isn't), but then what about the colors? I thought i read somewhere that OpenGL is responsible for the drawing of points with an pixelweight of less than 1 pixel, but i cant find it anymore. Somebody suggested that OpenGL might emulate thinner lines by compensating with alpha, but from the test images i added it looks more like brightness or something. – cbecker Aug 26 '19 at 17:47
  • @cbecker I've posted an answer above, it's not a full OpenGL/GLSL implementation, but a basic tweak to your code as a proof of concept demonstrating saving a 9000x9000px image. – George Profenza Aug 28 '19 at 12:05
0

Based on the many comments it seems the aim is to produce a 9000x9000 image using a basic algorithm to sample pixels and synthesise a new image.

The algorithm seems to work as follows:

  1. allocate random pixels locations based on input image dimensions
  2. draw a small(sub-pixel) dot at pre-allocate the pixel locations
  3. offset pixel locations on curves directed based on a colour channel(H/S/B/R/G/B) intensity to angle mapping for sin()/cos() functions

The existing processing script can easily be adapted to output a 9000x9000 image. In the case where the input image is smaller, coordinates can be re-mapped:

float remappedX = map(cx[i],0,input.width,0,output.width);
float remappedY = map(cy[i],0,input.height,0,output.height);

Here's a modified version of the Processing sketch posted at the top:

String filename = "image2";
String fileext = ".jpg";
String foldername = "./";

// run, after 30 iterations result will be saved automatically
// or press SPACE

/////////////////////////////////////
// number of pixels to sample
int n = 2000;
float[] cx;
float[] cy;

PImage img;
int len;

// working buffer
PGraphics buffer;
// buffer size
int bufferWidth  = 9000;
int bufferHeight = 9000;

String sessionid; 

int tick = 0;

boolean imageAutoSaved = false;

void setup() {
  size(300,300);
  background(0);

  // load image, setup session
  sessionid = hex((int)random(0xffff),4);
  img = loadImage(foldername+filename+fileext);
  len = (img.width<img.height?img.width:img.height)/6;
  // sample each pixel
  n = img.pixels.length;
  cx = new float[n];
  cy = new float[n];
  resetPixelSampling();
  // setup buffer
  buffer = createGraphics(bufferWidth,bufferHeight);
  buffer.beginDraw();
  //buffer.noFill();
  //buffer.smooth(8);
  //buffer.strokeWeight(1);
  buffer.strokeWeight(0.3);
  buffer.background(0);
  buffer.endDraw();
}

void resetPixelSampling(){
  for (int i=0; i < n; i++) {
    //cx[i] = i; // changed to a none random number for testing 
    //cy[i] = i; 
    cx[i] = random(img.width);
    cy[i] = random(img.height);
  }
}

void updatePixelSampling(){
  buffer.beginDraw();
  for (int i = 1; i < n; i++) {
    color c = img.get((int)cx[i], (int)cy[i]);
    buffer.stroke(c);
    // remap/re-scale coordinates from sampled image to target buffer size
    float bufferX = map(cx[i],0,img.width,0,bufferWidth);
    float bufferY = map(cy[i],0,img.height,0,bufferHeight);
    buffer.point(bufferX,bufferY);
    // you can choose channels: red(c), blue(c), green(c), hue(c), saturation(c) or brightness(c)
    float channel = hue(c);
    cy[i]+=sin(map(channel,0,255,0,TWO_PI));
    cx[i]+=cos(map(channel,0,255,0,TWO_PI));
  }

  buffer.endDraw();
}

void draw() {
  if (frameCount>len) {
    frameCount=0;
    println("iteration: " + tick++);
    resetPixelSampling();
  }

  updatePixelSampling();

  if(tick == 30) {
    if(!imageAutoSaved){
      imageAutoSaved = true;
      saveImage();
    }
  }

  image(buffer,0,0,width,height);
}

void keyPressed() {
  saveImage();
}

void saveImage(){
  buffer.save(foldername + filename + "/res_" + sessionid + hex((int)random(0xffff),4)+"_"+filename+fileext);
  println("image saved");
}

The script can be optimised further. For example, the sampling(analysis) and synthesis algorithm can be ported to a GLSL fragment shader. Note that 9000x9000 is a large image that can't be uploaded a texture on the GPU as is, however, a smaller buffer can be used as a tile that can render one section at a time into the large image.

Regarding porting the processing code into python so it can be used it in a gimp-python script:

  • Gimp has an "Ink" paint tool which can have a size less than a pixel.
  • The Gimp Python API allows this size to be set if it's selected: pdb.gimp_context_set_ink_size(0.3)
  • The Gimp Python API also has paint functions
George Profenza
  • 50,687
  • 19
  • 144
  • 218