Grayscale Solution (?)
(There is a discussion below as to your comment about a function "that preserves the information in the images")
It seems possible to me that you might be able to solve the problem using a grayscale image rather than an RGB image. I know I'm making assumptions here, but it's a thought.
I'm going to try a simple example relating to your code, then give an example of an image similarity measure using 2D Discrete Fourier Transforms that uses a conversion to grayscale. That DFT analysis will have its own section
(My apologies if you see this while in progress. I'm just trying to make sure my work is saved.)
Because of my assumption, I'm going to try your method with some RGB images, then see if the problem will be solved by converting to grayscale. If the problem is solved with grayscale, we can do an analysis of the amount of information loss brought on by the grayscale solution by finding the image similarity using a combination of all three channels, each compared separately.
Method
Making sure I have all the libraries/packages/whatever you want to call them.
> python -m pip install opencv-python
> python -m pip install scipy
> python -m pip install numpy
Note that, in this trial, I'm using some PNG images that were created in the attempt (described below) to use a 2D DFT.
Making sure I get the same problem
>>> import scipy.spatial.distance as dist
>>> import cv2
>>>
>>> im1 = cv2.imread("rhino1_clean.png")
>>> im2 = cv2.imread("rhino1_streak.png")
>>>
>>> im1.shape
(178, 284, 3)
>>>
>>> dist.euclidean(im1, im2)
## Some traceback stuff ##
ValueError: Input vector should be 1-D.
Now, let's try using grayscale. If this works, we can simply find the distance for each of the RGB Channels. I hope it works, because I want to do the information-loss analysis.
Let's convert to grayscale:
>>> im1_gray = cv2.cvtColor(im1, cv2.COLOR_BGR2GRAY)
>>> im2_gray = cv2.cvtColor(im2, cv2.COLOR_BGR2GRAY)

>>> im1_gray.shape
(178, 284)
A simple dist.euclidean(im1_gray, im2,gray) will lead to the same ValueError: Input vector should be 1-D. exception, but I know the structure of a grayscale image array (an array of pixel rows), so I do the following.
>>> dists = []
>>> for i in range(0, len(im1_gray)):
...   dists.append(dist.euclidean(im1_gray[i], im2_gray[i]))
...
>>> sum_dists = sum(dists)
>>> ave_dist = sum_dists/len(dists)
>>> ave_dist
2185.9891304058297
By the way, here are the two original images:


Grayscale worked (with massaging), let's try color
Following some procedure from this SO answer, let's do the following.
Preservation of Information
Following the analysis here (archived), let's look at our information loss. (Note that this will be a very naïve analysis, but I want to give a crack at it.
Grayscale vs. Color Information
Let's just look at the color vs. the grayscale. Later, we can look at whether we preserve the information about the distances.
Comparisons of different distance measures using grayscale vs. all three channels - comparison using ratio of distance sums for a set of images.
I don't know how to do entropy measurements for the distances, but my intuition tells me that, if I calculate distances using grayscale and using color channels, I should come up with similar ratios of distances IF I haven't lost any information.
My first thought when seeing this question was to use a 2-D Discrete Fourier Transform, which I'm sure is available in Python or NumPy or OpenCV. Basically, your first components of the DFT will relate to large shapes in your image. (Here is where I'll put in a relevant research paper: link. I didn't look too closely - anyone is welcome to suggest another.)
So, let me look up a 2-D DFT easily available from Python, and I'll get back to putting up some working code.
(My apologies if you see this while in progress. I'm just trying to make sure my work is saved.)
First, you'll need to make sure you have PILPillow and NumPy. It seems you have NumPy, but here are some instructions. (Note that I'm on Windows at the moment) ...
> python -m pip install opencv-python
> python -m pip install numpy
> python -m pip install pillow
Now, here are 5 images -
- a rhino image,
rhino1_clean.jpg (source);
the same image with some black streaks drawn on by me in MS Paint, rhino1_streak.jpg;
another rhino image, rhino2_clean.jpg (source);
a first hippo image hippo1_clean.jpg (source);
a second hippo image, hippo2_clean.jpg (source).
All images used with fair use.
Okay, now, to illustrate further, let's go to the Python interactive terminal.
>python
>>> import PIL
>>> import numpy as np
First of all, life will be easier if we use grayscale PNG images - PNG because it's a straight bitmap (rather than a compressed image), grayscale because I don't have to show all the details with the channels.
>>> rh_img_1_cln = PIL.Image.open("rhino1_clean.jpg")
>>> rh_img_1_cln.save("rhino1_clean.png")
>>> rh_img_1_cln_gs = PIL.Image.open("rhino1_clean.png").convert('LA')
>>> rh_img_1_cln_gs.save("rhino1_clean_gs.png")
Follow similar steps for the other four images. I used PIL variable names, rh_img_1_stk, rh_img_2_cln, hp_img_1_cln, hp_img_2_cln. I ended up with the following image filenames for the grayscale images, which I'll use further: rhino1_streak_gs.png, rhino2_clean_gs.png, hippo1_clean_gs.png, hippo2_clean_gs.png.
Now, let's get the coefficients for the DFTs. The following code (ref. this SO answer) would be used for the first, clean rhino image.
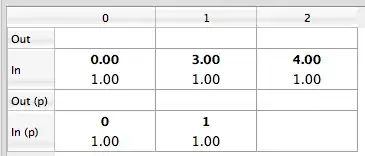
Let's "look" at the image array, first. This will show us a grid version of the top-left column, with higher values being more white and lower values being more black.
Note that, before I begin outputting this array, I set things to the numpy default, cf. https://docs.scipy.org/doc/numpy/reference/generated/numpy.set_printoptions.html
>>> np.set_printoptions(edgeitems=3,infstr='inf',
... linewidth=75, nanstr='nan', precision=8,
... suppress=False, threshold=1000, formatter=None)
>>> rh1_cln_gs_array = np.array(rh_img_1_cln_gs)
>>> for i in {0,1,2,3,4}:
...   print(rh1_cln_gs_array[i][:13])
...
[93 89 78 87 68 74 58 51 73 96 90 75 86]
[85 93 64 64 76 49 19 52 65 76 86 81 76]
[107  87  71  62  54  31  32  49  51  55  81  87  69]
[112  93  94  72  57  45  58  48  39  49  76  86  76]
[ 87 103  90  65  88  61  44  57  34  55  70  80  92]
Now, let's run the DFT and look at the results. I change my numpy print options to make things nicer before I start the actual transform.
>>> np.set_printoptions(formatter={'all':lambda x: '{0:.2f}'.format(x)})
>>>
>>> rh1_cln_gs_fft = np.fft.fft2(rh_img_1_cln_gs)
>>> rh1_cln_gs_scaled_fft = 255.0 * rh1_cln_gs_fft / rh1_cln_gs_fft.max()
>>> rh1_cln_gs_real_fft = np.absolute(rh1_cln_gs_scaled_fft)
>>> for i in {0,1,2,3,4}:
...   print(rh1_cln_gs_real_fft[i][:13])
...
[255.00 1.46 7.55 4.23 4.53 0.67 2.14 2.30 1.68 0.77 1.14 0.28 0.19]
[38.85 5.33 3.07 1.20 0.71 5.85 2.44 3.04 1.18 1.68 1.69 0.88 1.30]
[29.63 3.95 1.89 1.41 3.65 2.97 1.46 2.92 1.91 3.03 0.88 0.23 0.86]
[21.28 2.17 2.27 3.43 2.49 2.21 1.90 2.33 0.65 2.15 0.72 0.62 1.13]
[18.36 2.91 1.98 1.19 1.20 0.54 0.68 0.71 1.25 1.48 1.04 1.58 1.01]
Now, the result for following the same procedure with rhino1_streak.jpg
[255.00 3.14 7.69 4.72 4.34 0.68 2.22 2.24 1.84 0.88 1.14 0.55 0.25]
[40.39 4.69 3.17 1.52 0.77 6.15 2.83 3.00 1.40 1.57 1.80 0.99 1.26]
[30.15 3.91 1.75 0.91 3.90 2.99 1.39 2.63 1.80 3.14 0.77 0.33 0.78]
[21.61 2.33 2.64 2.86 2.64 2.34 2.25 1.87 0.91 2.21 0.59 0.75 1.17]
[18.65 3.34 1.72 1.76 1.44 0.91 1.00 0.56 1.52 1.60 1.05 1.74 0.66]
I'll print \Delta values instead of doing a more comprehensive distance. You could sum the squares of the values shown here, if you want a distance.
>>> for i in {0,1,2,3,4}:
...   print(rh1_cln_gs_real_fft[i][:13] - rh1_stk_gs_real_fft[i][:13])
...
[0.00 -1.68 -0.15 -0.49 0.19 -0.01 -0.08 0.06 -0.16 -0.11 -0.01 -0.27
 -0.06]
[-1.54 0.64 -0.11 -0.32 -0.06 -0.30 -0.39 0.05 -0.22 0.11 -0.11 -0.11 0.04]
[-0.53 0.04 0.14 0.50 -0.24 -0.02 0.07 0.30 0.12 -0.11 0.11 -0.10 0.08]
[-0.33 -0.16 -0.37 0.57 -0.15 -0.14 -0.36 0.46 -0.26 -0.07 0.13 -0.14
 -0.04]
[-0.29 -0.43 0.26 -0.58 -0.24 -0.37 -0.32 0.15 -0.27 -0.12 -0.01 -0.17
 0.35]
I'll be putting just three coefficient arrays truncated to a length of five to show how this works for showing image similarity. Honestly, this is an experiment for me, so we'll see how it goes.
You can work on comparing those coefficients with distances or other metrics.
More About Preservation of Information
Let's do an information-theoretical analysis of information loss with the methods proposed above.
Following the analysis here (archived), let's look at our information loss.
Good luck!


,_parque_nacional_de_Chobe,_Botsuana,_2018-07-28,_DD_82.jpg)