12

I have several dozen Texts that I would like to position such that their leading baseline (lastTextBaseline) is at a specific coordinate. position can only set the center. For example:

import SwiftUI
import PlaygroundSupport
struct Location: Identifiable {
    let id = UUID()
    let point: CGPoint
    let angle: Double
    let string: String
}

let locations = [
    Location(point: CGPoint(x: 54.48386479999999, y: 296.4645408), angle: -0.6605166885682314, string: "Y"),
    Location(point: CGPoint(x: 74.99159120000002, y: 281.6336352), angle: -0.589411952788817, string: "o"),
]

struct ContentView: View {
    var body: some View {
        ZStack {
            ForEach(locations) { run in
                Text(verbatim: run.string)
                    .font(.system(size: 48))
                    .border(Color.green)
                    .rotationEffect(.radians(run.angle))
                    .position(run.point)

                Circle()  // Added to show where `position` is
                    .frame(maxWidth: 5)
                    .foregroundColor(.red)
                    .position(run.point)
            }
        }
    }
}

PlaygroundPage.current.setLiveView(ContentView())

This locates the strings such that their center is at the desired point (marked as a red circle):

Image of Y, o, centered at their locations

I would like to adjust this so that the leading baseline is at this red dot. In this example, a correct layout would move the glyphs up and to the right.

I have tried adding .topLeading alignment to the ZStack, and then using offset rather than position. This will let me align based on the top-leading corner, but that's not the corner I want to layout. For example:

ZStack(alignment: .topLeading) { // add alignment
    Rectangle().foregroundColor(.clear) // to force ZStack to full size
    ForEach(locations) { run in
        Text(verbatim: run.string)
            .font(.system(size: 48))
            .border(Color.green)
            .rotationEffect(.radians(run.angle), anchor: .topLeading) // rotate on top-leading
            .offset(x: run.point.x, y: run.point.y)
     }
}

Image of Y, o, with top-leading at their locations

I've also tried changing the "top" alignment guide for the Texts:

.alignmentGuide(.top) { d in d[.lastTextBaseline]}

This moves the red dots rather than the text, so I don't believe this is on the right path.

I am considering trying to adjust the locations themselves to take into account the size of the Text (which I can predict using Core Text), but I am hoping to avoid calculating a lot of extra bounding boxes.

Rob Napier
  • 286,113
  • 34
  • 456
  • 610
  • I'm not sure I've got correctly from description what you're going to get in result. Could you provide mock up or something? – Asperi Dec 11 '19 at 09:57
  • @Asperi I'm currently rebuilding my previous work fully in SwiftUI: https://github.com/rnapier/CurvyText See also https://stackoverflow.com/a/59219561/97337 for the meat of the problem – Rob Napier Dec 11 '19 at 14:03

3 Answers3

10

So, as far as I can tell, alignment guides can't be used in this way – yet. Hopefully this will be coming soon, but in the meantime we can do a little padding and overlay trickery to get the desired effect.

Caveats

  • You will need to have some way of retrieving the font metrics – I'm using CTFont to initialise my Font instances and retrieving metrics that way.
  • As far as I can tell, Playgrounds aren't always representative of how a SwiftUI layout will be laid out on the device, and certain inconsistencies arise. One that I've identified is that the displayScale environment value (and the derived pixelLength value) is not set correctly by default in playgrounds and even previews. Therefore, you have to set this manually in these environments if you want a representative layout (FB7280058).

Overview

We're going to combine a number of SwiftUI features to get the outcome we want here. Specifically, transforms, overlays and the GeometryReader view.

First, we'll align the baseline of our glyph to the baseline of our view. If we have the font's metrics we can use the font's 'descent' to shift our glyph down a little so it sits flush with the baseline – we can use the padding view modifier to help us with this.

Next, we're going to overlay our glyph view with a duplicate view. Why? Because within an overlay we're able to grab the exact metrics of the view underneath. In fact, our overlay will be the only view the user sees, the original view will only be utilised for its metrics.

A couple of simple transforms will position our overlay where we want it, and we'll then hide the view that sits underneath to complete the effect.

Step 1: Set up

First, we're going to need some additional properties to help with our calculations. In a proper project you could organise this into a view modifier or similar, but for conciseness we'll add them to our existing view.

@Environment(\.pixelLength) var pixelLength: CGFloat
@Environment(\.displayScale) var displayScale: CGFloat

We'll also need a our font initialised as a CTFont so we can grab its metrics:

let baseFont: CTFont = {
    let desc = CTFontDescriptorCreateWithNameAndSize("SFProDisplay-Medium" as CFString, 0)
    return CTFontCreateWithFontDescriptor(desc, 48, nil)
}()

Then some calculations. This calculates some EdgeInsets for a text view that will have the effect of moving the text view's baseline to the bottom edge of the enclosing padding view:

var textPadding: EdgeInsets {
    let baselineShift = (displayScale * baseFont.descent).rounded(.down) / displayScale
    let baselineOffsetInsets = EdgeInsets(top: baselineShift, leading: 0, bottom: -baselineShift, trailing: 0)
    return baselineOffsetInsets
}

We'll also add a couple of helper properties to CTFont:

extension CTFont {
    var ascent: CGFloat { CTFontGetAscent(self) }
    var descent: CGFloat { CTFontGetDescent(self) }
}

And finally we create a new helper function to generate our Text views that uses the CTFont we defined above:

private func glyphView(for text: String) -> some View {
    Text(verbatim: text)
        .font(Font(baseFont))
}

Step 2: Adopt our glyphView(_:) in our main body call

This step is simple and has us adopt the glyphView(_:) helper function we define above:

var body: some View {
    ZStack {
        ForEach(locations) { run in
            self.glyphView(for: run.string)
                .border(Color.green, width: self.pixelLength)
                .position(run.point)

            Circle()  // Added to show where `position` is
                .frame(maxWidth: 5)
                .foregroundColor(.red)
                .position(run.point)
        }
    }
}

This gets us here:
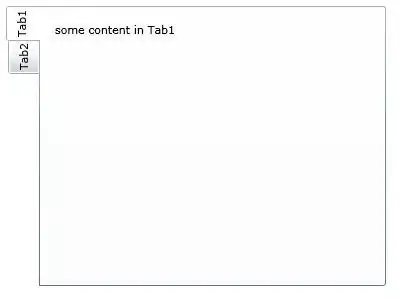
Step 2

Step 3: Baseline shift

Next we shift the baseline of our text view so that it sits flush with the bottom of our enclosing padding view. This is just a case of adding a padding modifier to our new glyphView(_:)function that utilises the padding calculation we define above.

private func glyphView(for text: String) -> some View {
    Text(verbatim: text)
        .font(Font(baseFont))
        .padding(textPadding) // Added padding modifier
}
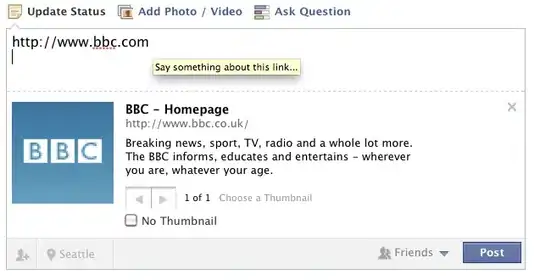
Step 3

Notice how the glyphs are now sitting flush with the bottom of their enclosing views.

Step 4: Add an overlay

We need to get the metrics of our glyph so that we are able to accurately place it. However, we can't get those metrics until we've laid out our view. One way around this is to duplicate our view and use one view as a source of metrics that is otherwise hidden, and then present a duplicate view that we position using the metrics we've gathered.

We can do this with the overlay modifier together with a GeometryReader view. And we'll also add a purple border and make our overlay text blue to differentiate it from the previous step.

self.glyphView(for: run.string)
    .border(Color.green, width: self.pixelLength)
    .overlay(GeometryReader { geometry in
        self.glyphView(for: run.string)
            .foregroundColor(.blue)
            .border(Color.purple, width: self.pixelLength)
    })
    .position(run.point)
Step 4

Step 5: Translate

Making use of the metrics we now have available for us to use, we can shift our overlay up and to the right so that the bottom left corner of the glyph view sits on our red positioning spot.

self.glyphView(for: run.string)
    .border(Color.green, width: self.pixelLength)
    .overlay(GeometryReader { geometry in
        self.glyphView(for: run.string)
            .foregroundColor(.blue)
            .border(Color.purple, width: self.pixelLength)
            .transformEffect(.init(translationX: geometry.size.width / 2, y: -geometry.size.height / 2))
    })
    .position(run.point)
Step 5

Step 6: Rotate

Now we have our view in position we can finally rotate.

self.glyphView(for: run.string)
    .border(Color.green, width: self.pixelLength)
    .overlay(GeometryReader { geometry in
        self.glyphView(for: run.string)
            .foregroundColor(.blue)
            .border(Color.purple, width: self.pixelLength)
            .transformEffect(.init(translationX: geometry.size.width / 2, y: -geometry.size.height / 2))
            .rotationEffect(.radians(run.angle))
    })
    .position(run.point)
enter image description here

Step 7: Hide our workings out

Last step is to hide our source view and set our overlay glyph to its proper colour:

self.glyphView(for: run.string)
    .border(Color.green, width: self.pixelLength)
    .hidden()
    .overlay(GeometryReader { geometry in
        self.glyphView(for: run.string)
            .foregroundColor(.black)
            .border(Color.purple, width: self.pixelLength)
            .transformEffect(.init(translationX: geometry.size.width / 2, y: -geometry.size.height / 2))
            .rotationEffect(.radians(run.angle))
    })
    .position(run.point)

Step 7

The final code

//: A Cocoa based Playground to present user interface

import SwiftUI
import PlaygroundSupport

struct Location: Identifiable {
    let id = UUID()
    let point: CGPoint
    let angle: Double
    let string: String
}

let locations = [
    Location(point: CGPoint(x: 54.48386479999999, y: 296.4645408), angle: -0.6605166885682314, string: "Y"),
    Location(point: CGPoint(x: 74.99159120000002, y: 281.6336352), angle: -0.589411952788817, string: "o"),
]

struct ContentView: View {

    @Environment(\.pixelLength) var pixelLength: CGFloat
    @Environment(\.displayScale) var displayScale: CGFloat

    let baseFont: CTFont = {
        let desc = CTFontDescriptorCreateWithNameAndSize("SFProDisplay-Medium" as CFString, 0)
        return CTFontCreateWithFontDescriptor(desc, 48, nil)
    }()

    var textPadding: EdgeInsets {
        let baselineShift = (displayScale * baseFont.descent).rounded(.down) / displayScale
        let baselineOffsetInsets = EdgeInsets(top: baselineShift, leading: 0, bottom: -baselineShift, trailing: 0)
        return baselineOffsetInsets
    }

    var body: some View {
        ZStack {
            ForEach(locations) { run in
                self.glyphView(for: run.string)
                    .border(Color.green, width: self.pixelLength)
                    .hidden()
                    .overlay(GeometryReader { geometry in
                        self.glyphView(for: run.string)
                            .foregroundColor(.black)
                            .border(Color.purple, width: self.pixelLength)
                            .transformEffect(.init(translationX: geometry.size.width / 2, y: -geometry.size.height / 2))
                            .rotationEffect(.radians(run.angle))
                    })
                    .position(run.point)

                Circle()  // Added to show where `position` is
                    .frame(maxWidth: 5)
                    .foregroundColor(.red)
                    .position(run.point)
            }
        }
    }

    private func glyphView(for text: String) -> some View {
        Text(verbatim: text)
            .font(Font(baseFont))
            .padding(textPadding)
    }
}

private extension CTFont {
    var ascent: CGFloat { CTFontGetAscent(self) }
    var descent: CGFloat { CTFontGetDescent(self) }
}

PlaygroundPage.current.setLiveView(
    ContentView()
        .environment(\.displayScale, NSScreen.main?.backingScaleFactor ?? 1.0)
        .frame(width: 640, height: 480)
        .background(Color.white)
)

And that's it. It's not perfect, but until SwiftUI gives us an API that allows us to use alignment anchors to anchor our transforms, it might get us by!

Tricky
  • 7,025
  • 5
  • 33
  • 43
  • 1
    This is really incredible work, and provides a lot of really useful ideas that I'm still pondering over. The trouble, however, is that it puts the `position` at the bottom-center rather than bottom-leading (which is what my calculations are based on; that's what NSLayoutManager and Core Text generate). Since each glyph box will be a different width, the general font metrics alone don't provide a simple way to adjust the point horizontally. So this will create incorrect spacing, especially for narrow glyphs like `i` and `l`. – Rob Napier Dec 15 '19 at 19:01
  • Thanks! Glad it was useful. I've updated my answer to accommodate the above which now goes with a slightly different method to work around things. Old answer is archived here: https://gist.github.com/tcldr/6169f16ec9dcb98f8ee5ebd7559a56d5 – Tricky Dec 16 '19 at 17:47
  • 1
    Thanks again. This was incredibly useful. Last night I implemented your bottom-center version, and it actually works better than bottom-leading (because it aligns the glyph to the curve more correctly). My current solution is to compute all the bounding boxes for the glyphs with CoreText, and use those directly, but your insight about using negative padding was the key to making this work. (My full problem handles multiple fonts in the same string, so each padding may be different.) But your geometry reader solution is very interesting and I may need to consider that. – Rob Napier Dec 16 '19 at 18:10
  • 1
    Great – glad it works for you! One advantage of the overlay solution is that it doesn't rely on calculating the Text view height manually which seems to differ across platforms and might change in a future version of SwiftUI. You should be able to tweak so that it's centre aligned pretty easily too. – Tricky Dec 16 '19 at 18:23
  • @RobNapier try to check my answer, it takes care about the font metrics, it is easy to change the position reference point and it conserves the visual appearance of the text and its background and border size and style. it also supports scaling and so on ... – user3441734 Dec 30 '19 at 10:15
1

this code takes care of the font metrics, and position text as you asked (If I properly understood your requirements :-))

import SwiftUI
import PlaygroundSupport


struct BaseLine: ViewModifier {
    let alignment: HorizontalAlignment
    @State private var ref = CGSize.zero
    private var align: CGFloat {
        switch alignment {
        case .leading:
            return 1
        case .center:
            return 0
        case .trailing:
            return -1
        default:
            return 0
        }
    }
    func body(content: Content) -> some View {
        ZStack {
            Circle().frame(width: 0, height: 0, alignment: .center)
        content.alignmentGuide(VerticalAlignment.center) { (d) -> CGFloat in
            DispatchQueue.main.async {
                self.ref.height =  d[VerticalAlignment.center] - d[.lastTextBaseline]
                self.ref.width = d.width / 2
            }
            return d[VerticalAlignment.center]
        }
        .offset(x: align * ref.width, y: ref.height)
        }
    }
}

struct ContentView: View {
    var body: some View {
        ZStack {

            Cross(size: 20, color: Color.red).position(x: 200, y: 200)
            Cross(size: 20, color: Color.red).position(x: 200, y: 250)
            Cross(size: 20, color: Color.red).position(x: 200, y: 300)
            Cross(size: 20, color: Color.red).position(x: 200, y: 350)


            Text("WORLD").font(.title).border(Color.gray).modifier(BaseLine(alignment: .trailing))
                .rotationEffect(.degrees(45))
                .position(x: 200, y: 200)

            Text("Y").font(.system(size: 150)).border(Color.gray).modifier(BaseLine(alignment: .center))
            .rotationEffect(.degrees(45))
            .position(x: 200, y: 250)

            Text("Y").font(.system(size: 150)).border(Color.gray).modifier(BaseLine(alignment: .leading))
            .rotationEffect(.degrees(45))
            .position(x: 200, y: 350)

            Text("WORLD").font(.title).border(Color.gray).modifier(BaseLine(alignment: .leading))
                .rotationEffect(.degrees(225))
                .position(x: 200, y: 300)

        }
    }
}

struct Cross: View {
    let size: CGFloat
    var color = Color.clear
    var body: some View {
            Path { p in
                p.move(to: CGPoint(x: size / 2, y: 0))
                p.addLine(to: CGPoint(x: size / 2, y: size))
                p.move(to: CGPoint(x: 0, y: size / 2))
                p.addLine(to: CGPoint(x: size, y: size / 2))
            }
            .stroke().foregroundColor(color)
            .frame(width: size, height: size, alignment: .center)
    }
}

PlaygroundPage.current.setLiveView(ContentView())

enter image description here

user3441734
  • 16,722
  • 2
  • 40
  • 59
0

Updated: you could try the following variants

Letter at point

let font = UIFont.systemFont(ofSize: 48)
var body: some View {
    ZStack {
        ForEach(locations) { run in
            Text(verbatim: run.string)
                .font(Font(self.font))
                .border(Color.green)
                .offset(x: 0, y: -self.font.lineHeight / 2.0)
                .rotationEffect(.radians(run.angle))
                .position(run.point)

            Circle()  // Added to show where `position` is
                .frame(maxWidth: 5)
                .foregroundColor(.red)
                .position(run.point)
        }
    }
}

there is also next interesting variant, use ascender instead of above lineHeight

.offset(x: 0, y: -self.font.ascender / 2.0)

enter image description here

Asperi
  • 228,894
  • 20
  • 464
  • 690
  • I believe you've misunderstood the goal. The goal is, given the red points, align the Text leading baseline to it. (The red points are added to demonstrate where that point is.) This is still aligning to the center, and also moves the red points, which are supposed to be fixed coordinates. – Rob Napier Dec 11 '19 at 14:05
  • I've got your point... anyway, previous variant also was interesting... please see updated. – Asperi Dec 11 '19 at 18:20
  • Thanks for the update. I am currently considering cases that involve lineHeight, but to be useful I'll need to calculate the more computationally intensive width (your approach will space the glyphs incorrectly, particularly when dealing with narrow glyphs like `l` and `i`). But your use of offset+position is an interesting combination that I hadn't considered. I need to think about how your ordering impacts rotation. – Rob Napier Dec 11 '19 at 18:52