-1

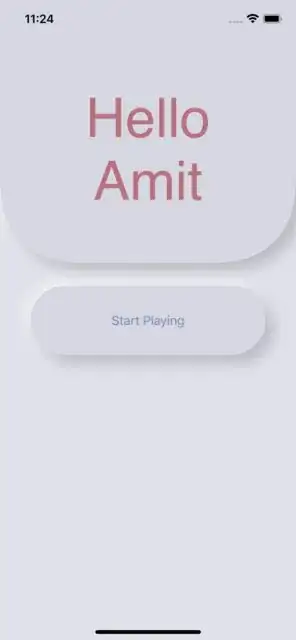
I am making a SwiftUI app and am giving it that "neomorphic" design but my issue is that since I use absolute positioning (due to the fact that I couldn't find any other viable solution), the app looks good on the iPhone 12 Pro and looks terrible on the other phones/tablets. I tried using Spacer() but I couldn't seem to understand on how to make the top "banner" into the size I want.

My code

//
//  ContentView.swift


import SwiftUI


extension Color {
    static let offWhite = Color(red: 225 / 255, green: 225 / 255, blue: 235 / 255)
    
    static let superoffwhite = Color(red: 215 / 255, green: 215 / 255, blue: 225 / 255)
    
    static let hellocolor = Color(red: 183 / 255,green: 114 / 255,blue: 126 / 255)
    
    static let StartPlayingColor = Color(red: 114 / 255,green: 138 / 255 ,blue: 183 / 255)

}

extension LinearGradient {
    init(_ colors: Color...) {
        self.init(gradient: Gradient(colors: colors), startPoint: .topLeading, endPoint: .bottomTrailing)
    }
}

struct ContentView: View {
    var body: some View {
        ZStack {
            Color.offWhite
            RoundedRectangle(cornerRadius: 98)
                .fill(Color.superoffwhite)
                .frame(width: 422, height: 459)
                .position(x:183, y: 125)

                .shadow(color: Color.black.opacity(0.2), radius: 10, x: 10, y: 10)
                .shadow(color: Color.white.opacity(0.7), radius: 10, x: -5, y: -5)
            
            
            Text("Hello\nAmit")
                .foregroundColor(Color.hellocolor)
                .font(Font.custom("Rubik", size: 72))
                .multilineTextAlignment(.center)
                .position(x: 183, y: 180)
            
            Button(action: {
                print("Button tapped")
            }) {
                Text("Start Playing")
                    .foregroundColor(.StartPlayingColor)
                    .position(x: 193, y: 382)
            }
            .buttonStyle(SimpleButtonStyle()).position(x: 193, y: 486)
            
            
        }
    }
}

struct SimpleButtonStyle: ButtonStyle {
    func makeBody(configuration: Self.Configuration) -> some View {
        configuration.label
            .background(
                Group {
                    if configuration.isPressed {
                        RoundedRectangle(cornerRadius: 98)      .fill(Color.superoffwhite)
                            .overlay(
                                RoundedRectangle(cornerRadius: 98)
                                    .stroke(Color.gray, lineWidth: 4)
                                    .blur(radius: 98)
                                    .offset(x: 2, y: 2)
                                    .mask(Circle().fill(LinearGradient(Color.black, Color.clear)))
                            )
                            .overlay(
                                RoundedRectangle(cornerRadius: 98)                                 .stroke(Color.white,              lineWidth: 8)
                                    .blur(radius: 98)
                                    .offset(x: -2, y: -2)
                                    .mask(Circle().fill(LinearGradient(Color.clear, Color.black)))

                            )
                            .frame(width: 242, height: 91)

                    }
                    else {
                        RoundedRectangle(cornerRadius: 98)                            .fill(Color.superoffwhite)
                            .shadow(color: Color.black.opacity(0.2), radius: 10, x: 10, y: 10)
                            .shadow(color: Color.white.opacity(0.7), radius: 10, x: -5, y: -5)
                            .frame(width: 242, height: 91)
                    }
                }
            )
        }
}

struct ContentView_Previews: PreviewProvider {
    static var previews: some View {
        ContentView()
    }
}


Picture of App on Multiple Devices

iPad Air

iPhone 12 Pro

iPhone SE (2nd Generation)

Any help would be greatly Appreciated!

Vasu Bansal
  • 41
  • 1
  • 6
  • The solution is definitely to not use absolute positioning -- it's kind of fighting the general principals of SwiftUI. What makes you say "due to the fact that I couldn't find any other viable solution"? – jnpdx Apr 02 '21 at 17:57
  • I couldn't find anyway to make my top rectangle the correct size without using absolute positioning, I knew that it wasn't the right way to do it but I also couldn't find any other way of doing what I wanted which is why I asked here hoping that somebody would know the answer. – Vasu Bansal Apr 02 '21 at 18:02

1 Answers1

1

This should get you most of the way there -- you can make adjustments to get it closer to your ideal.

struct ContentView: View {
    var body: some View {
        ZStack {
            Color.offWhite.edgesIgnoringSafeArea(.all)
            
            VStack(spacing: 30) {
                VStack {
                    Text("Hello\nAmit")
                        .foregroundColor(Color.hellocolor)
                        .font(Font.custom("Rubik", size: 72))
                        .multilineTextAlignment(.center)
                }
                .frame(maxWidth: .infinity)
                .frame(height: 300)
                .background(
                    RoundedCorner(radius: 98, corners: [.bottomLeft, .bottomRight])
                        .fill(Color.superoffwhite)
                        .shadow(color: Color.black.opacity(0.2), radius: 10, x: 10, y: 10)
                        .shadow(color: Color.white.opacity(0.7), radius: 10, x: -5, y: -5)
                        .edgesIgnoringSafeArea(.top)

                )
                
                Button(action: {
                    print("Button tapped")
                }) {
                    Text("Start Playing")
                        .foregroundColor(.StartPlayingColor)
                }
                .buttonStyle(SimpleButtonStyle())
                .padding(.horizontal, 40)
                
                Spacer()
            }
            
        }
    }
}

struct RoundedCorner: Shape {

    var radius: CGFloat = .infinity
    var corners: UIRectCorner = .allCorners

    func path(in rect: CGRect) -> Path {
        let path = UIBezierPath(roundedRect: rect, byRoundingCorners: corners, cornerRadii: CGSize(width: radius, height: radius))
        return Path(path.cgPath)
    }
}

struct SimpleButtonStyle: ButtonStyle {
    func makeBody(configuration: Self.Configuration) -> some View {
        configuration.label
            .frame(maxWidth: .infinity)
            .frame(height: 91)
            .background(
                Group {
                    if configuration.isPressed {
                        RoundedRectangle(cornerRadius: 98)
                            .fill(Color.superoffwhite)
                            .overlay(
                                RoundedRectangle(cornerRadius: 98)
                                    .stroke(Color.gray, lineWidth: 4)
                                    .blur(radius: 98)
                                    .offset(x: 2, y: 2)
                                    .mask(Circle().fill(LinearGradient(Color.black, Color.clear)))
                            )
                            .overlay(
                                RoundedRectangle(cornerRadius: 98)                                 .stroke(Color.white, lineWidth: 8)
                                    .blur(radius: 98)
                                    .offset(x: -2, y: -2)
                                    .mask(Circle().fill(LinearGradient(Color.clear, Color.black)))
                            )
                    }
                    else {
                        RoundedRectangle(cornerRadius: 98)
                            .fill(Color.superoffwhite)
                            .shadow(color: Color.black.opacity(0.2), radius: 10, x: 10, y: 10)
                            .shadow(color: Color.white.opacity(0.7), radius: 10, x: -5, y: -5)
                    }
                }
            )
    }
}

Tools I used:

  1. Try to avoid hard-coding anything about the safe area at the top (especially considering it can be different sizes on different devices). Instead, take advantage of .edgesIgnoringSafeArea when you need to cover the safe area.

  2. Use frame when you need to describe a certain dimension exactly (like height). You can also use frame to take up the available width or height like this: .frame(maxWidth: .infinity)

  3. Use VStack to lay out views vertically -- don't rely on absolute positioning.

  4. I used an answer from https://stackoverflow.com/a/58606176/560942 for your top view where only the bottom corners are rounded.

  5. Use padding and spacing to separate views.

enter image description here


Like I said, this should get you most of the way there, although you may have to make more adjustments. Also, keep in mind that when designing for many sizes of devices, sometimes you might get forced into making small compromises in order to make everything work for the vast majority of sizes.

You can also look into GeometryReader for when you need to know information about the size that you're filling and size classes through @Environment in case you want to make different decisions based on different sizes. For example, I've left in a height of 300 for the top view, but you could base that one the available screen size using these options. Also, you could use padding on the Text in that upper view to only make it as tall as necessary -- that would probably be my personal choice.

jnpdx
  • 45,847
  • 6
  • 64
  • 94