0

I have an SSIS job which takes files from an input FTP directory and unzips the contents into a temp directory for further processing. I'm using a For-Each directory loop over the input FTP directory, and within that there is a call to Winzip. The argument to the command-line call is configured with the filename of the input file and the name of the temp directory using the SSIS Expression builder. It looks like this in Expression Builder:

 -e  " +  @[User::InputFolder] + "\\" + @[User::CurrentInputFileName] + "  " + @[User::TempFolder] 

Now, this all works fine and dandy when I run it locally from VS2005 and access the relevant files over the network. But when I deploy to the application server, I get nothing out of the other side; it just hangs there. The variables seem to be being lost along the way.

Any ideas anyone? Has anyone seen similar behaviour from an SSIS package?
Mel Padden
  • 983
  • 1
  • 9
  • 21
  • Wow... thanks Siva for the detailed answer. turns out you were both right, to an extent. Running on the server used a different set of permissions, and the folder on the server had security settings out of whack. – Mel Padden Aug 12 '11 at 09:09

2 Answers2

1

My suggestion would be to enable logging (if you haven't already) on the post-execute events of each SSIS task in order to determine at which point the package is failing.

It could be that the user the SQL Server agent job is running under does not have permissions in FTP directory, for example.

DaveRead
  • 3,371
  • 1
  • 21
  • 24
1

When you run SSIS package in Business Intelligence Development Studio (BIDS), it executes under your credentials and you might have full permissions to the folder where the files are extracted to. When you schedule the package to run in SQL Server Agent, the package will run under SQL Agent Service Account, the account may not have access to the folder.

  • If you have permissions to log into the server hosting the database, then log into the server and double-click on the package. When you double-click on the package, it will bring the dtexec utility. Run the package in the utility, if it runs successfully from within the server then the issue is more likely related to the permissions.

  • Another thing to check is whether there is a possibility that the variable @[User::InputFolder] might contain a space in the path. In that case, that parameter should be enclosed within a double quotes when passed to the Winzip command line arguments.

  • Is there a possibility that the FTP server is not accessible from the server hosting the SQL job? I have encountered such an issue due to firewall block.

  • Enabling Logging option on the package would help to capture the error messages. Here is a link that explains how to enable logging.

  • I assume that the expression provided in the question is not the complete expression because that won't work. It has to begin with a double quote something like this to evaluate correctly. Expression: "-e " + @[User::InputFolder] + "\\" + @[User::CurrentInputFileName] + " " + @[User::TempFolder]

Following steps describe how to set up an SQL job to run SSIS package.If you have access to SQL Server Agent through SQL Server Management Studio, here are the steps to create a job using the Graphical User Interface. The steps show how to create an SQL job to run SSIS using SQL Agent Service Account and also how to create a proxy to run under a different using different credentials. If the problem is due to permissions ,running under different account might help you to fix the problem.

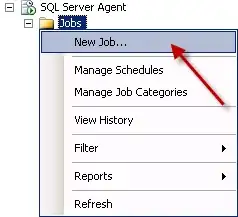
  1. Go to SQL Server Management Studio. Expand SQL Server Agent and right-click on Jobs, then select New Job... as shown in screenshot #1.

  2. Provide a name and Owner by default will be the account that creates the job but you can change it according to your requirements. Assign a Category if you would like to and also provide a description. Refer screenshot #2.

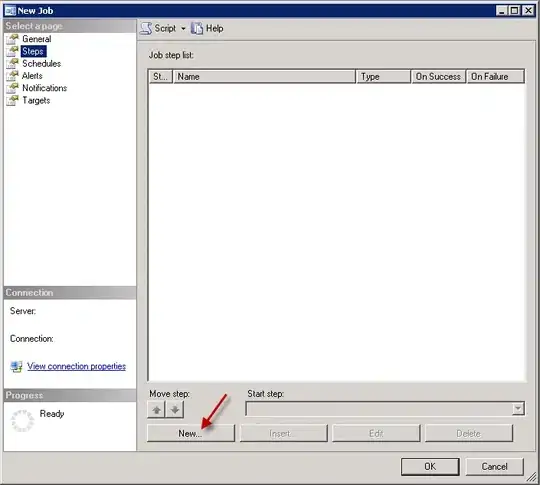
  3. On the Steps section, click New... as shown in screenshot #3.

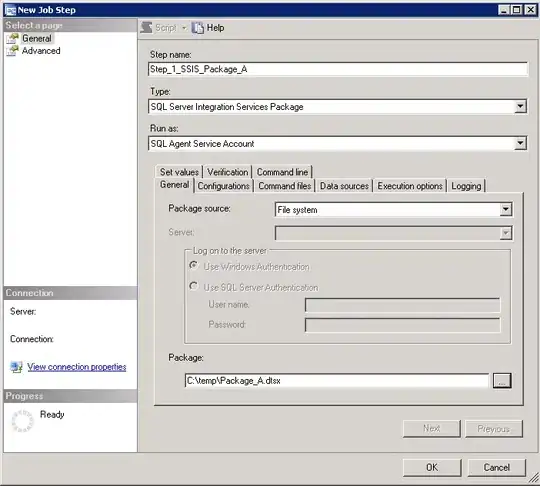
  4. On the New Job Step dialog, provide a Step name. Select SQL Server Inegration Services Package from Type. This step will run under SQL Agent Service Account by default. Select the package source as File system and browse to the package path by clicking on ellipsis. This will populate the Package path. Refer screenshot #4. If you don't want the step to execute under the SQL Agent Service Account, then refer the steps #8 - 9 to know how you can use a different account.

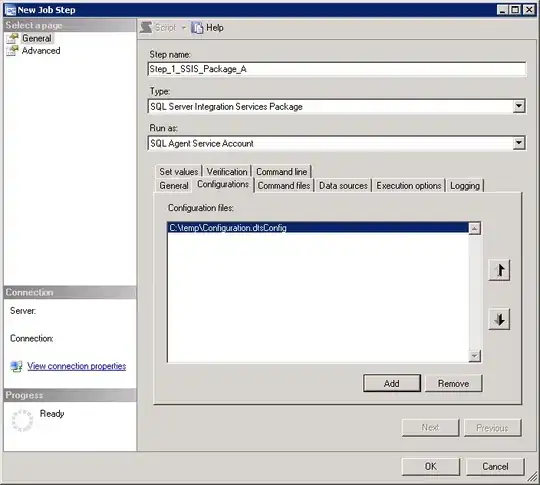
  5. If you have a SSIS configuration file (.dtsConfig) for the package, click on the Configurations tab and add the Configuration file as shown in screenshot #5.

  6. Click OK and there is the package in step 1 as shown in screenshot #6. Similarly, you can create different steps.

  7. Once the job has been created, you can right-click on the job and select Script Job as --> CREATE To --> New Query Editor Window to generate the script as shown in screenshot #7.

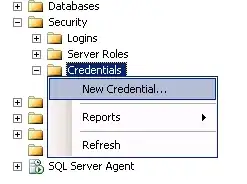
  8. To run the SSIS step under different account, on the Management Studio, navigate to Security --> right-click on Cedentials --> select New Credential... as shown in screenshot #8.

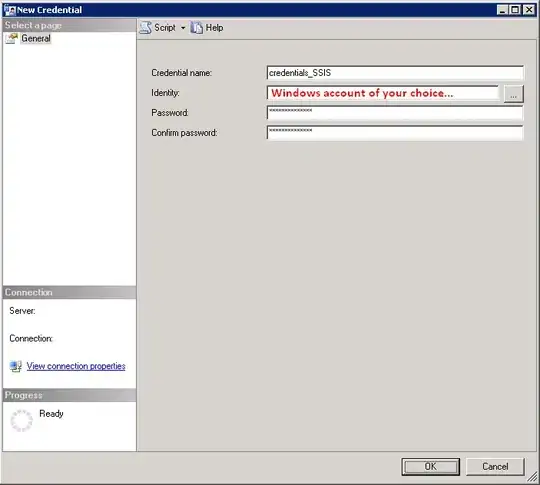
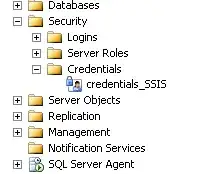
  9. On the New Credential dialog, provide a Credential name, Windows account and Password under which you would like to execute SSIS steps in SQL jobs. Refer screenshot #9. Credential will be created as shown in screenshot #10.

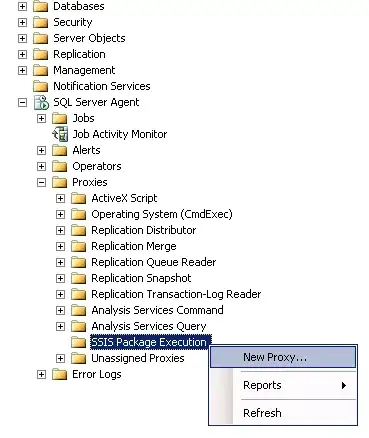
  10. Next, we need to create a proxy. On the Management Studio, navigate to SQL Server Agent --> Proxies --> right-click on SSIS Package Execution --> select New Proxy... as shown in screenshot #11.

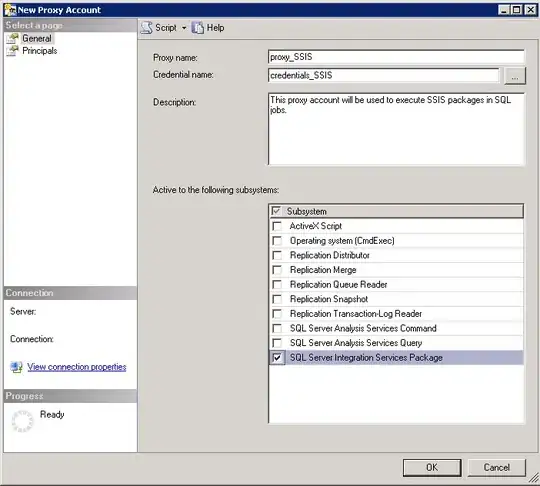
  11. On the New Proxy Account window, provide a Proxy name, select the newly created Credential, provide a description and select SQL Server Integration Services Package as shown in screenshot #12. Proxy account should be created as shown in screenshot #13.

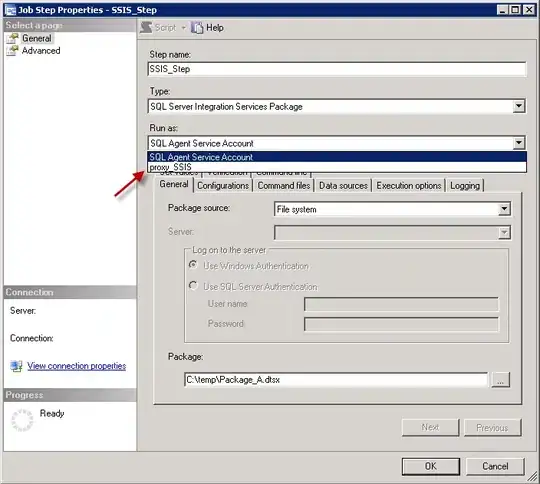
  12. Now, if you go back to the step in SQL job, you should see the newly created Proxy account in the Run as drop down. Refer screenshot #14.

Hope that helps.

Screenshot #1:

1

Screenshot #2:

2

Screenshot #3:

3

Screenshot #4:

4

Screenshot #5:

5

Screenshot #6:

6

Screenshot #7:

7

Screenshot #8:

8

Screenshot #9:

9

Screenshot #10:

10

Screenshot #11:

11

Screenshot #12:

12

Screenshot #13:

13

Screenshot #14:

14

Community
  • 1
  • 1