It is most likely that your original sample is not "clean enough".
The values of R channel that looks black are close to zero but not zero.
When using cv2.bitwise_and or cv2.bitwise_or with a mask, all the values in the mask that are not equal to zero are taken as "True" (when mask != 0, the value is like 255).
A close inspection of the image you have posted unravels that the value of the black pixels is actually 1 and not 0:
I downloaded a "clean" OpenCV logo from here, and it's working as expected:
import cv2
import numpy as np

image = cv2.imread('OpenCV_Logo.png')

B, G, R = cv2.split(image)

# Using bitwise_or and bitwise_and gives the same result.
masked = cv2.bitwise_or(image, image, mask=R)

cv2.imshow('Red', R)
cv2.imshow('masked', masked)
cv2.waitKey()
cv2.destroyAllWindows()
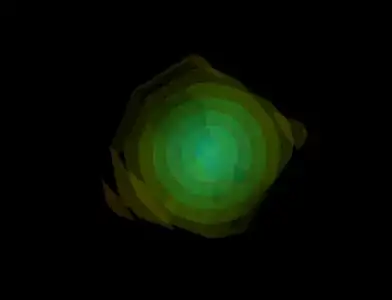
OpenCV_Logo:
R:
masked:

As you can see there are leftovers around the edges, because the edges are not "pure" zeros.
Reproducing your problem is simple:
We may add 1 to all elements of image.
For avoiding overflow I used cv2.add instead of +1: image = cv2.add(image, np.ones_like(image).
Code sample:
import cv2
import numpy as np

image = cv2.imread('OpenCV_Logo.png')

image = cv2.add(image, np.ones_like(image))

B, G, R = cv2.split(image)

masked = cv2.bitwise_or(image, image, mask=R)

cv2.imshow('image', image)
cv2.imshow('Red', R)
cv2.imshow('masked', masked)
cv2.waitKey()
cv2.destroyAllWindows()
Result:
image:

R:
masked:
As you can see image and R looks the same, but masked result is completely different.
Suggested solutions:
- You may find a better input image.
- You may apply cv2.threshold to
R for setting all the low values to zero.
cv2.threshold applies a threshold, the result is a binary image - all values are either zero or 255.
Example for using cv2.threshold:
import cv2
import numpy as np

image = cv2.imread('OpenCV_Logo.png')

image = cv2.add(image, np.ones_like(image))  # Modify the image for the example.

B, G, R = cv2.split(image)

# cv2.THRESH_OTSU finds the threshold automatically, you may use manual threshold instead.
R = cv2.threshold(R, 0, 255, cv2.THRESH_OTSU)[1]

masked = cv2.bitwise_or(image, image, mask=R)

cv2.imshow('image', image)
cv2.imshow('Red', R)
cv2.imshow('masked', masked)
cv2.waitKey()
cv2.destroyAllWindows()
Result:
masked: