Here's my approach. It is mainly morphological-based. It involves convolving the image with a special kernel. This convolution identifies the end-points of the triangle as well as the intersection points where the middle line is present. This will result in a points mask containing the pixel that matches the points you are looking for. After that, we can apply a little bit of morphology to join possible duplicated points. What remains is to get a list of the coordinate of these points for further processing.
These are the steps:
- Get a binary image of the input via Otsu's thresholding
- Get the skeleton of the binary image
- Define the special kernel and convolve the skeleton image
- Apply a morphological dilate to join possible duplicated points
- Get the centroids of the points and store them in a list
Here's the code:
# Imports:
import numpy as np
import cv2

# image path
path = "D://opencvImages//"
fileName = "triangle.png"

# Reading an image in default mode:
inputImage = cv2.imread(path + fileName)

# Prepare a deep copy for results:
inputImageCopy = inputImage.copy()

# Convert BGR to Grayscale
grayImage = cv2.cvtColor(inputImage, cv2.COLOR_BGR2GRAY)

# Threshold via Otsu:
_, binaryImage = cv2.threshold(grayImage, 0, 255, cv2.THRESH_BINARY_INV + cv2.THRESH_OTSU)
The first bit computes the binary image. Very straightforward. I'm using this image as base, which is just a cleaned-up version of what you posted without the annotations. This is the resulting binary image:

Now, to perform the convolution we must first get the image "skeleton". The skeleton is a version of the binary image where lines have been normalized to have a width of 1 pixel. This is useful because we can then convolve the image with a 3 x 3 kernel and look for specific pixel patterns. Let's compute the skeleton using OpenCV's extended image processing module:
# Get image skeleton:
skeleton = cv2.ximgproc.thinning(binaryImage, None, 1)
This is the image obtained:

We can now apply the convolution. The approach is based on Mark Setchell's info on this post. The post mainly shows the method for finding end-points of a shape, but I extended it to also identify line intersections, such as the middle portion of the triangle. The main idea is that the convolution yields a very specific value where patterns of black and white pixels are found in the input image. Refer to the post for the theory behind this idea, but here, we are looking for two values: 110 and 40. The first one occurs when an end-point has been found. The second one when a line intersections is found. Let's setup the convolution:
# Threshold the image so that white pixels get a value of 0 and
# black pixels a value of 10:
_, binaryImage = cv2.threshold(skeleton, 128, 10, cv2.THRESH_BINARY)

# Set the convolution kernel:
h = np.array([[1, 1, 1],
              [1, 10, 1],
              [1, 1, 1]])

# Convolve the image with the kernel:
imgFiltered = cv2.filter2D(binaryImage, -1, h)

# Create list of thresholds:
thresh = [110, 40]
The first part is done. We are going to detect end-points and intersections in two separated steps. Each step will produce a partial result, we can OR both results to get a final mask:
# Prepare the final mask of points:
(height, width) = binaryImage.shape
pointsMask = np.zeros((height, width, 1), np.uint8)

# Perform convolution and create points mask:
for t in range(len(thresh)):
    # Get current threshold:
    currentThresh = thresh[t]
    # Locate the threshold in the filtered image:
    tempMat = np.where(imgFiltered == currentThresh, 255, 0)
    # Convert and shape the image to a uint8 height x width x channels
    # numpy array:
    tempMat = tempMat.astype(np.uint8)
    tempMat = tempMat.reshape(height,width,1)
    # Accumulate mask:
    pointsMask = cv2.bitwise_or(pointsMask, tempMat)
This is the final mask of points:

Note that the white pixels are the locations that matched our target patterns. Those are the points we are looking for. As the shape is not a perfect triangle, some points could be duplicated. We can "merge" neighboring blobs by applying a morphological dilation:
# Set kernel (structuring element) size:
kernelSize = 7
# Set operation iterations:
opIterations = 3
# Get the structuring element:
morphKernel = cv2.getStructuringElement(cv2.MORPH_RECT, (kernelSize, kernelSize))

# Perform Dilate:
morphoImage = cv2.morphologyEx(pointsMask, cv2.MORPH_DILATE, morphKernel, None, None, opIterations, cv2.BORDER_REFLECT101)
This is the result:

Very nice, we have now big clusters of pixels (or blobs). To get their coordinates, one possible approach would be to get the bounding rectangles of these contours and compute their centroids:
# Look for the outer contours (no children):
contours, _ = cv2.findContours(morphoImage, cv2.RETR_EXTERNAL, cv2.CHAIN_APPROX_SIMPLE)

# Store the points here:
pointsList = []

# Loop through the contours:
for i, c in enumerate(contours):

    # Get the contours bounding rectangle:
    boundRect = cv2.boundingRect(c)

    # Get the centroid of the rectangle:
    cx = int(boundRect[0] + 0.5 * boundRect[2])
    cy = int(boundRect[1] + 0.5 * boundRect[3])

    # Store centroid into list:
    pointsList.append( (cx,cy) )

    # Set centroid circle and text:
    color = (0, 0, 255)
    cv2.circle(inputImageCopy, (cx, cy), 3, color, -1)
    font = cv2.FONT_HERSHEY_COMPLEX
    string = str(cx) + ", " + str(cy)
    cv2.putText(inputImageCopy, str(i) + ':' + string, (cx, cy), font, 0.5, (255, 0, 0), 1)

    # Show image:
    cv2.imshow("Circles", inputImageCopy)
    cv2.waitKey(0)
These are the points located in the original input:
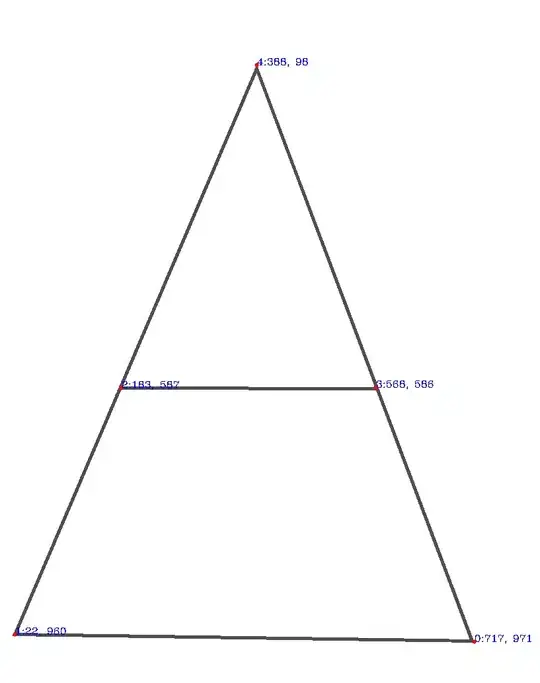
Note also that I've stored their coordinates in the pointsList list:
# Print the list of points:
print(pointsList)
This prints the centroids as the tuple (centroidX, centroidY):
[(717, 971), (22, 960), (183, 587), (568, 586), (388, 98)]


 NOTE: notice that the middle arrow (points 17 and 18) doesn't have a closed area, so isn't a polygon to study. Then, that region is not interested to obtain his points. Also, notice that the order of the points aren't important, but if the entry is the hole image, it should know that there are 4 polygons, so for each polygon points starts with 0, then 1, etc.