15

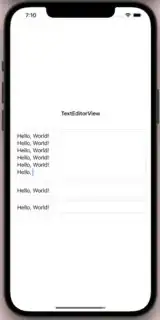
I wanted to have some TextEditor in my ForEach and I made this sample code in down! As you can see the code and result of it in Image, TextEditor act like a greedy view, and takes all available space! which has so many downsides for me at least!

If I go and limit the hight to a custom value then I would loss the possibility of seeing all strings and lines of strings of TextEditor in itself and I must scroll up or down for seeing other lines, which is not my design!

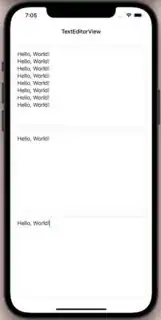
My goal is that the TextEditor takes the space as it needs and if I enter new line of string then it can grow in height or if I remove the lines of strings it can shrinks in height to minimum of 1 line at least!

I wonder how can I do this?

struct ContentView: View {
    
    @StateObject var textEditorReferenceType: TextEditorReferenceType = TextEditorReferenceType()
    
    var body: some View {
        
        Text("TextEditorView").bold().padding()
        
        VStack {
            
            ForEach(textEditorReferenceType.arrayOfString.indices, id: \.self, content: { index in
                
                TextEditorView(string: $textEditorReferenceType.arrayOfString[index])

            })
            
        }
        .padding()
        
    }
}


struct TextEditorView: View {
    
    @Binding var string: String
    
    var body: some View {
        
        TextEditor(text: $string)
            .cornerRadius(10.0)
            .shadow(radius: 1.0)
        
    }
    
}

class TextEditorReferenceType: ObservableObject {
    
    @Published var arrayOfString: [String] = ["Hello, World!", "Hello, World!", "Hello, World!"]
    
}
Result of current code:

enter image description here

Result of my Goal:

enter image description here

Mark A. Donohoe
  • 28,442
  • 25
  • 137
  • 286
ios coder
  • 1
  • 4
  • 31
  • 91

5 Answers5

23

You can use a PreferenceKey and an invisible Text overlay to measure the string dimensions and set the TextEditor's frame:


struct TextEditorView: View {
    
    @Binding var string: String
    @State var textEditorHeight : CGFloat = 20
    
    var body: some View {
        
        ZStack(alignment: .leading) {
            Text(string)
                .font(.system(.body))
                .foregroundColor(.clear)
                .padding(14)
                .background(GeometryReader {
                    Color.clear.preference(key: ViewHeightKey.self,
                                           value: $0.frame(in: .local).size.height)
                })
            
            TextEditor(text: $string)
                .font(.system(.body))
                .frame(height: max(40,textEditorHeight))
                .cornerRadius(10.0)
                            .shadow(radius: 1.0)
        }.onPreferenceChange(ViewHeightKey.self) { textEditorHeight = $0 }
        
    }
    
}


struct ViewHeightKey: PreferenceKey {
    static var defaultValue: CGFloat { 0 }
    static func reduce(value: inout Value, nextValue: () -> Value) {
        value = value + nextValue()
    }
}

Adapted from my other answer here: Mimicking behavior of iMessage with TextEditor for text entry

jnpdx
  • 45,847
  • 6
  • 64
  • 94
  • thanks, it works nice, I want to know if TextEditor gave this options for us as native? – ios coder Aug 31 '21 at 17:30
  • 1
    No -- that's why we have to use solutions like this. – jnpdx Aug 31 '21 at 17:30
  • 2
    Why do you suppose Apple is making SwiftUI so danged screwy? Why can't you just apply "scaledToFit()" and it just works? SwiftUI feels like such a poorly-done API... it is so limited and bad in so many ways that it really hurts my brain. I don't understand why Apple would make something like this... and then make it so crappy... – scaly Jun 02 '22 at 00:13
  • 1
    It would be a nice addition, but remember, it's a relatively young framework. This probably isn't the right forum for value judgements, though. – jnpdx Jun 02 '22 at 00:16
  • 1
    I was looking for a solution for this and I saw jnpdx answered the question and I never copy pasted so fast in my life! – Nat Serrano Sep 09 '22 at 23:52
  • @jnpdx When the above `ZStack` without a max height for the `textEditor` is used within a VStack with another view, do you know why the `onPreferenceChange` stops getting called after a few lines of the text editor expanding? – Kunal Shah Feb 01 '23 at 09:41
  • While this is somewhat clever, it's also incredibly fragile with the spacing and such. It also seems to break when using dynamic font sizing. More importantly, it's not needed! Check out the answer I just posted. It leverages `fixedSize` and `layoutPriority` to properly squish it down as wanted. – Mark A. Donohoe Jun 09 '23 at 07:26
22

iOS 16 - Native SwiftUI

In iOS 16 it's now natively possible with a regular textField by adding axis: .vertical and .lineLimit()

linelimit defines the number of lines until the textfield extends. Add a range to start to define a range of lines within the textfield will start and stop to extend.

enter image description here

WWDC22 Session "What'S new in SwiftUI around 17:10

wildcard
  • 896
  • 6
  • 16
1

Or you could just, y'know, use a Form guys:

struct JustUseAForm: View {
    @State var text1: String = "Enter Text Here"
    @State var text2: String = "Enter Text Here"
    @State var text3: String = "Enter Text Here"

    
    var body: some View {
        Form {
            Group {
                VStack(alignment: .leading) {
                    Spacer(minLength: 8)
                    Text("Comment 1:")
                    TextEditor(text: $text1)
                        .padding(.all, 1.0)
                    
                }
                VStack(alignment: .leading) {
                    Spacer(minLength: 8)
                    Text("Comment 2:")
                    TextEditor(text: $text2)
                        .padding(.all, 1.0)
                }
                VStack(alignment: .leading) {
                    Spacer(minLength: 8)
                    Text("Comment 3:")
                    TextEditor(text: $text3)
                        .padding(.all, 1.0)
                }
            }
            .padding(10)
            .background(Color(.sRGB, red: 0.9, green: 0.9, blue: 0.9, opacity: 0.9))
            .cornerRadius(20)
        }
                    
    }
}
    

Example:

just use a form bro

Of course, this means you have to be OK with the default way Forms render, because just like .sheet and most other things in SwiftUI, Apple gives us no way to customize the appearance. You either like what they give us, or you figure out a bizarre hack, or you wrap a UIKit implementation.

Fun times.

Maybe in the comments someone can explain for us why TextEditor magically works properly within a Form but not anywhere else? Or why scaleToFit() does not work properly with TextEditor? Or why lineLimit does not work properly with TextEditor? So many questions, so few answers, unless you work at Apple, I guess.

Mark A. Donohoe
  • 28,442
  • 25
  • 137
  • 286
scaly
  • 509
  • 8
  • 18
  • I didn’t used Form in my code! – ios coder Jun 02 '22 at 00:37
  • Form doesn't work for me... I still get a greedy TextEditor. Mind sharing whatever is containing your view? – Pete Apr 23 '23 at 14:24
  • There are sooooo many issues with `Form` controls (like not being able to use an `HStack` in them on macOS for one!) I'd strongly advise against using them and just do your layout manually. As for how to solve this, check out the answer I just posted. Keeps the layout dirt-simple. – Mark A. Donohoe Jun 09 '23 at 07:24
1

Adding .fixedSize(horizontal: false, vertical: true) and a minimum height solved the issue for me.

Example :

TextEditor(text: $myBinding)
           .frame(minHeight: 50)
           .fixedSize(horizontal: false, vertical: true)
el3ankaboot
  • 302
  • 2
  • 12
1

Pure and Simple SwiftUI Approach (*...and actually using TextEditor, not TextField!)

Contrary to some of the answers here, as others have pointed out, the OP specifically asked about TextEditor, not TextField. You need TextEditor if you want to support explicitly adding new-lines during text entry, not just wrapping a single line to span many.

The easiest solution for achieving this with TextEditor requires two things:

  1. Using .fixedSize(horizontal: false, vertical: true) on the TextEditor (to dictate the absolute minimum height)
  2. Having another greedy control with a higher layout priority within the same container (to smoosh it to that height!)

Here's an example where I have a Button directly underneath an auto-growing TextEditor. I'm using Color.clear with an infinite frame to make it greedy, then .layoutPriority(1) to make it overpower the greediness of the TextEditor control. The fixedSize on that TextEditor says 'Yo, you can't collapse past my text, brah!!', thus that's as far as it smooshes to. Without fixedSize, it would collapse to a height of zero.

struct TestApp: App {

    static private let initialText = """
        He: Tell me a joke!

        She: Ok... what do you call two crows sitting on a branch?

        He: I dunno, what?

        She: Attempted murder!
        """

    @State private var text: String = Self.initialText

    var body: some Scene {
        WindowGroup {

            VStack(alignment: .leading) {

                TextEditor(text: $text)
                .fixedSize(horizontal: false, vertical: true)

                Button("Test Me") {
                    text = Self.initialText
                }

                Color.clear
                .frame(maxWidth: .infinity, maxHeight: .infinity)
                .layoutPriority(1)
            }
            .padding()
        }
    }
}

Side-note: As mentioned above, layoutPriority only affects layout in the current container so make sure the greedy control it's applied to is either a direct sibling of your TextEditor (i.e. they have the same/immediate parent) or the TextEditor is further down the layout, not above.

This also means if you nest the below VStack inside another VStack with some other controls, the children of that outer VStack--including your inner VStack--will again be distributed equally within it (unless of course you apply layoutPriority to any of those controls too.)

As mentioned above, I use an explicit greedy spacer control there: Color.clear with the frame. However, technically it isn't needed as you can add a frame directly to the button to achieve the same thing. You just need to also specify the appropriate alignment value to say where you want that button to end up in the frame's resulting greedy area. Here that's .topLeading so the button ends up directly underneath the TextEditor on the left side. If you don't add the alignment, the button would end up in the middle of the greedy area as .center is the default alignment.

That said, I personally prefer explicit layouts so the spacer is my choice, but others may prefer the simplicity of not needing a dedicated control just for that.*

// `alignment: topLeading` in the frame puts the button in the top-left of the 'greedy' area that the frame creates
Button("Test Me") {
    text = Self.initialText
}
.frame(maxWidth: .infinity, maxHeight: .infinity, alignment: .topLeading)
.layoutPriority(1)

And here are examples of the results...

enter image description here

Mark A. Donohoe
  • 28,442
  • 25
  • 137
  • 286