ImageMagick -chop does just that
Man page on -chop:
The -chop option removes entire rows and columns, and moves the remaining corner blocks leftward and upward to close the gaps.
Also handy is the counterpart function -splice:
This will add rows and columns of the current -background color into the given image
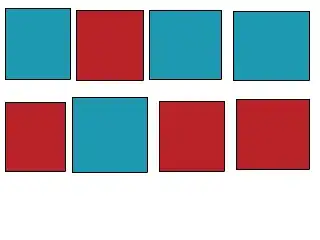
Chop out the undesired red row

→

convert in.png -chop x92+0+50 out-chopped.png
in.png is the original imageout-chopped.png is the desired outcome-chop x92+0+50: From the default reference point top left (could be changed with -gravity) at x +0px and y +50px (after the top blue part we want to keep) chop out the red segment at full width (because no number is specified before the x and hence it assumes full canvas width) and at a height of 92px (had some seam, hence I added 2px to cut clean)
Chop out the undesired red part + insert a thin separator row
→
→
If you want to insert some separator where you chopped out, you can achieve that with -splice.
convert in.png -chop x92+0+50 -background black -splice x2+0+50 out-chopped-spliced-separator.png
-chop already explained above- as the next processing step we change
-background to black which applies to all later command in the queue.
-splice x2+0+50 From the default reference point top-left at X 0px and Y 50px splice in a row of full width (nothin specified in front of the x) and of 2px height. Because we have set the background color black in the previous step that 2px row is filled black.
Batch processing
mogrify -path ../batch-done -chop x92+0+50 -background black -splice x2+0+50 *
mogrify keeps the same filename of each input file for the corresponding output file. Normally it overwrites in place. But we use:-path to write the out files to target directory ../batch-done* to consider all files of your current directory via shell globbing as the input files of your batch.
Sources